Welcome to Frugal with a Flourish!

Enjoy your time here! Don't miss a post by getting email updates any time there is something new. You can also get updates through Google Friend Connect or follow me on Facebook or Twitter to get the latest info and see all the things that inspire me!

[ | Posted in | Add Comment | ]

I hope everyone had a fantastic Memorial Day weekend!  My lil bro and my BFF came into town with us for the weekend and we had a wonderful BBQ with about 14 of our other friends!  (It was our last bash before baby!)  Of course – that meant I had to get out and show off my gorgeous Macel and Company slip and topper on my lil ol folding table.  I have a picture of the set I got below in case you forgot what she looked like!  I had her staged up like a desk before!

We had it set up outside and it was breezy!  In fact it was so windy that we couldn’t keep our citronella candles lit!  But that slip and topper never ever threatened to come loose.   We had BBQ chicken, pulled pork and strawberry pie on the menu (among other things) and all three of those ended up on my beautiful topper.  And guess what – all three of them wiped right off and there are no stains!  Everyone kept asking about where I got them and kept talking about how beautiful the fabric was and how nice it felt.  Of course I was a bad blogger and forgot to take pictures!  Oh well – sometimes the hostess has other things she has to juggle besides a camera!

So because these slips and toppers are so fantastic – Macel and Company have offered to give my readers a coupon code for 30% off any item of their choice!  So even if you don’t win today – you can still get a great deal on these custom table toppers for yourself!  Just enter “frugal2011” to get your 30% off! 

Now - let’s get down to business!  I know you guys are looking forward to finding out who the winner is and it is ….. #44 - Colleen @ Forty Something Bride!  Colleen – you are going to love them!   She said she would get a 6 foot Eva basic and the Black Pineapple Laura topper!  That is a great elegant choice.  Here is a pic of that combo from the Macel and Company website!   Beautiful!

So congrats to Colleen!  If you didn’t win – make sure you take advantage of the great 30% off one item offer by using the code “frugal2011”!!

[ | Posted in | Add Comment | ]

Update: The Nursery is finally finished!  Hop over and check out the full reveal!

Well we finally got one of our big to-do’s done for the nursery!!  The dresser has been refinished!  Here is what she looks like now and the rest of the post is how we got there.

DSC08297

If you remember from my “base” nursery post – the dresser was originally part of our guest bedroom suite.  But there was going to be no room for it in our guest bedroom/office.  So I decided that I wanted to keep it in the nursery and use it as our dresser/changing table.  This served both the purpose of giving it a home in our house and saved quite a bit of money in our nursery budget.  Here is a before picture of the dresser. 

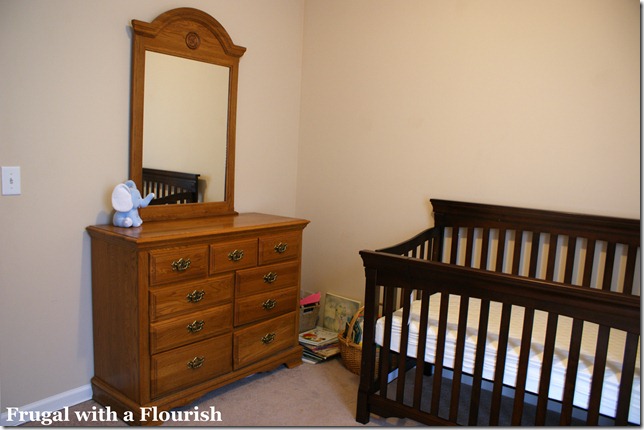
I have loathed this dresser for almost 5 years – surprisingly the same amount of time that this dresser has lived in my house.  I am not a big “oak” fan – so after we picked out the crib – I knew I wanted to strip this puppy down and restain it darker to match the crib.  Add some new hardware and it would be perfect.  But I have always heard that stripping was such a pain. 

People – I am here to tell you that stripping and restaining is not as bad as what you may have thought.  In fact – having refinished a piece by painting it and refinished a piece by stripping and restaining, I prefer stripping and staining.  Now I didn’t know that at the start of this journey, so I had to get a good inspiration piece to help get the courage up to take on the project.  The piece I found for this redo was this dresser from Restoration Hardware

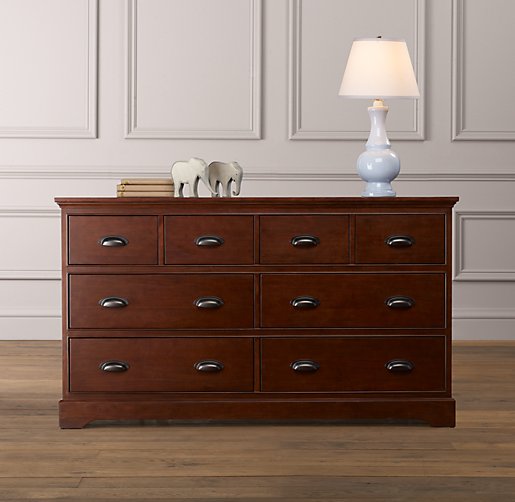
Now the dresser from Restoration Hardware runs $1249.  Loved the color and the hardware was perfect!  I was hoping that we would get this project done for significantly less than that.  And we did – our cost for this redo was $50.  So here is how we did it!

First, the hubby stripped each of the drawers and the dresser frame itself with Citri-strip Spray stripper.  Below is a pic of the product and a drawer that had already been stripped.  This stuff was amazing (and I am not being compensated in anyway to say that – we just loved the product)!  It doesn’t smell chemical at all and was perfect for getting in the crevices of the drawers and trim on the dresser. 

DSC08115

Once you spray it on – you leave it there for awhile while it loosens the old finish.  Then you just start stripping it off with a plastic scraper. You can see below how easy it comes off! 

DSC08118

Once all the stain was off – the hubby sanded everything down and we started staining.  We used Cabot Stain in Maple Leaf which is one of the custom colors that you can get mixed at the store. 

DSC08177

Once the first coat got on – I was really excited about how good it was looking. 

DSC08179

Another coat of stain and then a coat of poly and we ended up with our final product.  Here she is again below!!

DSC08277

Loving the hardware?  Yeah me too!  The cup pulls were the perfect addition and I got them for a steal on Amazon.  $2.19 a piece which is WAY less than what they were charging at the hardware store.

DSC08251

I love love love it!  And it is a perfect match to our crib!

DSC08267

The nursery is coming together very quickly!  I think I should be able to share with you guys within the next couple weeks!  I have a few more projects to finish and then it will be ready for its reveal.  Of course – hopefully that will be before Lil Man makes his appearance! 

So tell me – have you ever stripped or restained anything?  Was it as hard as you thought it would be?  If you haven’t – do you think you might try now?  I wanna know!

Linking this up to

Metamorphosis Monday with Susan @ Between Naps on the Porch
Get Your Craft On with Kim @ Today’s Creative Blog
Tutorials and Tips Tuesday with Beth at Stories of A to Z
Show and Tell with Becca @ Blue Cricket Designs
Transformation Thursday with Gina @ The Shabby Chic Cottage
Weekend Wrap Up Party with Jen @ Tatertots and Jello
Saturday Nite Special with Donna @ Funky Junk Interiors

Before and After Party with Sarah @ Thrifty Decor Chick

Furniture Feature Friday with Miss Mustard Seed @ Miss Mustard Seed

[ | Posted in | Add Comment | ]

I love hydrangeas!  And for some reason I have had them on the brain.  So I decided I wanted to do a quick wreath with some this weekend.  Here is what I came up with – the rest of the post is how I got there! 

DSC08235

Full lush faux hydrangea stems are normally pretty pricy.  Never fear – I just picked up a couple cheap less fluffy stems at the dollar store and cut them apart with some wire trimmers.

DSC08211

Next I took a couple of them and bunched them together to get that big full look that I love.  Isn’t that a better?!?

DSC08214

Then I added in a little bit of the greenery to give it some more texture and covered a cardboard initial with a little moss!  I love the way it came out!

DSC08232

It makes me smile!  Ah – what I wouldn’t give for a big ole bush of these outside my door!

DSC08234

One more and then I will stop I promise!

DSC08239

So what about you – is there a flower you would just love to have at your house?  Or perhaps you are lucky and you already have that flower in your garden? I wanna know!

Linking this to

Metamorphosis Monday with Susan @ Between Naps on the Porch
Tutorials and Tips Tuesday with Beth @ Stories of A to Z 
Tip Me Tuesday with Laurie @ Tip Junkie
Get Your Craft On with Kim @ Today’s Creative Blog
Hooking up with HOH with Allison @ House of Hepworths


[ | Posted in | Add Comment | ]

I have a fantastic giveaway and product to share with you guys today!  The wonderful folks at Macel and Company have offered me a chance to review their products and share a great giveaway with you!  Haven’t heard of Macel and Company?  They make the most beautiful and easy to care for slipcovers and toppers for folding tables that I have ever seen.  They have a ton of colors and patterns so you can find they look that is right for you! 

Macel collage 1

Macel and Company, is female owned company and they focus on providing customized fitted utility table slips and toppers that are perfect for any home event. They also have coordinating dining room tablecloths and napkins.  Since a lot of people have a folding table they pull out for parties or gatherings – these slipcovers can be the perfect addition to your entertaining arsenal.  They even come with their own matching storage bag – so cute! 

macel collage 3

But – here is what I was thinking.  Let’s say you need a desk?  Or a console table for your entry?  Or a buffet for your dining room?  And you have looked at different pieces of furniture and you can’t find anything that can fit your budget.  Well these slips and toppers can help you create a customized piece for whatever your room need is for a fraction of the cost of traditional furniture.  All you need is a folding table and you are ready to roll!
To show you what I mean – I drug out my card table to stage a little desk for you guys!  Here were the two pieces that Macel sent me to try out!  I got the Eva Basic slipcover in Sand and the Laura Topper in Brown.

DSC08128

Now I literally just took these out of the box they sent them to me in and plopped the slipcover on the table.  No ironing needed and it hangs perfectly. Then I just set it up as a little desk.  How perfect is this?  

DSC08142

Cute, stylish and then you still have ALL the space underneath for storage AND you can easily repurpose it if you do have a party or dinner where you need an additional table.

DSC08146

So here is the deal.  They are going to let me give a lucky reader their own slipcover and topperWhat do you have to do to win?  Hop over to the Macel and Company website and leave me a comment telling me which slipcover and topper you would pick out and how you would use it!  You can also get an additional entry by

  1. Like the Macel and Company Facebook Fan Page
  2. Tweet or Share this giveaway on Facebook
  3. Blog about this giveaway
That is 3 additional ways to win!  The contest will stay open until next Friday (5/27) evening at 8pm CST.  Good luck! 


[ | Posted in | Add Comment | ]

Update: The Nursery is finally finished!  Hop over and check out the full reveal!

I am slowly but surely getting all my to-do’s for the nursery done.  And one of those was to get a crib skirt made for our crib.  So here was the before. 

Now – the reason I decided to make a crib skirt was because I couldn’t find any bedding that I liked.  I looked forever trying to find something in my inspiration colors.  And when I couldn’t find anything premade – I started looking at fabric.  Luckily – I found the adorable “Wild and Wooly” fabric at Joann’s and I decided to make some of the bedding myself.  The first thing I started was the crib skirt.  My plan was to just do a simple straight skirt all the way around that way I wouldn’t need a pattern or anything fancy!

For starters – I ironed all the fabric and used just a smidgen of starch to keep it a little crisp.  I find that helps with getting straight even cuts.  Then I cut out plain piece of muslin to the size of our mattress.  Which was really simple because we got the mattress on Amazon – so I just looked up the dimensions there.  Way simpler than measuring it myself!  I added a half an inch on either side to use for my seam.  Next, I measured from the bottom of the mattress to the floor to figure out how long my skirt pieces needed to be (at the highest level – that was 16 inches so I added an additional 1 inch so that when I hemmed either side I had a 1/2 inch seam.  Then I ran into a problem. 

DSC08155

I wanted the stripes to hang vertically – but the fabric was only 43 inches wide.  Which as you can see is just a smidgen too short for my piece of muslin on the long side.  So I decided to stich on some additional fabric on either side and then do pleats to “hide” my seams.  Of course that meant I needed to make it longer than necessary to make the pleats.  I decided to do three pleats – one in the middle and the one on either side.

DSC08147

To do each pleat – I picked a mid-point and and overlapped the fabric by an inch on either side.  Pretty simple – but it works! 

DSC08152

See how it makes a nice pleat?

DSC08153

Once I got all the skirt pieces cut and laid out – I hemmed the three sides that wouldn’t be attached to the base muslin.  Next, I attached them to the muslin.  This is how the final piece looked.

DSC08162

The final product?  Check out the close up below.  I love it!  I will show you the “whole” thing once we get the nursery totally finished!  Right now the whole room looks like a baby shower threw up in there – I have stuff everywhere! 

DSC08172

If you are thinking about making a crib skirt – I would say go for it!  It is pretty simple – the whole thing is just straight seams so it is a really an easy beginner sewing project!  

So what do you think?  Will you try one out on your own?  Are you loving the colors as much as me?  I am sooooo in love with them!

Linking this to

Tutorials and Tips Tuesday with Beth @ Stories of A to Z
All Things Inspired with Robin @ All Things Heart and Home
Make it Yours Day with Carolyn @ My Backyard Eden
Transformation Thursday with Gina @ The Shabby Chic Cottage
Metamorphosis Monday with Susan @ Between Naps on the Porch
Tip Me Tuesday with Laurie @ Tip Junkie

Get Your Craft On with Kim @ Today’s Creative Blog

[ | Posted in | Add Comment | ]

I had the best birthday weekend!  For starters – some girlfriends took me out for dinner Friday night and we had a great time and lots of laughs!  Then on Saturday morning – I got up and headed out to meet up with some local mid-Tennessee bloggers!  Some were old friends and some are now new friends! 

Photo via Angie @ Country Chic Cottage – Pictured Jennifer, Kristen, Me, Gina, and Tobi

I got to hang out with this great group of ladies that included Gina @ The Shabby Chic Cottage, Kristen @ Ahoy Graphics, Angie @ Country Chic Cottage, Tobi @ Dr. Baby Mama Drama, Jennifer @ Designs by Jennifer, and Deneen @ Dreaming in Color.  We ate, talked blog tips and tricks, and all learned from each other.  I learned I need to bring a camera and that I can’t make silly faces around Angie – she will post pictures!

We headed out to get our shop on next!  Of course I scouted out a local Goodwill next to a Hobby Lobby on the way in!  The Goodwill turned out to be a good stop for me!  I got this adorable faux tin stamped mirror for $7.99.  I am thinking a nice coat of white spray paint and a little rub and buff will make this into a beauty! 

DSC08156

And then I picked up a few more frames for my gallery wall.  These will just need a quick shot of silver spray paint and they will be ready to go up on the wall!  The larger frames were just a $1.99 and the lil one was just 99 cents!  Love it!

DSC08160

I had to scoot – but the other ladies stayed around to get the hook up on some fantastic burlap coffee bags!  But I had to run some other errands and then get back to the house so I could gussy up for a date night with the hubby!  We had dinner and then saw Water for Elephants.  I loved the book so I was a little nervous that the movie wouldn’t end up as well – but I was not disappointed!  I would highly recommend that book for your summer reading list if you haven’t picked it up yet. 

So that was that!  What about you guys?  Get into anything fun this weekend?  I wanna know!

Linking this to

Thrifty Treasures with Rhoda @ Southern Hospitality

[ | Posted in | Add Comment | ]

I just loved reading all the ways you guys honored your mom on Mother’s Day!  There are a ton of thoughtful people out there – makes me feel good to become a mom in eight weeks!  But let’s get down to business and announce the winners – we have a lot of prizes to get through!

Let’s start with the prepaid card packs!  There were two up for grabs and the winners were entries #79 Andrew McKinley and #58 FaithPlusNothing. 

Andrew made a card for his mom this year (and said it did look like one made in the 2nd Grade!) and FaithPlusNothing thought about her mom who passed in 2003.  Sometimes it is the thoughtful things that count the most isn’t it!  Congrats you guys!

Now the winner of the Recordable Book was #16 – CraftyMama!  She said she loved the Counting Kisses book below and that she was hoping to honor her mom and mother-in-law with a new grandbaby!!  I know how that feels!  Congrats on winning the book! 

Give a big congrats to all our winners! 

[ | Posted in | Add Comment | ]

The ceiling is such an forgotten space in a room.   But giving it a little love can really transform your space.  Here are some ideas to get you going!

Think about starting off with just adding a simple coat of paint in a beautiful color. I love this blue!

Living Room contemporary living room

Using a tin ceiling panel is a great way to add some visual interest.

Zuniga Interiors mediterranean powder room

How about using molding to create a pattern on the ceiling? You could go complex ...

Details contemporary bedroom

Or a little more simple!

Showhouse Butlers Pantry traditional kitchen

Use wallpaper to create a little texture and pattern! This works well especially in small spaces.

Simply Grove eclectic bathroom

Painting stripes on the the ceiling is another great way to draw the eye up and perhaps add a splash of color!

Fun twin girls bedroom modern kids

And if you want something really different - how about doing a wood finish? I swear this looks like wood flooring doesn't it!

Pb Elemental modern kitchen

Or you can take several of the above and come up with a unique combo!  Love this!

Hollywood Residence eclectic living room

So there you go!  What about you?  Are your ceilings basic or do you have some pizazz?  See any ideas that have inspired you?  I wanna know!


Related Posts with Thumbnails