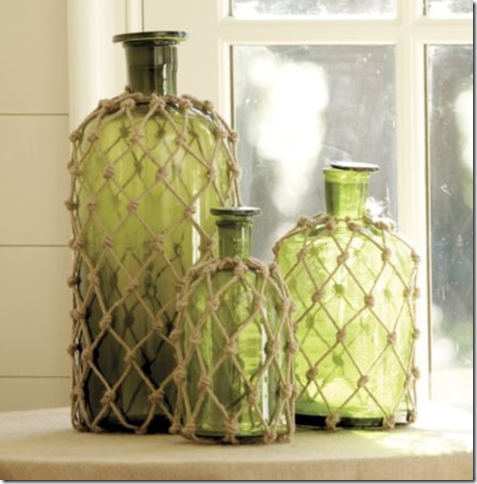
So I don’t know about you guys, but I have been lusting over these jute wrapped Ballard Demijohns for forever. I just love the textural look of all the little rope knots! But with the mid-sized one at $59 and the large one at $129 – I have been forced to love them from afar.
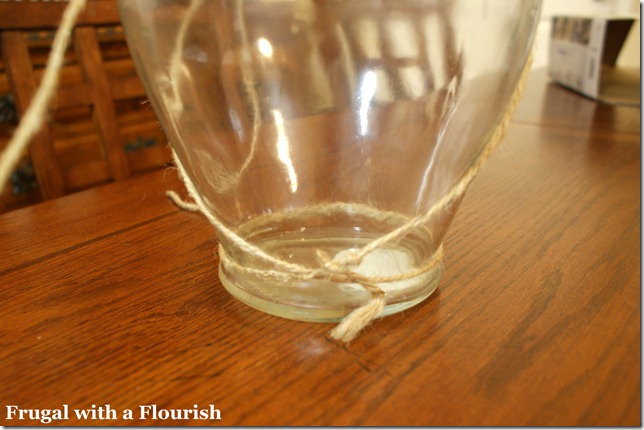
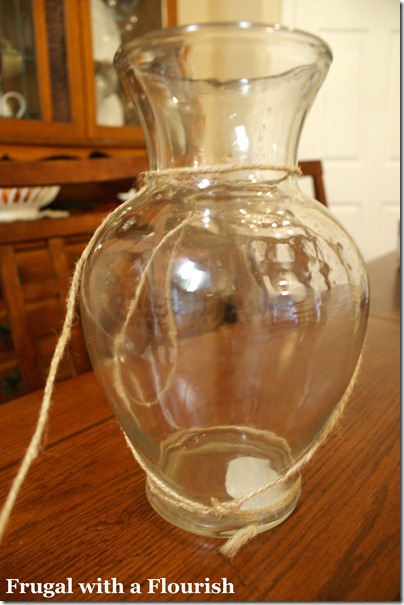
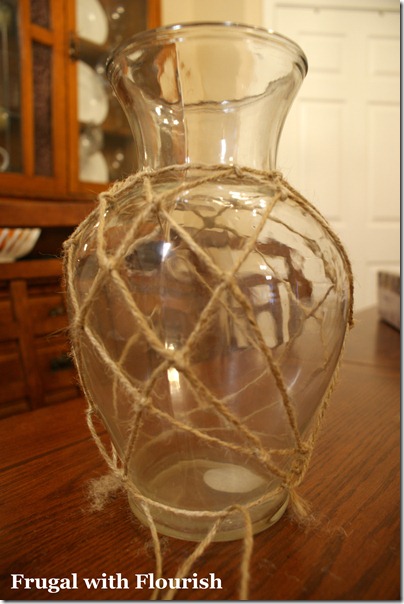
But when I was cleaning out some stuff – I came across a roll of jute twine and a heavy weight vase. And my curiosity got the best of me so I decided to try it out on my own. I started by wrapping it once around the bottom of vase and tying it off.
Then I took it up to the top of the vase and wrapped it once there too. Now – I had a bottom and top area to anchor off off as I did my crosses back and forth.
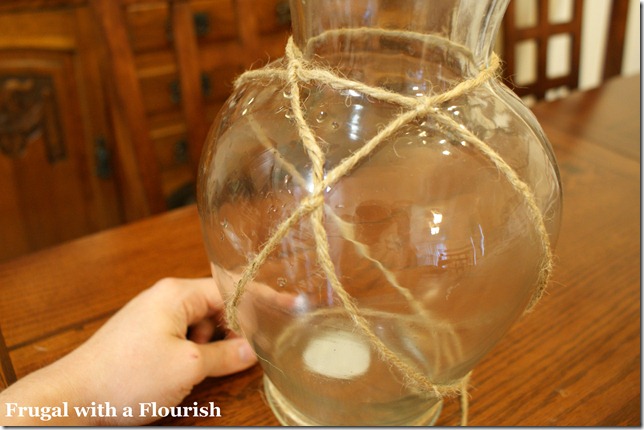
I went up and down. Around and around. And at each cross of the twine – I knotted it. And then tied it back to the top and bottom each time I got there.
At first, it went pretty quickly. But as I got more and more layers on – it took longer and longer to tie off. I did make sure as I went that I straightened out my lines and made sure they were tight! I think it took me about 30-40 minutes to complete the whole thing.
So here is the finished project! Not quite a demijohn – but I really like how it turned out! And I think the rope work on it looks pretty close to my inspiration piece!
I have some of my best girlfriends coming into town for a little girls weekend this weekend! I think this vase with some fresh spring flowers will be just the thing to brighten up my dining room table!
So what do you think? Did I capture the style?
Linking this to
Metamorphosis Monday with Susan @ Between Naps on the Porch
Made with Love with Elizabeth @ Sew Chatty
Get Your Craft On with Kim @ Today’s Creative Blog
Tip me Tuesday with Laurie @ Tip Junkie
Tutorials and Tips Tuesday with Beth @ Stories from A to Z
Make it Yours Day with Carolyn @ My Backyard Eden
Hooking up with HOH with Allison @ House of Hepworths
Transformation Thursday with Gina @ The Shabby Chic Cottage
Best DIY Projects of March with Traci @ Beneath My Heart








37 frugal friends said ...
I love this! Great job for giving it a try...this will be so much fun with some spring flowers!
Wow! That came out great! I love their twine fruits. I have some plastic fruits that I want to try my hand at with the twine. So far, I've not done too well with it but I'm willing to try it again!
Jeanine
that's incredible! great job Jess! I'm so going to have to copy cat you. Now, where did I put that vase and twine...
You are so clever. I have been wanting one of them also. You did a great job with your knots. It looks wonderful. Hugs, Marty
WOW....I mean WOW. That is a great knock off. Thanks for sharing.
I think it looks great! Very Impressive!
I think you knocked it right out of the park! I like your version even better without the big bulky knots that Ballards has.
It looks great! I've been thinking about trying to do it too, but wasn't sure how to get the knots right. I'll definitely be looking back at this post when I get around to doing my knock-off. Great job!
It looks fabulous and a whole let less expensive! Great knock-off.
~Jenna, SAS Interiors
www.sasinteriors.net
looks really good...you could certainly use this technique on other jars and jugs...thanks for sharing!
blessings,
alison
stuff and nonsense
Why didn't I think of that? Whenever I see those glass fishing floats, I crave them for decorating my garden, but don't want to pay the prices. Now I see how I can create the illusion on a shoestring. I'm off to find the appropriate bottles. I figure I can hide the bottle necks somehow. Ya think?
Thanks for another terrific idea.
Great Idea! You did a great job. I saw a few 'demijohn' type bottles at Goodwill the other day. Didn't pick them up. Now I may have to go back and see if they are still there.
Great Job! I love how yours turned out.
www.itsybitsypaperblog.com
I love this Jess, this is absolutely awesome and I have a couple of vases this would work wonderfully on, thanks for a great project!!!
LOVE IT! It look so much like the inspiration!
I love the vase! Very beachy!
Stumbled you! :) I am going to have to try this! :)
You sure captured it, I love it! I have to try it, it will look great with flowers in it. Be sure to take a picture of it so we can see.
Rondell
It looks great! I'm going to have to give this a try.
You REALLY inspired me!! My version:
http://www.thecountrychiccottage.net/2011/03/ballard-knock-off-vases.html
Gave you some linky love too! :)
Just found your blog through Thrifty Decor Chic. The job you did on that vase is fantastic!
I actually like yours better than the Ballard ones! I have a very similar vase and the jute so this is getting bookmarked and put on my to-do list! Thanks for sharing!
Looks great, Jess!
This is just so fabulous! Thanks for showing me how to do this :)
This is so cool! I always see things I can't afford and think "I could do that!" The difference between you and me is that I never actually get around to doing it. You're inspiring me to get better about it. It turned out awesome!
You definitely captured the style! This is a great spiff up for those generic florist vases that I have laying around. Yeah, my husband likes to send my flowers and I have a bunch of those vases. Life is tough sometimes :)
It looks great. Thanks for sharing the idea.
Ruth
Yes! I was just admiring those just the other day at Ballards!! (and wondered how I could replicate!)
Doesn't look though as easy to do as you made it though....can I handle?
juliesfreshperspectives.blogspot.com
Love it!! I might make one of these for our beach themed bathroom! :)
That is fantastic. You did an amazing job!
Love this! In fact, I like yours better than your inspiration piece. Great job!
Love it! I'm bookmarking you so I can come back to try this myself. I can never just sit in front of the TV without doing something--I'll be able to finish 1 or 2 while watching American Idol :)
Very nautical (in my book)... and so neat!! Great job!!!!
Jess, I love how this turned out! Such a neat idea, and I like yours better than the store version. So glad I came across your blog. I'm a new follower.
LOve this! I've also been drooling over the BD demijohns, and have been thinking of how to copy the net look. Thanks for the tutorial! Will be trying to make my own!
Great job. At first when I saw it I thought it was macrame (flash-back to the 70's)! I'm going to have to try this!
Jess,
This is such a great tutorial. I've been admiring, OK coveting, these from afar, too. I have the perfect large green bottle to do your technique on. You've made me one happy girl as I'll do this tonight.
XO,
Kimberly
Post a Comment
Your comments mean the world to me - so please leave one! It makes my day! I read and try to respond to each one!
Didn't get a response? Check out my tips here to link your email and blog back to your profile.