Update: The Nursery is finally finished! Hop over and check out the full reveal!
Well we finally got one of our big to-do’s done for the nursery!! The dresser has been refinished! Here is what she looks like now and the rest of the post is how we got there.

If you remember from my “base” nursery post – the dresser was originally part of our guest bedroom suite. But there was going to be no room for it in our guest bedroom/office. So I decided that I wanted to keep it in the nursery and use it as our dresser/changing table. This served both the purpose of giving it a home in our house and saved quite a bit of money in our nursery budget. Here is a before picture of the dresser.

I have loathed this dresser for almost 5 years – surprisingly the same amount of time that this dresser has lived in my house. I am not a big “oak” fan – so after we picked out the crib – I knew I wanted to strip this puppy down and restain it darker to match the crib. Add some new hardware and it would be perfect. But I have always heard that stripping was such a pain.
People – I am here to tell you that stripping and restaining is not as bad as what you may have thought. In fact – having refinished a piece by painting it and refinished a piece by stripping and restaining, I prefer stripping and staining. Now I didn’t know that at the start of this journey, so I had to get a good inspiration piece to help get the courage up to take on the project. The piece I found for this redo was this dresser from Restoration Hardware.
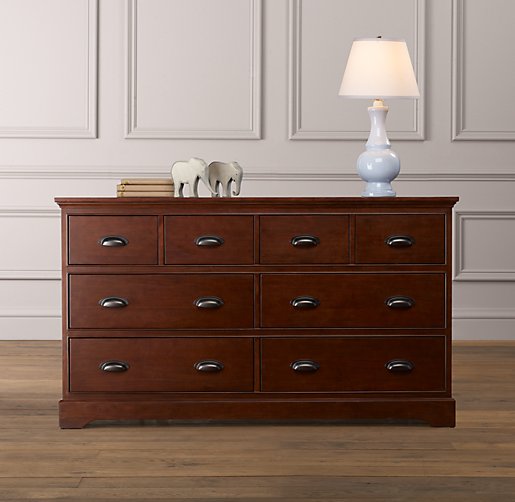
Now the dresser from Restoration Hardware runs $1249. Loved the color and the hardware was perfect! I was hoping that we would get this project done for significantly less than that. And we did – our cost for this redo was $50. So here is how we did it!
First, the hubby stripped each of the drawers and the dresser frame itself with Citri-strip Spray stripper. Below is a pic of the product and a drawer that had already been stripped. This stuff was amazing (and I am not being compensated in anyway to say that – we just loved the product)! It doesn’t smell chemical at all and was perfect for getting in the crevices of the drawers and trim on the dresser.

Once you spray it on – you leave it there for awhile while it loosens the old finish. Then you just start stripping it off with a plastic scraper. You can see below how easy it comes off!

Once all the stain was off – the hubby sanded everything down and we started staining. We used Cabot Stain in Maple Leaf which is one of the custom colors that you can get mixed at the store.

Once the first coat got on – I was really excited about how good it was looking.

Another coat of stain and then a coat of poly and we ended up with our final product. Here she is again below!!

Loving the hardware? Yeah me too! The cup pulls were the perfect addition and I got them for a steal on Amazon. $2.19 a piece which is WAY less than what they were charging at the hardware store.

I love love love it! And it is a perfect match to our crib!

The nursery is coming together very quickly! I think I should be able to share with you guys within the next couple weeks! I have a few more projects to finish and then it will be ready for its reveal. Of course – hopefully that will be before Lil Man makes his appearance!
So tell me – have you ever stripped or restained anything? Was it as hard as you thought it would be? If you haven’t – do you think you might try now? I wanna know!

Linking this up to
Metamorphosis Monday with Susan @ Between Naps on the Porch
Get Your Craft On with Kim @ Today’s Creative Blog
Tutorials and Tips Tuesday with Beth at Stories of A to Z
Show and Tell with Becca @ Blue Cricket Designs
Transformation Thursday with Gina @ The Shabby Chic Cottage
Weekend Wrap Up Party with Jen @ Tatertots and Jello
Saturday Nite Special with Donna @ Funky Junk Interiors
Before and After Party with Sarah @ Thrifty Decor Chick
Furniture Feature Friday with Miss Mustard Seed @ Miss Mustard Seed


