Welcome to Frugal with a Flourish!

Enjoy your time here! Don't miss a post by getting email updates any time there is something new. You can also get updates through Google Friend Connect or follow me on Facebook or Twitter to get the latest info and see all the things that inspire me!

[ | Posted in | Add Comment | ]

I am so behind on my posting!!  Yikes!  (Sorry guys!)  Here's hoping this post redeems me!


Say hello to my little friend!  If you stopped by my place in real life - this is what would greet you at the front door!  I LOVE it! (Please excuse the shadow that the beam by my front door casts on my pics!)

So for starters - let's go back to the beginning shall we.  It all began when I was browsing the 50% off Easter Stuff at Hobby Lobby.  I found this pre-painted wood plaque and the flower cut out in that section.  Total cost = $1.50 for the sign and $0.50 for the flower.  (Love it!)  So I painted the flower up with a little hot pink paint.  To paint the stem, I used the "soft apple" green mixed with some black.  (This is the same "soft apple" I used on the Apple project.)

Once I finished the flower - I painted these uber cute letters I found at Hobby Lobby for $0.99 a piece (times six = $6 bucks)!

Now, I had the letters painted and the flower painted, but there was still this issue.  The flower had a hole in the top that could be used as a hanger if it was an ornament - it originally came on a thin pink ribbon.  I thought about cutting it out, but then I came up with a better idea!  (Keep going to see what it was!)

So here is the finished project.  After painting, I glue gunned the letters and flower in place.  I love how whimsical and fun it is!

Oh and that hole?  I stuck a chopped off piece of an old choker style necklace into the hole with a cute little bee charm on the end ($2.99).  I just glued the wire in - no muss no fuss!  Isn't the little bee too cute!

If you were keeping track - this adorable sign cost me $11.  Again - can I just say that I LOVE it!  It makes me smile!!!  So my question is - do you have anything on your door?  Or do you think hanging things on the door is overdone for holidays other than Christmas?  Inquiring minds want to know!


Linking this up to the following parties

[ | Posted in | Add Comment | ]

If you have been following the blog for awhile, you may know that the hubby and I aren't afraid of a little road tripping.  So, we drove (10 hours) to Oklahoma this weekend for a friends wedding.  I was her "day of" coordinator - what can I say, being bossy comes naturally to me!  We drove to Memphis and stayed the night before driving the rest of the way to Oklahoma.  On the way, our GPS (that the hubby swears is possessed) decided to take us in on the "scenic route".  We drove all through parts of Arkansas and Oklahoma this weekend that I know I would have never seen otherwise.

As the hubby drove, I was glued to the window like a kid at Christmas looking at all the early spring blooms against the bright green of the new leaves that are just starting to pop out.  There were Forsythia, Redbuds, Dogwoods and then there were these. (Representative photo below since I didn't have my camera - it was in the trunk!)
(photo via Turnstone Cabins)

I literally gasped out loud when I saw this bright orange flowering bush!  Isn't it beautiful???  I love that bright orange against the green!!  I had never seen one but I knew I was in love.  Turns out this is a Flowering Quince or Japonica plant.  How freaking gorgeous are these blooms?

I am totally in love!  I did a little searching online to figure out what it was called and found this very informative article on the Flowering Quince from the University of Arkansas.  Although it evidently doesn't flower for very long - I think these blooms are amazing and would look great against a wooded area.  

I also saw another pink blooming bush/tree with no leaves yet.  The blooms were Marquis shaped hot pink blooms with a little white in the middle coming out from the stem.  I have been googling for hours with no luck.  It might have been a flowering Plum tree, but for some reason those flowers don't look right.  It wasn't a Pink Dogwood (the blooms were way too dark) and the flowers were too big to be Cherry Blossoms. Any ideas?  I would love it if you could help me figure it out! 


P.S. I figured it out! The Tulip Tree (or Japanese Magnolia) shown below - is another of my new favorite Spring friends! 
 (Pic from Granny Smith)

[ | Posted in | Add Comment | ]

So for starters – here is what I made. For $5! I love them. The rest of this post is about how we got there.

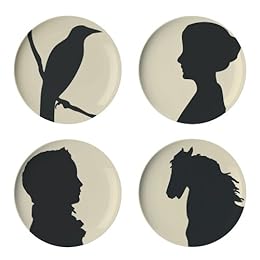
I’ll admit I was a little stumped when Lindsay @ Living with Lindsay first announced her project. I wanted to think of something unique to do and I just wasn’t having any inspiration. That is until I did my Mood Board Monday Dining Area and featured these Gothic Silhouette Plates from Target.

Everyone raved about them in the comments and I was in love. I seriously thought about buying them until I figured out that they were Melamine (aka glorified plastic) plates and were still $29.99 for a 4-piece appetizer size set. That was when I decided to knock em off for the challenge!
So I went surfing online for Silhouette Clip Art Freebies – check out the great ones they have at Fun with Pictures and Milliande Printables (both sources I used). After playing around online – I decided that I really wanted to do birds on mine. (Have you noticed that silhouette bird stuff is really starting to make the rounds? See examples A and B. I think we have found a trend here!)
I also (during the search for the perfect birdies) went to the dollar store and picked up these five plain off white plates. The coloring looks just a tad vintage – which is exactly the look I was going for.
At home – I printed out my silhouettes on to white card stock (which I had), cut them out, and traced them on to black card stock (which I also had) and cut those out. I am quite sure there is an easier way to do this, but I have to say that this really helped me get just the right cuts on the details and angles.


Once they were all cut out, I whipped out my jar of Mod Podge and set to work. I applied the Mod Podge to the back, centered the bird where I wanted it, and then applied a coat to the whole plate to create an even glossy look.

I LOVE the finished project!!!


They are so perfect for this nice little patch of wall at the end of my kitchen that leads into the laundry room. $5 for a some big impact wall décor!

So tell me what you think! Are you in love too? Do you think bird silhouettes are the next big thing?  Head back over the Lindsay's and check out the rest of the entries in the $5 challenge!


And because this was my absolute most favorite project I did all month I am also linking it up to Traci @ Beneath My Heart's Best DIY Projects of March Party

P.S. I am one of the finalists for the Challenge!  Please head over to Lindsay's and cast your vote if you think this project rocks! 

P.P.S  They are finally up!  Check out the final project

Also linking this up to the Mod Podge Challenge at the CSI Project!  

Visit thecsiproject.com

[ | Posted in | Add Comment | ]

I am guest posting over at JJ's (who is The Blah Blah Blahger and a super fabulous chick!) for her Tool Talk Tuesday series today!  The topic - my new BFF - the Dremel tool!  Hop over to her place to read all about the Dremel and the types of projects you can do with it!  Oh, and if you liked my Custom Cork Board Project this week - see how the frame went from its dingy before to beautiful after.


Thanks JJ for having me over! 


[ | Posted in | Add Comment | ]

How do you know you are a home blogger?  You spend more time on a weekend after you just moved in on projects you couldn't get out of your head rather than unpacking boxes!

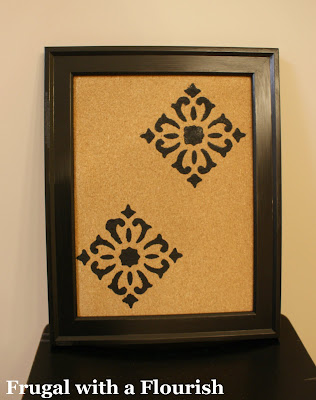
I was walking through Hobby Lobby the other day and spied a really cute cork board.  Actually I saw a couple - they were all screen printed with these really adorable patterns.  And it got me thinking that I could probably pull something off for a lot less since I picked up this cute frame on sale there a couple weeks ago for $5.  Here it is all touched up and gorgeous!

So I grabbed a piece of foam board on sale for a $1.99 and then used some cork from a roll that I had from another project.

I then cut to size and glued together with a hot glue gun. Finally - I took a stencil and sponge brush and dabbed some paint on. (Note - you may want to clean your stencil in between applications so you don't end up with smudges!)

Voila - finished project!

$5.99 for the frame and $1.99 for the foam board.  Now if I could only find the box with the picture hanging stuff in it!  Oh well - I will hang it another day!  Have you ever customized a cork board?


Linking this to the following parties! 

[ | Posted in | Add Comment | ]

I love shoes!  And when my dear friend Beth over at Stories from A to Z decided to have a Show Me Your Shoes party I knew I was in!  Anyone who knows me - knows that I am pretty much a shoe collector.  I have actually toned it down a little since I got married, but there is still something about walking into a DSW and smelling that new shoe smell!  Ahhhh!


Now to show you my whole collection would take some time, so instead I decided to show off my 5 favorite pairs.  Now let me say that these aren't the five pairs I wear most often, but they are my five prize wins that really speak to me the most.  After taking the pictures and getting them ready to post I started to notice that my favorite shoes say a lot about my personal style too.  

So my first fav pair is one that I bought a couple years ago and it is almost time to break these out again.  I wear these in the spring with a pair of dark wash trouser cut jeans and a white button up on Casual Fridays at work.  I love the bright white trim, graphic pattern and shiny sturdy hardware.  This is true for me at home too.  I like a good contrast between my trim and wall color.  I tend to go for graphic prints over florals.  And any "hardware" (knobs, fixtures, or faucets) needs to be sturdy and shiny! 

This pair is also another variation on a lot of the things I love from the shoe above.  I wear these to work with black or gray slacks.  I adore the shiny patent leather and the menswear vibe of the tweed fabric.  The chunky heel is great too - it is substantial but has a great line and curve to it!  And they do have some great hardware going on!  I tend to gravitate towards furniture that has the same principals - dark, substantial pieces with a little curve! 

This picture turned out a little fuzzy, but I love these faux snakeskin flats I got at Target.  Note that this is what I consider a flat.  (As a shorty I need to have some height going on at all times.)  Again - these feature a sturdy tapered wedge which is both functional and fashionable.  And while they are a little more casual - they still have a dressy vibe!  I like that in my furniture and tend to mix pieces that aren't too casual but aren't too formal!

Now these is where I let my more adventurous side show through.  Love the 4 inch heel, the multiple buckles and the fact that they just look like I could kick booty in them!  This is the kind of occasional spark that I like to find in accessories.  Something that is a little surprising is sometimes the element that makes a room! 

This is my current fav dressy pair, and are the ones I wore to the cocktail party at Blissdom!  I love the shiny metallic accents and the fact that the faux snakeskin print (again) adds some texture.  I definitely tend to gravitate towards shiny accessories around the house (remember my blinged out Christmas tree) and this silvery gunmetal color is one of my new current favorite accents. 

So there you have it!  My five favorite pairs of shoes.  What do you think?  Do you think that your style in clothing and shoes is reflected in your style that you use in your home?  I am curious to see if that is just me.  Oh and head on over to Beth's to check out all the other great shoes!!


P.S. If you have missed me the last two days online - I have a reason.  Our internet stopped working!  Turns out the technician that did our move didn't transfer our address on our modem and it started locking us out.  After two nights on the phone with Tech Support and getting a new modem we finally got it fixed.  I will be catching up on email and comments later today!   

[ | Posted in | Add Comment | ]

Well I thought I would give you guys another update from the home front here and update you on the move!

The Positives 
-   We have gotten moved into the new place!  Hooray!
-   I now have a house full of "new to us furniture" that was free!  Hooray!  See exhibit A below for some of our new additions.  The coffee table and cats were already ours.


-   It only got slightly dinged up on the way over!  Double Hooray!
-   I LOVE our new garage! 

The Negatives
-   We found some pet mess stains that are going to have to be professionally cleaned.  Landlord is paying - but we can't get it scheduled until Thursday.  Until then we have "The Great Wall of Boxes" that is keeping our cats from "that corner" of the Dining Area.  (P.S.  The table, chairs, and large painting are another new to us freebie score!)

-   The microwave is broken - and will be replaced on Wednesday.  Until then I must cook everything on the stove.
-   The sprayer on the sink leaks and will also be replaced on Wednesday.  Until then, it has to hang into the sink! 
-   I absolutely must refinish my coffee table.  What has been a minor annoyance is now a blazing "Ugh!" in the middle of my "new to me" living room. 

So those are the updates from here!  Since I am still neck high in boxes I will need you guys to bear with me while I dig out and get my creative juices going again.  (I am still trying to gauge how long it will take me to pull the coffee table into the garage and go at it!  I think I am probably going to give it until this weekend - if I don't grab the sander before that!)

However since I had some fun moving drama of my own - I thought I would let you share yours!  What have you "found" upon moving into a new place?  Funny, gross, disappointing - I am ready to hear about someone else's crazy moves! 


[ | Posted in | Add Comment | ]

Thought I would give you guys and update from the front here.  We are almost packed up and I am actually scoring some free furniture tonight!  (Super excited about that!)


I will probably not be on too much between now and next Sunday/Monday while we get moved over the weekend.  I will be keeping up with emails and comments though! 

While I am gone, I am still thinking about some upcoming events here in blogland!  First, Beth over at From A to Z is hosting a "Virtual Slumber Party" with a Show Off Your Shoes party!  As a card carrying DSW member - I am all over this.  Plan to get your toes all pretty and show off your favorites over at Beth's on 3-18.


Next, Lindsay over at Living with Lindsay is having her second annual $5 Challenge where you create an Spring Decor Item for your home and only spend $5 at a Dollar Store!  I can't wait to see all the creative ideas everyone comes up with and hope you join in too!  That is going to be taking place on 3-25 and did I mention there will be prizes for the top entries.  Stop over at Lindsay's and get the details!


I will see you guys when I dig out of all of these boxes!  Hopefully, I won't be too sore at the end of this weekend!

[ | Posted in | Add Comment | ]

It's Mood Board Monday time again!  I love this party - I always start out stumped and end up creating something that I love!

For this round, Sarah at Pewter + Sage is hosting and she picked out these two inspiration pieces. 

First, we have the Andalusia Rug from West Elm. 
And next we have the St. John's Indoor/Outdoor Stripe Rug from Dash and Albert. 

Against my normal tendency to gravitate towards blue, I decided to pick the yellow rug.  I wanted to do it in a fun dining area and here is what I came up with this time! This is my slightly whimsical take on yellow, black, and white.


Ok - so lets break this down shall we! While the rug is ever so slightly modern, I felt like it could also show off playfully in a traditional room.  The furniture is all done in traditional lines in an deep espresso color.  I decided I would want to change out the beige microfiber on the chairs and found the Hopsack fabric in the same yellow shade would really make the chairs pop.  I also carried the color up by using it in the cornice as well.  I think I would do a black ribbon border on the drapes to give them a little more definition. 

The remaining accessories are fun and whimsical.  The vases are very modern while the prints maintain a traditional vibe.  I wanted to keep the table grounded in traditional white place settings but throw in a little fun and contrast with the black and grey patterned dinnerware.  Finally - I love the gothic touch with the sillhouete appetizer plates which I would hang on the wall.     

And now for the details. Starting from the top right we have
- A Yellow Fabric Covered Window Cornice from Target for $79.99-$139.99
- An Ivory Window Panel from Target for $24.99
- A 4 Door Lowboy from Home Decorators Outlet for $184.99
- A Set of Vases from Target that range from $19.99-$49.99
- Two Brown and White Daisy Prints from Target for $49.99
- A 20 Piece White Porcelain Dinnerware Set from Target for $39.99
- A Black and White Floral Patterned Set from Target - 4 pieces for $19.99
- A 48 inch Solid Wood Dining Table from Overstock for $277.99
- A Set of 2 Dining Chairs from Overstock for $104.99
- Yellow Hopsack Fabric from Fabric.com for $6.98 a yard
- A Four Piece Gothic Silhouette Plate set for $29.99

So what do you think?  Does it work?  How do you get playful with your decorating? 

Head on over to Sarah's to check out the rest of the Mood Board Entries.
 

[ | Posted in | Add Comment | ]

I am not quite sure if you have figured out how the randomness of my mind works yet. But this post should clue you in on that. What I made is this - a custom wine bottle label - the rest of the blog is how we got there!


It all started as I was scrolling through my reader the other day and saw this post from Jenn @ The Hostess with the Mostess about Oscar Party decorations using Photo Wrapped Cylinders. Hold the phone - is this not a GORG centerpiece!

And as soon as I saw this I thought "Meighan!" (I told you I'm random.) But here is why. My BFF Meighan is getting married at the end of August and we have been tossing around centerpiece ideas since I am helping her do the flowers (I did mine for my wedding and it has to be less stressful to do them for someone else!). I immediately shot it over and when she called back she said "What about instead of on the vases, we do that on the wine bottles?" (It is going to be a wine themed reception.)  We were thinking personal shots of her and her beau (and their pups!) on the bottles with a different one for each table. So I told her I would give it a test run here.

First, I got a wine bottle - this one I had saved because the label cracked me up (don't try to figure out what it is if you are easily offended!). My step-MIL bought it for us while we were down in Key West.  But it was willing to give itself up for the cause!


So I stripped off the top foil wrap and started to work on getting off that label. People, I am here to tell you that there are a lot of resources out there to tell you how to remove a wine label. If you want to save it - I just wanted it off!!

Here is what I can tell you after my trials and tribulations. According to the internet - my bottle, which came from California - has the highest concentration of glue. (If you attempt this on your own, may I recommend an import.) To get everything off, what worked for me was
- to soak the bottle in hot water for a couple hours
- scrub with steel bristled brush
- get frustrated
- sprinkle the bottle with Barkeepers Friend (my all time favorite cleaner!)
- scrub some more with fantastic results
Ah - a clean bottle.

Then I pulled up one of my favorite pictures of me and the hubby from our wedding into Picnik (BTW - if you aren't using this yet you are missing out!) and I put in a sepia tone, added a vignette feature, then added a focal soften, rounded the corners, added a regular border, and then added a museum mat border.  (And if you weren't using Picnik before I bet you will want to now - all of that is FREE! No sponsorship here - I am just in love!)


I printed that bad boy off onto some white card stock, cut it out and pulled out the Mod Podge! You can still see it drying a little in the photo below.

Here is a close up of the detail. I love how vintage it looks with the sepia and softening accents that I used in Picnic

I can't wait to see what Meighan comes up with - but I think these are going to look fantastic on the tables with little square vases of dark red and pink roses, votives, and scattered corks! I think these would be great as an Anniversary present or perfect for creating your own personal wine labels for an event or party.

So let's hear it - any tips you can pass along for decoupaging paper or photos on to glass? I (and Meighan too!) would love to hear your tips!

Update:  Wanna see how Meighan's came out?  Check them out here!

I am linking this up to the following parties this week! 

Made it Monday with Jules @ The Persimmon Perch 
The DIY Project Parade with Roeshel@ The DIY Showoff
Trash to Treasure with Kimm @ Reinvented 
DIY Day with Kimba with Kimba @ A Soft Place to Land
Get Your Craft On with Kim @ Today's Creative Blog
Penny Pinching Party with Jen @ The Thrifty Home
Show and Tell with Becca @ Blue Cricket Design

Also linking this up to the Mod Podge Challenge at the CSI Project!  

Visit thecsiproject.com


Related Posts with Thumbnails