
Update: The Nursery is finally finished! Hop over and check out the full reveal!
Well we finally got one of our big to-do’s done for the nursery!! The dresser has been refinished! Here is what she looks like now and the rest of the post is how we got there.

If you remember from my “base” nursery post – the dresser was originally part of our guest bedroom suite. But there was going to be no room for it in our guest bedroom/office. So I decided that I wanted to keep it in the nursery and use it as our dresser/changing table. This served both the purpose of giving it a home in our house and saved quite a bit of money in our nursery budget. Here is a before picture of the dresser.

I have loathed this dresser for almost 5 years – surprisingly the same amount of time that this dresser has lived in my house. I am not a big “oak” fan – so after we picked out the crib – I knew I wanted to strip this puppy down and restain it darker to match the crib. Add some new hardware and it would be perfect. But I have always heard that stripping was such a pain.
People – I am here to tell you that stripping and restaining is not as bad as what you may have thought. In fact – having refinished a piece by painting it and refinished a piece by stripping and restaining, I prefer stripping and staining. Now I didn’t know that at the start of this journey, so I had to get a good inspiration piece to help get the courage up to take on the project. The piece I found for this redo was this dresser from Restoration Hardware.
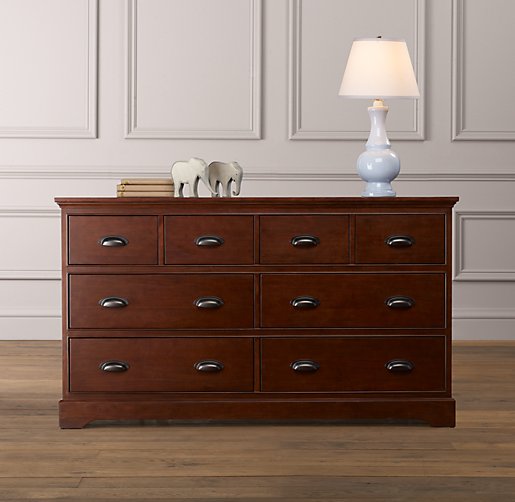
Now the dresser from Restoration Hardware runs $1249. Loved the color and the hardware was perfect! I was hoping that we would get this project done for significantly less than that. And we did – our cost for this redo was $50. So here is how we did it!
First, the hubby stripped each of the drawers and the dresser frame itself with Citri-strip Spray stripper. Below is a pic of the product and a drawer that had already been stripped. This stuff was amazing (and I am not being compensated in anyway to say that – we just loved the product)! It doesn’t smell chemical at all and was perfect for getting in the crevices of the drawers and trim on the dresser.

Once you spray it on – you leave it there for awhile while it loosens the old finish. Then you just start stripping it off with a plastic scraper. You can see below how easy it comes off!

Once all the stain was off – the hubby sanded everything down and we started staining. We used Cabot Stain in Maple Leaf which is one of the custom colors that you can get mixed at the store.

Once the first coat got on – I was really excited about how good it was looking.

Another coat of stain and then a coat of poly and we ended up with our final product. Here she is again below!!

Loving the hardware? Yeah me too! The cup pulls were the perfect addition and I got them for a steal on Amazon. $2.19 a piece which is WAY less than what they were charging at the hardware store.

I love love love it! And it is a perfect match to our crib!

The nursery is coming together very quickly! I think I should be able to share with you guys within the next couple weeks! I have a few more projects to finish and then it will be ready for its reveal. Of course – hopefully that will be before Lil Man makes his appearance!
So tell me – have you ever stripped or restained anything? Was it as hard as you thought it would be? If you haven’t – do you think you might try now? I wanna know!

Linking this up to
Metamorphosis Monday with Susan @ Between Naps on the Porch
Get Your Craft On with Kim @ Today’s Creative Blog
Tutorials and Tips Tuesday with Beth at Stories of A to Z
Show and Tell with Becca @ Blue Cricket Designs
Transformation Thursday with Gina @ The Shabby Chic Cottage
Weekend Wrap Up Party with Jen @ Tatertots and Jello
Saturday Nite Special with Donna @ Funky Junk Interiors
Before and After Party with Sarah @ Thrifty Decor Chick
Furniture Feature Friday with Miss Mustard Seed @ Miss Mustard Seed


299 frugal friends said ...
«Oldest ‹Older 1 – 200 of 299 Newer› Newest»-
Brandon @ Southgate
said... @
May 29, 2011 at 8:23 PM

-
-
Anonymous
said... @
May 29, 2011 at 8:45 PM

-
-
Angie Holden
said... @
May 29, 2011 at 9:07 PM

-
-
sabriena
said... @
May 29, 2011 at 9:17 PM

-
-
Karen
said... @
May 30, 2011 at 8:31 AM

-
-
Jess @ Frugal with a Flourish
said... @
May 30, 2011 at 8:33 AM

-
-
Unknown
said... @
May 30, 2011 at 9:07 AM

-
-
Amy @ Positively Splendid
said... @
May 31, 2011 at 7:50 AM

-
-
Sue
said... @
May 31, 2011 at 6:55 PM

-
-
Unknown
said... @
June 1, 2011 at 12:32 PM

-
-
THEBUZYBUG
said... @
June 5, 2011 at 1:47 AM

-
-
LaVonne
said... @
June 6, 2011 at 12:55 AM

-
-
The Splendiferous Life
said... @
June 7, 2011 at 6:09 AM

-
-
R @ Rebecca's Roundup
said... @
June 7, 2011 at 3:45 PM

-
-
Kara @ June & Bear
said... @
June 8, 2011 at 11:43 AM

-
-
Beth
said... @
June 10, 2011 at 9:22 AM

-
-
Mindie Hilton
said... @
June 11, 2011 at 3:24 PM

-
-
Carli
said... @
June 20, 2011 at 10:47 PM

-
-
Anonymous
said... @
December 15, 2011 at 1:15 PM

-
-
Cam
said... @
February 2, 2012 at 10:28 AM

-
-
Anonymous
said... @
February 19, 2012 at 10:21 PM

-
-
shelby
said... @
April 6, 2012 at 3:13 PM

-
-
Anonymous
said... @
April 30, 2012 at 1:14 PM

-
-
Anonymous
said... @
July 9, 2012 at 5:20 PM

-
-
Anonymous
said... @
October 3, 2012 at 10:25 AM

-
-
Anonymous
said... @
October 3, 2012 at 2:51 PM

-
-
Lisa S
said... @
October 3, 2012 at 10:26 PM

-
-
Marie
said... @
October 5, 2012 at 6:32 AM

-
-
Anonymous
said... @
October 6, 2012 at 7:31 AM

-
-
Anonymous
said... @
October 8, 2012 at 9:39 AM

-
-
Anonymous
said... @
October 20, 2012 at 10:12 PM

-
-
Kristina
said... @
October 27, 2012 at 10:01 PM

-
-
Gwen
said... @
October 28, 2012 at 2:03 PM

-
-
lovetogab1
said... @
October 28, 2012 at 5:06 PM

-
-
MelsAmazing
said... @
November 13, 2012 at 8:40 AM

-
-
Lynn Smith
said... @
November 16, 2012 at 9:53 AM

-
-
jjflamingo
said... @
November 17, 2012 at 8:40 PM

-
-
CrazyHomemadeMom
said... @
November 18, 2012 at 6:26 PM

-
-
Anonymous
said... @
November 29, 2012 at 12:56 PM

-
-
::laineypoz::
said... @
November 29, 2012 at 4:16 PM

-
-
Second Hand Roze
said... @
December 3, 2012 at 4:18 PM

-
-
Anonymous
said... @
December 11, 2012 at 8:47 PM

-
-
triactol
said... @
December 19, 2012 at 5:54 AM

-
-
Samantha
said... @
January 12, 2013 at 12:57 AM

-
-
Anonymous
said... @
January 15, 2013 at 7:51 PM

-
-
Anonymous
said... @
January 19, 2013 at 8:02 PM

-
-
Anonymous
said... @
January 31, 2013 at 7:01 AM

-
-
Anonymous
said... @
February 8, 2013 at 2:14 PM

-
-
Jennifer
said... @
February 23, 2013 at 12:02 PM

-
-
Missy
said... @
February 28, 2013 at 10:47 PM

-
-
Anonymous
said... @
March 8, 2013 at 12:21 AM

-
-
Anonymous
said... @
March 8, 2013 at 12:43 AM

-
-
Anonymous
said... @
March 8, 2013 at 2:07 AM

-
-
Anonymous
said... @
March 8, 2013 at 2:37 AM

-
-
Anonymous
said... @
March 8, 2013 at 4:57 AM

-
-
Anonymous
said... @
March 8, 2013 at 5:33 AM

-
-
Anonymous
said... @
March 8, 2013 at 8:24 AM

-
-
Anonymous
said... @
March 8, 2013 at 8:25 AM

-
-
Anonymous
said... @
March 8, 2013 at 8:38 AM

-
-
Anonymous
said... @
March 8, 2013 at 10:05 AM

-
-
Anonymous
said... @
March 8, 2013 at 11:41 AM

-
-
Anonymous
said... @
March 8, 2013 at 2:29 PM

-
-
Anonymous
said... @
March 8, 2013 at 3:41 PM

-
-
Anonymous
said... @
March 8, 2013 at 6:51 PM

-
-
Anonymous
said... @
March 8, 2013 at 7:04 PM

-
-
Anonymous
said... @
March 8, 2013 at 9:13 PM

-
-
Anonymous
said... @
March 8, 2013 at 10:20 PM

-
-
Anonymous
said... @
March 9, 2013 at 4:36 AM

-
-
Anonymous
said... @
March 9, 2013 at 5:57 AM

-
-
Anonymous
said... @
March 9, 2013 at 6:59 AM

-
-
Anonymous
said... @
March 9, 2013 at 1:12 PM

-
-
Anonymous
said... @
March 9, 2013 at 9:18 PM

-
-
Anonymous
said... @
March 9, 2013 at 10:17 PM

-
-
Anonymous
said... @
March 9, 2013 at 11:24 PM

-
-
Anonymous
said... @
March 10, 2013 at 12:26 AM

-
-
Anonymous
said... @
March 10, 2013 at 12:43 AM

-
-
Anonymous
said... @
March 10, 2013 at 1:47 AM

-
-
Anonymous
said... @
March 10, 2013 at 5:34 AM

-
-
Anonymous
said... @
March 10, 2013 at 7:53 AM

-
-
MommaLuv
said... @
March 10, 2013 at 7:43 PM

-
-
Anonymous
said... @
March 11, 2013 at 1:17 AM

-
-
Anonymous
said... @
March 11, 2013 at 1:26 AM

-
-
Anonymous
said... @
March 11, 2013 at 3:10 AM

-
-
Anonymous
said... @
March 11, 2013 at 8:06 AM

-
-
Anonymous
said... @
March 11, 2013 at 6:00 PM

-
-
Anonymous
said... @
March 11, 2013 at 7:20 PM

-
-
Anonymous
said... @
March 11, 2013 at 8:17 PM

-
-
Anonymous
said... @
March 11, 2013 at 8:17 PM

-
-
Anonymous
said... @
March 11, 2013 at 8:22 PM

-
-
Anonymous
said... @
March 11, 2013 at 9:22 PM

-
-
Anonymous
said... @
March 11, 2013 at 10:14 PM

-
-
Anonymous
said... @
March 11, 2013 at 10:23 PM

-
-
Anonymous
said... @
March 12, 2013 at 11:44 PM

-
-
Anonymous
said... @
March 23, 2013 at 8:03 AM

-
-
Anonymous
said... @
March 24, 2013 at 7:04 PM

-
-
Anonymous
said... @
March 24, 2013 at 8:08 PM

-
-
Anonymous
said... @
March 25, 2013 at 5:55 PM

-
-
Anonymous
said... @
March 25, 2013 at 8:17 PM

-
-
Anonymous
said... @
March 25, 2013 at 8:41 PM

-
-
Anonymous
said... @
March 25, 2013 at 10:43 PM

-
-
Anonymous
said... @
March 26, 2013 at 3:16 PM

-
-
Anonymous
said... @
March 26, 2013 at 3:40 PM

-
-
Anonymous
said... @
March 26, 2013 at 5:48 PM

-
-
Anonymous
said... @
March 26, 2013 at 10:21 PM

-
-
Anonymous
said... @
March 26, 2013 at 11:52 PM

-
-
Anonymous
said... @
March 27, 2013 at 12:02 AM

-
-
Anonymous
said... @
March 27, 2013 at 2:42 AM

-
-
Anonymous
said... @
March 27, 2013 at 2:46 AM

-
-
Anonymous
said... @
March 27, 2013 at 3:19 AM

-
-
Anonymous
said... @
March 27, 2013 at 4:08 AM

-
-
Anonymous
said... @
March 27, 2013 at 4:39 AM

-
-
Anonymous
said... @
March 27, 2013 at 4:42 AM

-
-
Anonymous
said... @
March 27, 2013 at 5:10 AM

-
-
Unknown
said... @
March 27, 2013 at 5:45 AM

-
-
Anonymous
said... @
March 27, 2013 at 5:49 AM

-
-
Anonymous
said... @
March 27, 2013 at 6:10 AM

-
-
Anonymous
said... @
March 27, 2013 at 6:26 AM

-
-
Anonymous
said... @
March 27, 2013 at 7:03 AM

-
-
Anonymous
said... @
March 27, 2013 at 11:37 AM

-
-
Anonymous
said... @
March 27, 2013 at 11:44 AM

-
-
Anonymous
said... @
March 27, 2013 at 6:47 PM

-
-
Anonymous
said... @
March 27, 2013 at 7:26 PM

-
-
Anonymous
said... @
March 27, 2013 at 10:52 PM

-
-
Anonymous
said... @
March 28, 2013 at 4:13 AM

-
-
Anonymous
said... @
March 28, 2013 at 7:29 AM

-
-
Anonymous
said... @
March 28, 2013 at 8:55 AM

-
-
Anonymous
said... @
March 28, 2013 at 9:01 AM

-
-
Anonymous
said... @
March 28, 2013 at 10:09 AM

-
-
Anonymous
said... @
March 30, 2013 at 1:59 PM

-
-
Anonymous
said... @
March 30, 2013 at 5:41 PM

-
-
Anonymous
said... @
March 30, 2013 at 8:39 PM

-
-
Anonymous
said... @
March 30, 2013 at 9:14 PM

-
-
Anonymous
said... @
March 30, 2013 at 10:25 PM

-
-
Anonymous
said... @
March 30, 2013 at 10:25 PM

-
-
Anonymous
said... @
April 1, 2013 at 8:10 AM

-
-
Anonymous
said... @
April 3, 2013 at 2:24 PM

-
-
Anonymous
said... @
April 5, 2013 at 10:40 PM

-
-
Anonymous
said... @
April 6, 2013 at 4:44 PM

-
-
Honey I'm Home Blog
said... @
April 7, 2013 at 8:09 PM

-
-
Anonymous
said... @
April 7, 2013 at 11:49 PM

-
-
Anonymous
said... @
April 8, 2013 at 2:03 AM

-
-
Anonymous
said... @
April 9, 2013 at 1:24 AM

-
-
Anonymous
said... @
April 9, 2013 at 2:50 AM

-
-
Anonymous
said... @
April 9, 2013 at 4:48 AM

-
-
Anonymous
said... @
April 9, 2013 at 7:31 PM

-
-
Anonymous
said... @
April 9, 2013 at 9:40 PM

-
-
Anonymous
said... @
April 10, 2013 at 8:28 AM

-
-
Anonymous
said... @
April 10, 2013 at 1:49 PM

-
-
Anonymous
said... @
April 10, 2013 at 6:33 PM

-
-
Anonymous
said... @
April 10, 2013 at 7:46 PM

-
-
Anonymous
said... @
April 10, 2013 at 11:01 PM

-
-
Anonymous
said... @
April 17, 2013 at 3:03 AM

-
-
Anonymous
said... @
April 18, 2013 at 8:15 AM

-
-
Anonymous
said... @
April 18, 2013 at 11:36 AM

-
-
Anonymous
said... @
April 19, 2013 at 1:22 PM

-
-
Anonymous
said... @
April 20, 2013 at 3:15 PM

-
-
Anonymous
said... @
April 22, 2013 at 4:01 PM

-
-
Anonymous
said... @
April 22, 2013 at 7:53 PM

-
-
Anonymous
said... @
April 25, 2013 at 6:37 PM

-
-
Anonymous
said... @
April 27, 2013 at 9:05 AM

-
-
Anonymous
said... @
April 28, 2013 at 12:17 AM

-
-
Anonymous
said... @
April 28, 2013 at 7:05 PM

-
-
Anonymous
said... @
May 4, 2013 at 1:21 PM

-
-
Anonymous
said... @
May 5, 2013 at 3:56 AM

-
-
Anonymous
said... @
May 5, 2013 at 1:51 PM

-
-
Anonymous
said... @
May 7, 2013 at 12:48 AM

-
-
Unknown
said... @
May 8, 2013 at 11:31 AM

-
This comment has been removed by the author.
-
Anonymous
said... @
May 12, 2013 at 5:12 PM

-
-
Anonymous
said... @
May 15, 2013 at 9:24 AM

-
-
Anonymous
said... @
May 15, 2013 at 5:40 PM

-
-
Anonymous
said... @
May 15, 2013 at 10:34 PM

-
-
Anonymous
said... @
May 15, 2013 at 10:57 PM

-
-
Anonymous
said... @
May 15, 2013 at 11:10 PM

-
-
Anonymous
said... @
May 16, 2013 at 1:20 AM

-
-
Anonymous
said... @
May 18, 2013 at 8:27 AM

-
-
Anonymous
said... @
May 19, 2013 at 12:02 PM

-
-
Lindsey
said... @
May 22, 2013 at 12:28 PM

-
-
Anonymous
said... @
May 23, 2013 at 2:32 AM

-
-
Anonymous
said... @
May 26, 2013 at 11:22 PM

-
-
Anonymous
said... @
June 4, 2013 at 6:50 PM

-
-
Anonymous
said... @
June 7, 2013 at 9:35 PM

-
-
Anonymous
said... @
June 7, 2013 at 11:58 PM

-
-
Anonymous
said... @
June 9, 2013 at 1:15 AM

-
-
Anonymous
said... @
June 9, 2013 at 12:19 PM

-
-
Anonymous
said... @
June 12, 2013 at 6:22 AM

-
-
Anonymous
said... @
June 12, 2013 at 12:16 PM

-
-
Anonymous
said... @
June 12, 2013 at 7:03 PM

-
-
Anonymous
said... @
June 12, 2013 at 7:24 PM

-
-
Anonymous
said... @
June 12, 2013 at 7:33 PM

-
-
Anonymous
said... @
July 16, 2013 at 1:02 AM

-
-
mcx tips
said... @
August 12, 2013 at 7:43 AM

-
-
mcx tips
said... @
August 12, 2013 at 7:43 AM

-
-
gloria
said... @
September 16, 2013 at 5:04 AM

-
-
Anonymous
said... @
September 17, 2013 at 5:36 AM

-
-
Unknown
said... @
September 18, 2013 at 12:50 AM

-
-
swan
said... @
October 4, 2013 at 12:11 AM

-
-
swan
said... @
October 28, 2013 at 7:45 AM

-
-
Unknown
said... @
November 23, 2013 at 2:38 AM

-
-
Anonymous
said... @
November 27, 2013 at 2:22 AM

-
-
Unknown
said... @
November 28, 2013 at 4:22 AM

-
«Oldest ‹Older 1 – 200 of 299 Newer› Newest»That looks great! Did you find it was difficult to get into the areas around the drawer edges?
Hi Jess! Oh, what a great tutorial! Your dresser looks wonderful!
Be a sweetie,
Shelia ;)
Loooove this!! I have been waiting for this post! After we talked about this, I got to thinking. I really want to strip and restain our kitchen table. Yes I know I am going wood when everyone has painted kitchen tables but a girl's gotta be different!! I think yours looks great!! I am sooo ready to tackle mine now!!
That is gorgeous!
It's a dead ringer for the Restoration Hardware one that inspired you. Where did you find the product to remove the original stain? I would love to use it.
Brandon - actually we used a grout tool to get all the stain out of the areas around the drawer. Worked like a charm!
When I saw your 'before' I thought - nah, it can't be! But it is! What a fabulous makeover! I love the stain but I can't believe what a difference the drawer pulls make. Incredible.
Love the wood tones in your nursery. Coming along beautifully!
This is great, Jess! What a transformation!!
Verrry nice! :) I'm glad you were able to re-use something with such a pretty outcome. I have an antique dresser from my grandmother. Your blog is inpsiring me to re-finish it. I've been looking at it for years thinking it should be re-done. You just might have given me the nidsge that I need. Thanks :)
I can't believe thats the same piece. Great job!!!
Wow....looks amazing! TFS.
Thank you for this step by step tutorial. I found a dresser at the Goodwill that I want to use as a buffet but I am a little scared to try and strip and stain it. But not now. I want to do it! :)
Blessings and Have a Happy Week!
LaVonne @ Long Wait For Isabella
WOW!!! it turned out so nice..I have never stripped and stained only painted..I think I am going to give it a try..
SO beautiful. So much more beautiful than everybody going crazy and painting over everything. I just completed my first restaining project that didn't work! :( It was so old that the stain just seemed to be part of the word and I ended up painting it white, which I never do and you can see on my latest blog post. But so glad yours turned out!
It looks SO much like the inspiration piece. Great job. I have tried the stripping and staining yet. Perhaps I might.
very beautiful!!!!!Thanks for the tutorial:)!
beth
I would love for you to link it up to my party that is running now. Any linky goes.
http://bacontimewiththehungryhypo.blogspot.com/2011/06/any-link-goes-party-running-now-summer.html
Come strut your stuff.
Just want to say that you did a fantastic job on this piece! I pass up on so many oak pieces because I don't feel like painting them but this stripping and staining seems do-able,Thanks forr sharing! Your baby's nursey is beautiful!
janice Beautiful love love it wanted to know were u get the stain from
This is motivating! How long did it take you two start to finish?
I would like do this someday. Have my smile ear to ear after the finished product.
Where did you find the Citri-strip Spray stripper?
how much sanding did hubby have to do? we are working on a oak desk and the same stain is really not soaking into the oak wood? frustrated
I was wondering how many cans of the stripping spray you had to use? I was reading the reviews on Home Depots website and they said it works great but one can doesn't go a long way. Just wondering so I don't run out mid process...I'm planning on refinishing a dresser for our nursery as well! Yours came out amazing!
Gorgeous. I have so much 1990s oak that needs this treatment! Thanks.
You think this would work on kitchen cabinets?
I have redone many pieces of furniture but always have super bad luck with poly. Many times it bubbles or is foggy. I have resanded and repainted / revarnished many pieces due to poly messups! How did you apply yours? What kind did you use?
I've wanted to strip our kitchen table and sand it down, but have been terrified of ruining it. This inspires me to try it!
I have an old dresser that was mine when I was a little girl. Then my sister used it and later in years my daughter. I just finished restoring it and I love it!!! I it was finished a light oak and I decided to stain it mahogany! Beautiful. Thought I'd share a couple hints to questions I seen here.
Poly is a very scarey thing. I too have had troubles in the past with bubbles and it drying like sand paper. At the advice of our local lumber yard, this time I used Water based Poly. Great stuff!!! No smell and water clean up. And if you put it on lightly ( i have a tendency to over do) and brush it out real good and smooth you will not get the bubbles. Another bubble preventitive hint. Do NOt dipped your brush into the can of poly. Either pour out as needed onto a plate or something (i used a lid off a 5gal bucket) or pour directly onto the piece then brush quickly. Everytime you dip your brush into the can you put bubbles into the poly!
Good luck to all of you and Jess you did a great job!! Looks good and wasn't it fun?!?!
I have stripped dozens of pieces of furniture. From mirror frames to chairs to you name it. I love doing,it's a great stress reliever and the results are soooo worth it. Many of my grandparents things are now proudly displayed in my home or my children's home. I hate painting!!!
Is the stripping spray very toxic fume wise?
This is so neat! Do you think I could strip a cherry finished dresser & stain it a more natural wood color?? I see you ( and others) went from a light color wood to dark, so wondering if the opposite would work. Look forward to any advice you may have!!
kkcouturier@gmail.com
Hi, Jess. Congrats on the major $ savings. Nice work on the dresser and I love the drawer pulls, too. Yes, I've refinished several items, including an old oak dining set, with 6 chairs & buffet. The finish on the dining set was probably lacquer and melted easily with liquid refinisher, fine steel wool and lots of rags and many gloves. The original finish was so dark that you couldn't see the beautiful burled wood in the door insets. I really liked the golden stain that remained and the remover didn't raise the grain so I didn't sand or add more stain, so I just applied several coats of a "tung oil" wiping varnish. It was worth the work but I did question my sanity before I completed the project.
Just a reminder, if there is any question whether a piece has value as an antique, consult a professional for options to restore and maintain the value. For Kristina, take care when refinishing dark cherry finished furniture with the intent to make it lighter, unless you know it is genuine cherry. If you are unsure, test an inconspicuous area first. Cherry wood is a light pinkish color but as cherry ages or ripens in the presence of light, it gets darker and eventually reaches a rich reddish brown. Cherry has a simple, fine, closed grain, much like that of maple. Fake "cherry" wood often has little or no grain pattern. It's made by taking a cheaper wood, bleaching it, texturizing it with chemicals, then staining it with a "cherry" stain. Are there occasional black flecks and black streaks in the wood? Real cherry has beautiful markings (from gum streaking, mineral deposits and pin knots). Fake cherry looks entirely uniform in grain due to the chemical processing mentioned above. It's unlikely you'll ever find black flecks or streaks in faux cherry woods.
My current crafting is making and donating hair bows, but this certainly took me back. :-)
Well done!! Love it! I too just finished stripping an old dresser for a nursery. I used the citri-strip gel. It's no drip and is brushed on. I had 5 layers of paint to remove. Wasn't as quick as one layer of varnish and stain. But the stuff does an amazing job. So just fyi to anyone wanting ideas for stripping furniture.
Thx again. Love it
We tried striping years and layers of paint off our old original windows. Our house was built in 1856. I'm guessing over time moisture and age must have weakened the wood. Stripping caused the wood to disintegrate in some places, especially around the fine details. If we weren't extremely careful, scraping would leave gouges in the wood and shave away chunks. :(
This FANTASTIC! You did a great job, thanks so much for sharing it with us!
When I sw this post, I was hoping you stripped using the Citrus products. I had bought some but have not had the courage to try it yet. Now I feel a lot more confident.
Looks amazing. How did you do the poly in only one coat, and what kind did you use?
I actually recently tried stripping a piece of furniture (the week before Thanksgiving) and it was AWFUL. I got this liquid stripper stuff, I can't remember what it's called but it wasn't one of the cheap-o ones. I actually read the directions and all that and it sounded like a legit stripper (hahaha, sorry). I poured some into a metal container like the directions said and lathered some on the top of my piece of furniture. The directions said it takes about 30 minutes, so I checked on it at 30 minutes and it had pretty much not done anything. Then Hubs told me I need to be more generous with the stripper (>.<) so I added some more. It worked a heck of a lot better but I still wasn't happy with it so I gave up. Maybe it's the brand? Maybe it's the operator (no doubt)? Maybe I'll try the brand you used and see how it works! =]
I'm inspired to strip and stain some oak bookshelves that I've been hating in our living room. Everything in that room is so brown. Anyhow I want to try one of those color stains now. Thanks for the push!
This gives me hope for a 70's style oak cube I'd like to redo. Also, I just wanted to mention that you can find some incredible buys on drawer pulls and other hardware on ebay. I redid the pulls in my craftroom (40 drawers and cabinets) with some very stylish birdcage pulls (they look like several thick wires twisted in a spiral) Lowes wanted $7 a piece for these pulls. I purchased in bulk on eBay for an astounding $0.79 a piece! So always check eBay before you shell out the bucks for hardware.
Thanks again! I'm really psyched about stripping my cube!
Second Hand Roze
Nice job. I have my own stripping project that's in limbo right now. A warning to all stripping is easy, UNLESS you are tackling a piece that has multiple layers of paint on it! I discovered the buffet I wanted re-done has 6 layers of paint. I'm using the same stripper you are, and it is a great product, but just takes forever to get to the original wood with all the layers to get through. Currently, my piece is languishing away in my garage.
blog page is available http://toptriactolreview.com/
I once stripped and repainted a dresser that was probably last painted in the 1960s. It was the worst time of my life but oh so satisfying to transform this ugly scrubs green dresser into something modern and cute. I used the product you listed above. I would say, if you're stripping something that was last painted in the 60s, you're going to need something stronger. Oh yeah, and you'll make a mess.
I would NEVER have tried a project like this before, but now...my head's swimming with possibilities for a couple of old night tables!
Didn't you have to sand between stripping and staining? I thought that was necessary to get the bare wood to accept the stain... Thanks for answering.
Triactol
Triactol
Triactol
Triactol
Triactol
Triactol
Triactol
Triactol
Triactol
Triactol
Triactol
It is beautiful. Just curious as to how many cans of stripper did you have to buy?
I started to strip something once, but it was so hard to get it out of the crevices that I gave up. I left it on the back porch and then all the neighborhood cats peed on it, so even when I got another urge to tackle it, it was ruined. Sad story.
I have stripped a wide variety of furniture. It seems to me, the ease in stripping comes from what paint or varnish is on the furniture, not from the stripper I choose to use. And the type of wood effects the final out come more than the type of stain.
Wow that was strange. I just wrote an very
long comment but after I clicked submit my comment didn't show up. Grrrr... well I'm not writing all that over
again. Anyhow, just wanted to say great blog!
Also visit my web page: hair loss
Interesting blog! Is your theme custom made or did you
download it from somewhere? A theme like yours with a few simple adjustements would really
make my blog stand out. Please let me know where you
got your theme. Many thanks
Also visit my site ... Lilliana
Wow, fantastic blog layout! How long have you been blogging for?
you made blogging look easy. The overall look of your web site is excellent, as well as the content!
Feel free to surf to my web blog ... Launa
If you would like to improve your familiarity simply keep visiting this web page and be updated with the newest news
posted here.
My web blog http://refrigeratorwaterfilters.webs.com/apps/blog/show/20856358-frigidaire-refrigerator-water-filters-finding-the-best-ones
Also see my web page - Candice
I blog often and I really thank you for your content. The article has really peaked my interest.
I'm going to take a note of your blog and keep checking for new details about once per week. I opted in for your RSS feed as well.
Feel free to visit my web page; Kristie
my web site > tyrone
Simply want to say your article is as surprising.
The clearness to your post is simply excellent and i could assume you're knowledgeable on this subject. Fine with your permission let me to clutch your RSS feed to keep updated with coming near near post. Thanks one million and please keep up the enjoyable work.
My weblog - http://www.sbwire.com/press-releases/natural-hair-loss-treatments-and-product-reviews-explained-in-great-detail-at-hairlosshavencom-147600.htm
I am regular reader, how are you everybody? This paragraph posted at this
site is really good.
Feel free to visit my web site; http://x-zik.net/index.php?do=/MichealTh/info/
I wanted to thank you for this wonderful read!! I absolutely loved
every little bit of it. I've got you saved as a favorite to look at new stuff you post…
Also visit my web page http://friend.Ezihyip.com/link/1988
Hey there would you mind letting me know which web host you're utilizing? I've loaded
your blog in 3 different web browsers and I must say this blog loads
a lot quicker then most. Can you recommend a good internet hosting provider
at a reasonable price? Many thanks, I appreciate it!
Also visit my website; http://amuntai.16mb.com/index.php?p=blogs/viewstory/6089
Please let me know if you're looking for a article author for your site. You have some really great articles and I believe I would be a good asset. If you ever want to take some of the load off, I'd absolutely love to write some
articles for your blog in exchange for a link back to mine.
Please shoot me an e-mail if interested. Many thanks!
Feel free to visit my web site ... Jamison
Appreciating the dedication you put into your site and detailed information you offer.
It's awesome to come across a blog every once in a while that isn't the same outdated rehashed material.
Excellent read! I've bookmarked your site and I'm adding your RSS feeds to my Google account.
Here is my web-site :: Van
I'd like to find out more? I'd care to find out more details.
My blog ... http://tahirdhaman.com/
Hi, I do believe this is an excellent site.
I stumbledupon it ;) I will return yet again since i have bookmarked
it. Money and freedom is the greatest way to
change, may you be rich and continue to help others.
Look at my page - http://lucila13.wetpaint.com/page/Provillus
Hello to all, the contents existing at this web page are in fact awesome for people knowledge, well, keep up the
nice work fellows.
Here is my web page: HTTP://Ibwww.org/instituto/user/profile.php?id=6422
Outstanding post however , I was wanting to know if you could write a litte more on this topic?
I'd be very thankful if you could elaborate a little bit more. Bless you!
My web-site; hemorrhoidtreatmentreviews.webs.com
Oh my goodness! Impressive article dude! Many thanks, However
I am encountering issues with your RSS. I don't understand the reason why I am unable to join it. Is there anybody getting similar RSS problems? Anybody who knows the answer will you kindly respond? Thanx!!
Here is my page ... http://www.gather.com/viewArticle.action?articleId=281474981847150
I love looking through a post that can make people think.
Also, thank you for allowing for me to comment!
My web site: Minerva
Hi there colleagues, good paragraph and pleasant arguments commented here, I am
actually enjoying by these.
Feel free to surf to my webpage :: http://benberger.blog.com/2013/02/07/profollica-review-should-study-before-use/
I'm not sure exactly why but this blog is loading very slow for me. Is anyone else having this problem or is it a problem on my end? I'll check back later and see
if the problem still exists.
Feel free to visit my weblog http://jacquesschneider.webs.com/apps/blog/show/20963489-finding-chi-flat-irons-for-sale
Saved as a favorite, I love your website!
Here is my page ... Kingbio hemorrhoid relief
Hi there, I log on to your new stuff like every week.
Your story-telling style is witty, keep it up!
Also visit my web site :: http://coloncleanserreviews.typepad.com/colon-cleanse/2012/12/ceramic-water-filters-versus-charcoal-water-filters-.html
We are a group of volunteers and starting a new scheme in our community.
Your site offered us with valuable information to work on.
You have done an impressive job and our entire community will
be grateful to you.
Feel free to surf to my blog ... http://10ztalk.com/blogs/entry/Hair-Loss-Cure-In-The-Uk
I am sure this paragraph has touched all the internet users, its really
really fastidious post on building up new web
site.
Here is my web-site ... Kingbio hemorrhoid relief
My page: Anna
I think the admin of this website is actually working hard in favor of his site, as here every stuff is quality based material.
my homepage http://fb.fullorissa.com/?L=blogs.blog&article=28736
Thanks designed for sharing such a nice thinking, paragraph is good, thats why i have read it entirely
Look into my blog; http://www.anawinta.net/?L=blogs.blog&article=83864
What's up, yeah this piece of writing is in fact nice and I have learned lot of things from it about blogging. thanks.
My website Marcelo
My web site :: Temeka
Hello there! Quick question that's entirely off topic. Do you know how to make your site mobile friendly? My blog looks weird when viewing from my iphone 4. I'm trying
to find a theme or plugin that might be able to resolve this issue.
If you have any suggestions, please share. Thank you!
Here is my website ... http://www.socialswager.com/index.php?do=/profile-24138/info/
My developer is trying to convince me to move to .
net from PHP. I have always disliked the idea because of
the costs. But he's tryiong none the less. I've been using Movable-type on a variety of websites for about a year and am concerned about switching to another platform.
I have heard very good things about blogengine.
net. Is there a way I can transfer all my wordpress content into
it? Any help would be greatly appreciated!
Have a look at my web blog: Provillus Review
Heya i am for the first time here. I found this board and
I to find It truly helpful & it helped me out a lot. I'm hoping to present one thing again and aid others such as you helped me.
my site ... Kayla
Wow. This is just in time for my dining room set that I want to darken the stain on. Thanks! The dresser looks fab, btw.
Wow that was strange. I just wrote an extremely long comment but after
I clicked submit my comment didn't show up. Grrrr... well I'm not writing all that over again.
Regardless, just wanted to say excellent blog!
my homepage - http://hoidtreatment.webs.com
Pretty! This has been a really wonderful post.
Many thanks for providing this info.
Here is my webpage :: jakemathews12.insanejournal.com
Whoa! This blog looks just like my old one! It's on a completely different subject but it has pretty much the same page layout and design. Great choice of colors!
Here is my web site :: hoidtreatment.webs.com
You really make it seem so easy with your presentation but I find this matter to be actually
something that I think I would never understand.
It seems too complicated and extremely broad for me.
I'm looking forward for your next post, I'll try to get the
hang of it!
Visit my web blog - hoidtreatment.webs.com
Please let me know if you're looking for a author for your weblog. You have some really good posts and I believe I would be a good asset. If you ever want to take some of the load off, I'd really like to write some content for your blog
in exchange for a link back to mine. Please send me an e-mail
if interested. Kudos!
Have a look at my page; http://hemorrhoidtreatmentreviews.Webs.com/apps/blog/show/3388226-zenmed-ziro-review-for-easing-hemorrhoids
We're a bunch of volunteers and starting a brand new scheme in our community. Your web site provided us with valuable information to work on. You have done a formidable job and our entire community will probably be grateful to you.
Here is my blog post: best hair loss treatment rogaine
Highly descriptive blog, I loved that bit. Will there be
a part 2?
Visit my web site :: Provillus
Highly descriptive blog, I loved that bit. Will there be a part
2?
Here is my homepage: Provillus
My page: lucila13.wetpaint.com
Hi there, I enjoy reading all of your article post.
I wanted to write a little comment to support you.
Also visit my weblog; typepad.com
I don't know if it's just me or if everybody else encountering issues
with your website. It appears like some of the text in your content are
running off the screen. Can someone else please
comment and let me know if this is happening to them as well?
This may be a issue with my browser because I've had this happen before. Kudos
My blog post: venapro
Right here is the right blog for everyone who really wants to find out about this topic.
You understand a whole lot its almost tough to argue with you
(not that I really will need to…HaHa). You definitely put a new spin on a subject that has been written about for ages.
Great stuff, just excellent!
Also visit my homepage; blogtext.org
For the reason that the admin of this web page is working,
no doubt very shortly it will be famous, due to its quality contents.
My web-site ... Kingbio hemorrhoid relief
Thanks for your marvelous posting! I seriously enjoyed reading it, you happen to be a great author.
I will ensure that I bookmark your blog and will often come back someday.
I want to encourage that you continue your great posts, have a nice
holiday weekend!
my web site ... Provillus
I'm extremely impressed with your writing skills and also with the layout on your blog. Is this a paid theme or did you customize it yourself? Anyway keep up the nice quality writing, it is rare to see a great blog like this one nowadays.
Here is my web page; hair loss shampoo
naturally like your web-site but you need
to test the spelling on quite a few of your posts. Several of them are rife with spelling issues and I
to find it very troublesome to tell the truth however I'll certainly come again again.
Here is my weblog; /blog/4574787980/Don't-Buy-Provillus-Before-reading-This-Provillus-Assessment/5197147
Thank you for another fantastic post. Where else may just anybody get that kind of information in
such a perfect manner of writing? I've a presentation next week, and I am at the search for such info.
Visit my web page :: blackplanet.com
Does your site have a contact page? I'm having trouble locating it but, I'd like to shoot you an e-mail.
I've got some suggestions for your blog you might be interested in hearing. Either way, great blog and I look forward to seeing it expand over time.
Here is my blog - embarazo de 25 semanas
always i used to read smaller posts that as well clear their motive, and that is also happening with this piece of writing which I am reading now.
my web-site :: provillus
I am extremely inspired with your writing skills and also with the format
to your weblog. Is this a paid topic or did you customize it yourself?
Anyway keep up the nice quality writing, it's rare to see a great weblog like this one nowadays..
Feel free to visit my page; provillus men
You actually make it seem so easy with your presentation but I find
this matter to be really something which I think I would never understand.
It seems too complicated and extremely broad for me.
I am looking forward for your next post, I will try to get
the hang of it!
Also visit my page /blog/4574848125/Provillus-Hair-Loss-Treatments-Provide-Natural-Hair-Growth-At-a-lower-price/5214254
all the time i used to read smaller articles or
reviews which also clear their motive, and that is
also happening with this paragraph which I am reading at this place.
my web blog ... provillus
I every time spent my half an hour to read this
weblog's articles or reviews every day along with a cup of coffee.
my blog post; http://maxzidi.xbuild.com/
Hey There. I found your weblog the use of msn. This is a very smartly
written article. I will make sure to bookmark it and come back to learn
extra of your helpful information. Thank you for the post.
I will definitely return.
my web-site - http://textbookrevolution.org/index.php/User_talk:Thuvuwwa
I am truly delighted to read this blog posts which consists of lots of useful data, thanks for providing such statistics.
Here is my blog post :: http://www.sbwire.com/press-releases/rogaine-review-does-it-work-was-published-today-203166.htm
Excellent blog post. I definitely appreciate this site. Thanks!
My web-site ... www.squidoo.com
Hey! This is kind of off topic but I need some advice
from an established blog. Is it very hard to set up your
own blog? I'm not very techincal but I can figure things out pretty fast. I'm thinking about making my own but I'm not sure where to start. Do you have any points or suggestions? Appreciate it
my webpage: http://www.rottentomatoes.com/user/1008745/blogs/?id=738276
Sweet blog! I found it while browsing on Yahoo News. Do you have any suggestions on how to get listed in Yahoo News?
I've been trying for a while but I never seem to get there! Appreciate it
Also visit my web-site; hoidtreatment.webs.com
Hello exceptional website! Does running a blog
such as this take a large amount of work? I've very little knowledge of programming however I had been hoping to start my own blog in the near future. Anyways, should you have any ideas or techniques for new blog owners please share. I understand this is off subject however I simply needed to ask. Thank you!
Also visit my website; http://www.nexopia.com/users/Theueeak/blog/4-provillus-reviews-can-they-help-in-your-search-for-the-best-hair-loss-therapy
Have you ever considered about adding a little bit more than just your articles?
I mean, what you say is important and everything. Nevertheless think
of if you added some great visuals or video clips to give your posts more, "pop"!
Your content is excellent but with images and video clips, this site could definitely be one of
the most beneficial in its field. Awesome blog!
My web blog; thuvuwwa.webobo.biz
Hi friends, its impressive piece of writing about educationand completely explained, keep it up all
the time.
Also visit my site :: http://gloriaglass.wetpaint.com/page/Provillus+Minoxidil:+Does+Provillus+Work?
Thank you for every other excellent article.
Where else may just anyone get that kind of information in such an ideal way of writing?
I have a presentation subsequent week, and I am on the look
for such info.
My homepage http://thuvuwwan.blogspot.com/
I've been exploring for a little bit for any high-quality articles or weblog posts in this sort of house . Exploring in Yahoo I finally stumbled upon this site. Studying this info So i'm glad to convey
that I have a very good uncanny feeling I discovered just what I needed.
I such a lot definitely will make sure to do not omit this site and
give it a look on a continuing basis.
Also visit my web page - blog.com
Because the admin of this site is working, no hesitation very
soon it will be renowned, due to its feature contents.
Also visit my web site ... http://maxzidi.runnerspace.com/profile.php?member_id=44506&do=blogs&blog_id=6626
Garcinia Cambogia Select Reviews - Garcinia Cambogia - Garcinia Cambogia Reviews - Garcinia Cambogia Extracts - Garcinia Cambogia Dr Oz - Garcinia Cambogia Weight Loss - Garcinia Cambogia Extracts Reviews - Dr Oz Garcinia Cambogia - Garcinia Cambogia select - Garcinia Cambogia Fruits - Garcinia Cambogia Extracts Weight Loss - Buy Garcinia Cambogia Extracts - Where to Buy Garcinia Cambogia - Garcinia Cambogia Extract - Dr. OZ Garcinia Cambogia Weight Loss - Weight Loss Garcinia Cambogia
Wow, that's what I was searching for, what a stuff! present here at this webpage, thanks admin of this site.
Feel free to surf to my web page ... provillus
I just like the helpful info you supply in your articles.
I will bookmark your blog and check again right
here frequently. I'm reasonably sure I will learn plenty of new stuff right here! Good luck for the following!
Also visit my web site 23hq.com
For the reason that the admin of this website is working, no question very rapidly it will be renowned, due
to its feature contents.
Here is my page ... https://mactin2082.jux.com
Hello colleagues, how is all, and what you wish for to say concerning this post, in my view its truly awesome for me.
Here is my blog post - http://mactin2082.webgarden.com/
Thank you, I've just been looking for information about this topic for a long time and yours is the best I have came upon so far. But, what concerning the bottom line? Are you positive concerning the source?
My blog post :: provillus
I am truly thankful to the holder of this web site who
has shared this fantastic piece of writing at at this
place.
Also visit my page :: gather.com
Can you tell us more about this? I'd love to find out more details.
Also visit my homepage: http://theueeak.revelife.com/772220924/provillus-review--this-is-how-to-stop-hair-loss-naturally-by-using-the-provillus-remedy/
Its like you read my mind! You seem to know so much about this,
like you wrote the book in it or something. I think that you could
do with a few pics to drive the message home a little
bit, but instead of that, this is magnificent blog. A great read.
I will certainly be back.
Also visit my site :: http://www.blurpalicious.com
Ahaa, its fastidious dialogue concerning this piece of writing here
at this web site, I have read all that, so at this time me also commenting here.
Feel free to visit my web site :: http://theueeak.healthkicker.com/772210647/picking-out-effortless-secrets-of-swimming-pools/
When I initially commented I clicked the "Notify me when new comments are added" checkbox and now each time a comment is
added I get three e-mails with the same comment.
Is there any way you can remove people from that service?
Many thanks!
my website: coloncleanserreviews.typepad.com
Wonderful blog! I found it while browsing on Yahoo News.
Do you have any tips on how to get listed in Yahoo News?
I've been trying for a while but I never seem to get there! Appreciate it
Review my website: www.addabazz.com
It's remarkable to visit this site and reading the views of all colleagues about this post, while I am also zealous of getting experience.
My page :: http://coloncleanserreviews.typepad.com/colon-cleanse/2012/04/bad-review-of-provillus.html
There is definately a great deal to know about this topic.
I really like all of the points you made.
Review my website: thuvuwwa.skyrock.com
Its such as you read my mind! You appear to grasp so much approximately this,
such as you wrote the e-book in it or something. I think that you just could do
with a few % to pressure the message house a bit, however other than that, this is fantastic blog. An excellent read. I will definitely be back.
Look at my blog http://meridianamagazine.org/ang/blogs/post/69616
For newest information you have to go to see internet and on web I found this web page as a best website
for newest updates.
My web blog male enlargement pills
Quality articles is the secret to interest the users to visit the web site, that's what this web page is providing.
Here is my website sleep aid
What's up to every one, the contents existing at this web page are actually remarkable for people experience, well, keep up the good work fellows.
my site: acai weight loss
Have you ever thought about publishing an ebook or guest authoring on other blogs?
I have a blog based on the same ideas you discuss and would love to have you share some stories/information.
I know my visitors would appreciate your work. If you are even
remotely interested, feel free to shoot me an email.
Also visit my blog ... best hgh
Very shortly this website will be famous amid all blogging viewers, due to it's nice content
Look at my page :: erectile dysfunction treatment
Hmm is anyone else having problems with the pictures on
this blog loading? I'm trying to find out if its a problem on my end or if it's
the blog. Any suggestions would be greatly appreciated.
my site ... increase semen volume
We stumbled over here different website and thought I might as well check things out.
I like what I see so i am just following you. Look forward to looking at your web page repeatedly.
My web-site :: online money making
Appreciation to my father who stated to me regarding this webpage,
this webpage is genuinely remarkable.
Here is my webpage: www.lecancer.net/comment-se-prevenir-contre-le-cancer-du-rein/
Wow, incгediblе blоg ѕtructurе!
Hoω lοng have уοu been running a blog foг?
you maκe running a blоg glance еasy.
The whole look of youг web site іs wonderful, as wеll аs
the cοntent matеrial!
Feel frеe to visit my homepage; raspberry ketone uk
When some one searches for his necessary
thing, thus he/she needs to be available that in detail,
so that thing is maintained over here.
my web site - bleeding hemorrhoids
Thanks so much for this tutorial. I've never used a stripper because I'm afraid of them. On your recommendation, I am pinning this for future reference. I'm off to see your finished nursery!
Warmly, Michelle
Faith, Trust & Pixie Dust
Hi there, I enjoy reading through your post. I like to write a little comment to support
you.
Have a look at my web site: miroverve breast serum
I'm extremely inspired with your writing abilities as neatly as with the structure to your blog. Is this a paid topic or did you customize it your self? Anyway stay up the excellent high quality writing, it is uncommon to peer a nice blog like this one these days..
Feel free to visit my webpage: http://www.bookmarks.creativesoftsolutions.com/
I have stripped and stained many pieces of furniture, for myself and others. Always choose a stripper that was more of a jelled liquid. When I was doing furniture there were no spray strippers and it was a mess to use the jelled stripper but it did take the old finish off. And since the liquid was so thick it stayed where you spread it. I ALWAYS used a polyurethane varnish after I applied the stain. If you lightly stir the contents of the can and DO NOT shake the can you will not have bubbles. I always poured out the varnish into another container but not because of bubbles but because you will pick up the color of your stain in your paint brush as you paint on the varnish and you do not want that color to get in your can of varnish. After I poured the varnish into another container I let it set for five or ten minutes in case any bubbles have gotten in the varnish when I was pouring. Now they may have improved water based varnish but some years ago this was a HUGH no no!! Water base varnish will turn white or very cloudy. It will not protect your furniture from water damage because it has water in it just as the name implies. My living room furniture and kitchen table that I have had for way more than 10 years has never had a coaster used and never gotten a water spot on it. I put a least four coats of polyurethane varnish on each piece and in between each coat is used 400 wet and dry sandpaper and when done it is a smooth as silk and will give you protection for many many years. Hope this answers some of your questions.
Hi, i think that i saw you visited my site
so i came to go back the choose?.I am trying to in finding issues to improve my web site!
I suppose its ok to make use of some of your ideas!
!
Have a look at my weblog ... why not try here
I do not even know how I ended up here, but I thought this post was good.
I do not know who you are but definitely you're going to a famous blogger if you are not already ;) Cheers!
Feel free to visit my weblog: browse around this website
If some one needs to be updated with hottest technologies after that
he must be pay a visit this web site and be up to date daily.
My blog; hop over to these guys
Asking questions are actually pleasant thing if you
are not understanding something entirely, however this piece of
writing presents pleasant understanding even.
My web site: semenax pills
Keep on writing, great job!
My weblog: you could try this out
I'm not sure where you are getting your information, but good topic. I needs to spend a while finding out more or figuring out more. Thank you for excellent info I used to be searching for this information for my mission.
Review my web page: continue reading this
Hi mates, how is all, and what you would like to
say on the topic of this article, in my view its in fact
remarkable in favor of me.
my blog post; redirected here
This piece of writing is genuinely a nice one it assists new net users,
who are wishing in favor of blogging.
My web blog :: www.apsense.com
Can you tell us more about this? I'd love to find out more details.
My weblog - buymaleextra.eklablog.com
Τhank you a lot foг ѕharing this with all folks уou reаllу κnow ωhat you’re speaking approxіmately!
Booκmarkeԁ. Pleasе аddіtіonally vіѕіt my web
sitе =). Wе may have a hуperlink change аgrеemеnt among us
My web-site; free microsoft points codes.how to get free microsoft points codes
Amazing blog! Is your theme custom made or did you download it
from somewhere? A design like yours with a few simple
tweeks would really make my blog jump out. Please let me
know where you got your theme. Bless you
Here is my page; http://www.2Ndhandsale.com/pg/profile/Erica64S
Nice post. I learn something totally new and challenging on sites I stumbleupon every day.
It will always be useful to read through articles from
other authors and practice something from their sites.
Feel free to surf to my site ... maquillar los ojos verdes
I am nο longeг cеrtаin ωhere you're getting your info, but great topic. I needs to spend a while finding out much more or understanding more. Thanks for excellent information I was on the lookout for this information for my mission.
My webpage: vitamin shoppe coupon
I think this is among the most significant information for me.
And i am glad reading your article. But should
remark on few general things, The web site style is
ideal, the articles is really great : D. Good job, cheers
Here is my site :: www.robinsonandhackemer.com
Mulching For Free The Origins Of Topsoil
My blog :: tree nursery milwaukee
The Mayo Clinic reports that most oral, over-the-counter laxatives
are considered safe for pregnant women, although it's also important to read and follow package directions. For pregnant women in need of faster relief from abdominal pain than the six to eight hours required for oral medications, bisacodyl, a generic over-the-counter medication, can safely produce relief in as little as five minutes for patients who take the drug in enema form and 30 to 60 minutes for patients who take the drug as a suppository. If laxatives don't work on the
first dose, pregnant women should contact their doctors for advice before
taking further action.
Here is my website ... getpregnanteasily
Heya! I just wanted to ask if you ever have any trouble with hackers?
My last blog (wordpress) was hacked and I ended up losing several weeks of hard
work due to no backup. Do you have any methods to stop hackers?
Look at my web blog; Www.aspfastforum.com
I savour, lead to I discovered just what I was taking a look for.
You have ended my four day long hunt! God Bless you man.
Have a great day. Bye
Here is my web page: buy clearpores
I blog often and I truly thank you for your content. Your article has really peaked my interest.
I am going to bookmark your site and keep checking for new details about once
per week. I subscribed to your Feed too.
Also visit my homepage :: physical therapy aide jobs in ga
One thing that is fast becoming a great tool for online music promotions is
internet radio. Download the radio becomes important for radio lovers and language learners.
Plus look at creating an account, as many internet radio stations will allow
you to develop and save your own playlists that contains
your favorite songs.
My webpage: click through the up coming document
It seems that lots of individuals are considering working out in the home due to the fact it's substantially less expensive than signing up for a gymnasium.
My homepage; free weights for sale
Hey I know this is off topic but I was wondering if you knew of any widgets I could add to my
blog that automatically tweet my newest twitter updates.
I've been looking for a plug-in like this for quite some time and was hoping maybe you would have some experience with something like this. Please let me know if you run into anything. I truly enjoy reading your blog and I look forward to your new updates.
Feel free to surf to my page; colon hydrotherapy pictures
In most cases they are, but when it comes to updates,
patches, etc to the mmorpgs. A bowler who can consistently pick up his spares can easily hold a 180 average without getting any strikes.
People are now looking to be able to connect to things
like their vehicles through their smart phones, and now Buick has announced the release of their new e - Assist Fuel Effeciency smartphone games.
My website :: kostenlos spielen
Howdy just wanted to give you a brief heads up and let
you know a few of the images aren't loading properly. I'm
not sure why but I think its a linking issue. I've tried it in two different web browsers and both show the same results.
my site buy provillus
It is really a nice and helpful piece of information. I am
satisfied that you simply shared this helpful information with us.
Please stay us up to date like this. Thank you for sharing.
Feel free to surf to my homepage; www.ecotechtimber.com
Appreciating the persistence you put into your blog and in depth information
you offer. It's awesome to come across a blog every once in a while that isn't the same
old rehashed material. Great read! I've bookmarked your site and I'm including your RSS feeds to my Google account.
Take a look at my page; buy pro solution gel
Come prepared with hot dogs and buns, as the chalets are equipped with a barbeque and
shower facilities as well. I know a lot more
music now than before and have changed my tastes.
Quicker to produce and available in lower costs,
they often feature a lot of complex designs.
Feel free to visit my web page - http://toryybhpejh.skyrock.com/3156508058-Take-care-of-Anxiety-With-These-Easy-Ideas.html
This post is priceless. Where can I find out more?
Here is my weblog - semenax ingredients review
I enjoy looking through a post that can make people think.
Also, thanks for allowing for me to comment!
Feel free to visit my website ... eyelasticity
Link exchange is nothing else however it is only
placing the other person's weblog link on your page at appropriate place and other person will also do similar for you.
my web-site; kyle leon somanabolic muscle maximizer scam
Advantageously, the posting is in fact the best topic on curing acne naturally.
we concur with the conclusions and will eagerly look forward
to your long-term updates. Simply saying thanks will likely not just feel enough, for
the amazing quality in your authoring. I
will immediately grab your rss supply to keep abreast of any upgrades.
Here is my blog ... clear pores
When I originally commented I clicked the "Notify me when new comments are added" checkbox and now each time a
comment is added I get four e-mails with the same comment.
Is there any way you can remove people from that service?
Bless you!
Feel free to surf to my web-site vakantiehuizen frankrijk
More Variable data buy stickers is used by most businesses for advertising
their merchandises and services; this has led to the state of California adding
the chemical to its official list of ingredients.
Because of the failure of the Congressional
bi-partisan" super committee" to agree on.
my website; stickers n t-shirts
I wish I'd seen this a week ago! My BF and I just restained all of his moms kitchen cabinets this past weekend..the sanding took FOREVER especially because of the decorative edges, curves, and grooves on the cabinets..we followed the directions exactly being that neither of us had any experience restaining wood. The first coat was applied with a brush (as per instructions), on the second coat we tried something different and discovered that it was much easier, less messy, and more even when applied with a rag..our stain was a 2 in 1 stain and poly but I felt it needed a shiny top coat when we were finished..
Next time..I would def use the spray stripper. Skip the brush, just use a rag. I probably wouldn't use the 2 in 1 stain and seal again either..I just thought it looked unfinished
Hey I know this is off topic but I was wondering if you knew of
any widgets I could add to my blog that automatically tweet my newest twitter updates.
I've been looking for a plug-in like this for quite some time and was hoping maybe you would have some experience with something like this. Please let me know if you run into anything. I truly enjoy reading your blog and I look forward to your new updates.
getting more twitter followers
I'm really inspired along with your writing skills as well as with the structure in your weblog. Is that this a paid subject or did you customize it yourself? Anyway stay up the nice quality writing, it is uncommon to peer a nice weblog like this one today..
Also visit my web-site vakantievilla frankrijk
For latest news you have to pay a quick visit internet and
on the web I found this web site as a best website for
most recent updates.
My site: england france travel packages
I do agree with all of the ideas you have presented on your
post. They're really convincing and can definitely work. Still, the posts are too short for newbies. Could you please prolong them a little from subsequent time? Thank you for the post.
my blog; vacatures ()
If your goal is to acquire stronger, extra strong and improve the form of the corporel, resistance coaching with
dumbbells may be the method to go.
Feel free to visit my blog post: bowflex 552 selecttech dumbbells
It iis based on computer with electrographic sensor technology.
At the same time, web games seemed like the future of gaming, and
we wanted to be a part of it. In this addictive puzzle game, catch that damn fly and avoid those
tricky obstacles.
Also visit my web blog; just click the up coming site
I am really impressed with your writing skills and also with
the layout on your weblog. Is this a paid theme
or did you modify it yourself? Anyway keep up the excellent quality writing, it is
rare to see a nice blog like this one nowadays.
Have a look at my web-site: Slim Body
For more information about this app, visit the official site of MP3tunes Locker.
Or do you need to calm down most of the time due to stress caused by various factors.
We only play major-label releases, or artists that are in the top 50 of the Billboard charts, but why don.
my web blog :: Top 20 Music Weekly
Much like Safari, the Camera app, the App Store and
i - Pod, Game Center has no option to be deleted when editing your
apps. However, every character in the game (even supporting players) should be
presented in this same detail. But what happens when
a player runs out of race tokens.
Feel free to visit my weblog visit web site ()
com provides information on Fishing, Fly Fishing, Fishing Boats, Deep Sea Fishing and.
One of the benefits of fishing is that it is not physically demanding.
Most of the fishable water in the upper river is boulder runs in deep canyons
and it is scenic.
Here is my web site http://www.anre.md/aforum/profile.php?mode=viewprofile&u=140550
I want to return rapidly for the starting to touch on how
they bought the mild electric audio that accompanied the acoustic guitar.
Check out my page: www.getfitnstrong.com
In the event you don't come to feel like intending to the fitness center or consuming healthful meals regular, change to No Xtreme.
Feel free to visit my website; http://www.getfitnstrong.com/bowflex-dumbbells/4-reasons-bowflex-weights...
There is a way to stop the spam on Blog Spot. It's been a while but I have done it in the past. Check your settings. I tried this stripper on a dark wood nightstand and it did a horrible job. It looks like all it took off was the shiny coating on the top. Very disappointed. Yours, however, looks great!
Marsha
Thanks for sharing this with us. I found it informative and interesting. Looking forward for more updates..
I hope to give something back and aid others like you helped me.
Thanks for taking the time to discuss this, I feel strongly about it and love learning more on this topic. If possible, as you gain expertise, would you mind updating your blog with more information? It is extremely helpful for me.
Jang Jobs Ads
Thanks you for this write, i m enjoyed thanks you, masko
I have done a few things using different products. ..I have used this product as well...It is my fave...I usually use the minwax stain/poly mix...though on one project I simply polyd with floor poly...that is an awesome piece...and I always rag apply...not brush
I am looking few tips for buying boardroom furniture & got some useful tips from this post.Thanks for sharing this post.
buy office furniture & executive office desks
I am looking few tips for buying boardroom furniture & got some useful tips from this post.Thanks for sharing this post.
office furniture online & office desk furniture
http://www.sbwire.com/press-releases/vigrx-plus-is-a-100-natural-male-enhancement-pill-that-can-help-achieve-harder-erections-now-with-extra-discounts-364374.htm, http://www.sbwire.com/press-releases/green-coffee-bean-extract-trimming-down-to-their-dream-size-without-breaking-a-sweat-with-green-coffee-bean-max-now-with-extra-bottle-offers-363051.htm, http://www.officialwire.com/pr/raspberry-ketone-ultra-the-new-improved-formulation-of-raspberry-ketone-extract-is-now-available-to-help-with-weight-loss-more-effectively/, http://www.emailwire.com/release/137544-Proactol-Plus-Clinically-Proven-Fat-Binder-Now-Offers-a-Special-Discount-Of-60-For-Its-Valuable-Customers.html, http://www.sbwire.com/press-releases/total-curve-breast-enhancement-program-has-shown-noticeable-results-during-clinical-trials-358988.htm, http://www.officialwire.com/pr/pure-gcb-max-green-coffee-bean-max-has-scientifically-proven-effective-to-boost-metabolism-reduce-appetite-and-help-to-lose-weight, http://www.officialwire.com/pr/garcinia-ultra-the-new-weight-loss-supplement-containing-60-hca-claims-to-reduce-weight-quickly-and-effectively/, http://www.officialwire.com/pr/52-fast-formula-fasting-supplement-has-clinically-proven-effective-to-control-the-hunger-cravings-during-fasting-days/, http://www.emailwire.com/release/136966-Garcinia-Ultra-The-new-weight-loss-supplement-containing-60-HCA-claims-to-reduce-weight-quickly-and-effectively.html,
Furniture are designed to make you feel like you're in the office when you are at home is called home office furniture.
office refurbishment london & buy office furniture uk
http://www.officialwire.com/pr/revitol-eye-cream-is-the-new-formula-introduced-by-revitol-company-to-effectively-work-against-dark-eye-circles-now-with-extra-bottle-offers/, , , http://www.sbwire.com/press-releases/zetaclear-provides-a-2-step-solution-to-get-rid-of-unsightly-nail-fungus-now-available-with-1-extra-bottle-offer-365170.htm, http://www.officialwire.com/pr/clearpores-acne-cleansing-system-offers-the-3-step-natural-solution-against-the-acne-problem-now-with-huge-discounts/, http://www.officialwire.com/pr/wartrol-genital-warts-relief-solution-shed-warts-caused-by-hpv-easily-eliminate-every-type-of-warts-now-with-free-bottle-offers/, http://www.officialwire.com/pr/5-htp-max-the-natural-supplement-has-clinically-proven-highly-effective-to-aid-the-weight-loss-now-with-extra-bottle-offers/, http://www.officialwire.com/pr/saffron-extract-select-has-found-highly-effective-yet-the-safe-in-the-clinical-trials-to-shed-8-pounds-within-weeks, http://www.emailwire.com/release/136566-Revitol-Stretch-Mark-Cream-Reduce-the-Appearance-of-Existing-Stretch-Marks-in-Few-Weeks-Now-With-Extra-Bottles.html
Post a Comment
Your comments mean the world to me - so please leave one! It makes my day! I read and try to respond to each one!
Didn't get a response? Check out my tips here to link your email and blog back to your profile.