Welcome to Frugal with a Flourish!

Enjoy your time here! Don't miss a post by getting email updates any time there is something new. You can also get updates through Google Friend Connect or follow me on Facebook or Twitter to get the latest info and see all the things that inspire me!

Showing posts with label Decorating Obstacles. Show all posts
[ | Posted in | Add Comment | ]

Hey guys!  Sorry for the extended absence – we have had a ton of family and friends rotating through and I haven’t had any time to hop on the computer.  I haven’t even been on Pinterest for weeks until today!  And I know I owe you guys some updated pics of the Lil Man – stay tuned for some of those soon!

However today I am back with one of my favorite bloggers – Leslie @ The Design File.

Leslie writes a fantastic blog all about design trends, ideas, and advice.  I love her blog because she writes about such great topics including DIY tips (check out her article on tips for choosing a chair to reupholster),

features fantastic home tours,

and great products and shopping advice

Last year she did a series on 30 days of design ideas for under $30 that you just have to read – I loved this one! 

Leslie also does great thoughtful commentaries on design trends – and she has been kind enough to share one of these with us today!  So with out further ado – here is Leslie!

~~~~~~~~~~~~~~~~~~~~~~~~~~~~~~~~~~~~~~~~~~~~~~~~~~~~~~~~~~~~~

Over at The Design File we’ve been talking recently about design trends and my favorite discussion has been about the use of little fur rugs on sofas, ottomans and other furniture pieces.

I love this trend and I remember that the first time I noticed it is when my mom threw a small IKEA sheepskin rug over an ottoman several years ago. It looked fantastic.

Now, I see them everywhere.

The photo at right is a pre-Design Star room from winner Emily Henderson.

Henderson, who now is the host of the show Secrets from a Stylist, loves doing this.

Below you’ll find two more of her rooms.

The one on the left is from Secrets from a Stylist and was from an early version of the room. I don’t think the final design included the fur. The one below right is another pre-Design Star room that Emily submitted as part of her application to be on the show. I like it better!

fur on chairs - Emily Henderson

But it’s not just Emily.

Sherry & John over at Young House Love have a little fur rug thrown over an ottoman in their living room. They’ve actually used these little pieces all over their old and new houses.

John & Sherry - Young House Love - sheepskin-1

I found the beautiful dining room below at Apartment Therapy from a 2010 post about how faux fur rugs are showing up all over dining room chairs.

I wonder what you have to do to get the cushy chair for dinner?

fur on dining chair - Apt Therapy

Raina of Alberta, who has a blog called Raining Sheep and posts photos on Flickr, has sheepskin over the sofa in her cool, modern living room, pictured below.

Raina has used the throw the look with a cow-hide rug too. That may be too much animal fur/print for me but it seems to work well here.

Raina living room raining sheep

What do you think of this trend? I love it but will it be over soon?

~~~~~~~~~~~~~~~~~~~~~~~~~~~~~~~~~~~~~~~~~~~~~~~~~~~~~~~~

Leslie – I think this is a trend that will keep making an appearance time and time again.  Furs have been around since the dark ages, and while then they were a necessity for warmth, they still provide the ascetic features of creating a cozy feeling.  I think this is one that we will see continue, especially as the weather turns cooler every year!  The size and shape may vary – but I think the fur look will always be with us!

So what about you?  Do you think fur as a design trend is one that will continue?  Leslie and I would love to know your opinion! 

[ | Posted in | Add Comment | ]

Hey guys!  I am back again with another great guest post for you guys from one of my dear bloggy friends Colleen who blogs at Mural Maker & More. 

Colleen is a fantastic artist and painter who creates the most beautiful murals! Here are some of her works!  Love this trey ceiling!

And this beautiful nursery!

But she is also into DIY and decorating too!  Like this outdoor tray table!  So cute! 

So without any further ado – here is Colleen with some great ideas for decorating a room with paint.

~~~~~~~~~~~~~~~~~~~~~~~~~~~~~~~~~~~~~~~~~~~~~~~~~~~~~~~~~~~~

Hi! My name’s Colleen and I’m so excited to be here at Frugal with a Flourish while Jess’ ‘lil man’ enjoys his Welcome Home party. My blog is called Mural Maker & More. ‘Mural Maker’ because that’s what I do - I make murals. And ‘More’ because I love all things DIY and decorating.


I paint murals for any room, but my all-time favorite are babies rooms. Girls or boys, it doesn’t matter. Or sometimes both!


Safari Mural for baby boy


Here’s the thing - people think murals are really expensive. And they can get pricey, especially when the family is expanding. So I found some decorating ideas so you don’t have to hire an artist!


I know, I know - a lot of you are probably saying, “I can’t even draw a stick figure”! No worries! A little bit of creativity and thinking ‘outside the box’ and you’ll have a dream nursery you painted yourself!


Baby Boy Decorating


How about a graphic alphabet wall mural painted in subtle shades of the wall color? Looks a little tricky, doesn’t it? I’ll tell you how I’d paint this if someone hired me. I’d print off letters, maybe in different fonts, take them to a printer that prints oversized copies (like a blueprinter). Then I’d transfer some letters, paint them all in one color, then transfer some more, and paint them in another color.


No freehanding required! Now, you could also cut stencils if you wanted but, to me, that’s a lot of extra work. There are a lot of straight lines where you could just use good ol’ painter’s tape after you’ve marked your transfer.


BabiesBassinets.com

Here’s an idea - forget painting the walls and paint the ceiling! How fun is this?!? Then you’d have all of your wall space available to change as you please.


BabyBedding.com


Or maybe paint just the corners of the room.


KronBaby2


Ok, maybe your theme isn’t jungle animals, but you could still paint a trio of silhouettes and create an awesome focal area. These could be painted on canvas and hung, but I wouldn’t hang them over the crib then.


These are just a few ideas to spark your creativity. The cool thing about paint is, if you don’t like it, just paint over it! Not to mention, paint is really affordable. (I paint my murals with good ol’ craft paint - the 99 cent variety!)


I want to thank Jess for letting me hang out with all of you today. Jess was one of my very first blogging friends and has been incredibly supportive so I’m just thrilled to pitch in while she enjoys some Mommy & Me time.

~~~~~~~~~~~~~~~~~~~~~~~~~~~~~~~~~~~~~~~~~~~~~~~~~~~~~~~~~~

Great ideas!!!  Thanks so much Colleen for giving us some ideas!  And make sure you hop over and check out Colleen’s blog and give her some love – and if you ever wanted to learn how to paint anything – you have to make sure you check out her step by step painting tutorials! 

[ | Posted in | Add Comment | ]

Update: The Nursery is finally finished!  Hop over and check out the full reveal!

Thanks for letting me vent the other day!  I appreciate your support and don’t worry – I will still be around!  I just don’t know how to stay away!!  I know you guys are probably looking forward to seeing some of the progress that we are making on the nursery!  Well – we haven’t gotten a whole lot finished but we do have a basic shell together that I wanted to share with you guys as a “before” and show you what I was planning! 

So without further ado – here is what the nursery looks like now!   As you can see it is pretty basic.  And pretty small! 

DSC08055

Yep so – basically – all that is going to fit in this room is a crib, my cushy comfy rocking chair and ottoman and a dresser.  You can see my pile of kids books I have started collecting in the floor there.

DSC08059

The way I look at it – if the Lil Man showed up today – we would have a place to put him!  However – I am planning on getting a few things done over the next 10 weeks before he is supposed to officially arrive!  Wanna see my to do list?  Check it out!

DSC08056

And on this side of the room….

DSC08060

So the hubby is already in the process of stripping the dresser down and restaining it darker to match the crib.  We are also going to install the wall shelves so I can create the book wall of my dream nursery over on the wall next to the window.  In hindsight – getting my heart set on that look was brilliant since there is so little room in the room. 

And yes … the chair is technically too big.  But I don’t care!  I love that thing and I already spend a lot of time there resting and reading to the Lil Man.  It is awesome it glides and swivels – so we can easily spin it to get in and out of the closet.  I am not too worried about it blocking anything. 

DSC08063

So stay tuned over the next couple weeks to see how this unfolds!!  I am looking forward to sharing the progress with you guys!


[ | Posted in | Add Comment | ]

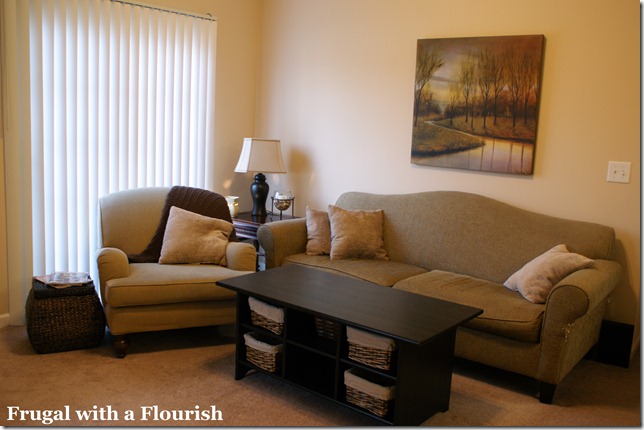
My long time followers may remember when I first posted my living room to do list back last June.  Well, I started with a new coffee table, got a new lamp and added some art.

Here was my most recent update after adding some new baskets for our coffee table.  The only thing left on the list was to find a replacement for my ugly vertical blinds!  Blech!

Well I have to say the solution for these ugly blinds has been a long time coming.  I first came up with an idea last summer.  And then I bought everything for it in November.  And then I got into the first trimester and the holidays – so nothing got done then.  And then I thought I lost some pieces.  And then I found everything and by then it was March!  So I hope you guys are finally ready to see the result!  Behold my new sliding fabric panel solution! 

DSC08017

Ack!!  I love it!  The pictures really don’t do it justice!  The fabric is a different color than the walls – I promise!! 

This was set up using Ikea’s Kvartal system and I chose their triple rail system.  My reasons?  One – I wanted to have a solution that allowed light in but also keep up the privacy.  Our sliding glass door faces our neighbor’s sliding glass door so privacy is important!  Two – I wanted something that we could still slide to one side to access the sliding glass door as well. 

DSC08032

The Kvartal system offered all of that.  But I just wasn’t falling in love with the fabric options that they had at Ikea.  So that is when I decided to get really creative.  I cut up a set of cheapo Wilma panels and used those to make my “back layer” of sheers.  You can see there are three of them back there.  Just enough to let in plenty of light during the day but keep the privacy! 

DSC08020

Then I made my front panels out of a blogger’s best friend – a drop cloth!  I can spread out both layers of the front panels to cover the window completely and they are pretty opaque at night.  

DSC08024

Here is a close up of the fabric!  I really am loving the drop cloth!  It gives it that perfect (and cheap) linen look. 

DSC08035

So while the fabrics are fairly traditional – the application and structure of the drapes and the hardware is a little modern.  It totally fits my “little bit modern and a little bit traditional” vibe! 

DSC08014

Now – cause I can’t leave well enough alone – I am thinking about adding a subtle embellishment on the drop cloth panels.  What do you guys think about a faux nail head treatment?  Or some sort of trim?  I am back and forth on it myself so I would love for you guys to weigh in! 

Linking this up to

Show and Tell with Becca @ Blue Cricket Designs
Whatever Goes Wednesday with Michelle @ Someday Crafts
Make it Yours Day with Carolyn @ My Backyard Eden
Hooking up with HOH with Allison @ House of Hepworths
Transformation Thursday with Gina @ The Shabby Chic Cottage
Metamorphosis Monday with Susan @ Between Naps on the Porch
Get Your Craft On with Kim @ Today’s Creative Blog

Tutorials & Tips Tuesday with Beth @ Stories of A to Z

[ | Posted in | Add Comment | ]

I know I talked with you guys about gallery walls last week and we debated symmetrical vs. asymmetrical arrangements.  And I left you guys hanging about where I was going to hang things for the gallery wall that I was working on.

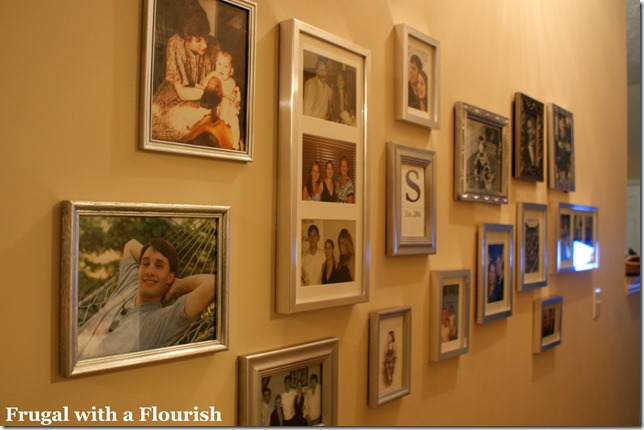
So if you were dying to know how it came out, here is my gallery wall!  Asymmetrical of course!   Sorry for the craptastic pictures …. it is a little difficult to take pictures of a hallway!

DSC07899

I have all silver frames – which not only gives it a cohesive look but also brightens up the hallway considerably.

DSC07902

I did a grouping of family pictures – which is really important to me.  Our family all is at least 5 hours away and I really wanted to have everyone where I could see them every day.  While we can’t have our family together – I can have them up on the wall together.  All in one place.  And that makes me happy on a level that is somewhat hard to understand.

DSC07906

I also wanted to show you some of my favorites!  I love this one of my hubby when he was three!  Isn’t he adorable!

DSC07907

My college roommate drew this picture of my oldest cat.  I love it! 

DSC07911

And this one is my favorite!  I found this behind another picture in an album my mom brought up a couple weeks ago.  It is a picture of me and her – and I just love it!

DSC07915

I am really loving the whole thing.  Just walking by the smiles and memories warms my heart.  And it is right outside the baby’s room – so I am excited for him to get to see and love all the memories too! 

And that is as mushy as I think I should get with you guys on a Tuesday night!  So what about you?  Do you have a wall of family photos in your house?  Does it make you grin every time you walk by too?  I wanna know!   Oh and if you want to see even more Gallery Wall inspiration – hop over to the Inspired Room and join in on Melissa’s Gallery Wall party!

[ | Posted in | Add Comment | ]

So on my to-do list is a gallery wall for the hallway.  And like a lot of things on the list, it has been on there for at least 3 months.  So I was super excited when Melissa @ The Inspired Room announced she was having a link party next week on gallery walls.  Sometimes it just takes a deadline to get me going.  So I will be ready next week! 

So I got to looking for ideas and came up with a question.  What do you prefer in gallery wall – do you prefer them symmetrical or asymmetrical?  I thought I would share a couple examples of each and let you guys debate amongst yourselves what you prefer!  So here we go!

This little corner really works with an asymmetrical arrangement don't you think?

Wall Display eclectic family room

So this room feels a little staged – but the organized side of me enjoys the different patterns lined up precisely behind the couch!

Lovely Living Room contemporary living room

This random layout is both cute and quirky at the same time!

family photo wall eclectic staircase

But this neat grouping in the bedroom makes me feel organized and at ease.

wall decor inspiration set 1

A traditional living room with an asymmetrical arrangement can be inspiring as this Restoration Hardware room shows.

Restoration Hardware traditional living room

Or you could go all out symmetrical and still keep it traditional like these wood cuttings.

warmington north traditional living room

This somewhat random nautical layout does seem beachy and laid back!

Marcelo Brito - Sao Paulo - Brazil contemporary living room

But then again – keeping it neat and linear like in this bedroom is also calming don’t you think?

Beach Condo Renovation eclectic bedroom

Or maybe you want to split the difference? The shelves in this room are very symmetrical but all the photos are different sizes which still gives it a little bit of an abstract feel.

NJ Residential contemporary living room

So there you go – where do you land?  Symmetrical, asymmetrical or a little of both!  I wanna know!  As for me?  Well you guys will just have to wait for next week to see where I decide to take my stance!  And don’t forget to head over to Melissa’s next week for the gallery wall party!  I will see you there!


Related Posts with Thumbnails