Welcome to Frugal with a Flourish!

Enjoy your time here! Don't miss a post by getting email updates any time there is something new. You can also get updates through Google Friend Connect or follow me on Facebook or Twitter to get the latest info and see all the things that inspire me!

Showing posts with label DIY Tips. Show all posts
[ | Posted in | Add Comment | ]

So for today – I have a tutorial on how to make a Tricycle Diaper Cake.  However, let me start by saying this isn’t something that I made.  This is something that was given to me at one of my showers.  But it was so amazing that I took it apart piece by piece to make sure I would 1.) be able to replicate it and 2.) share it with you guys! 

DSC08186

So here is what you will need as far as ingredients go! 

  • Diapers – at least two jumbo packs
  • Lots of big rubber bands
  • 1 1/2 inch ribbon
  • 1 paper towel tube
  • 2 napkins
  • 1 receiving blanket
  • 1 pair of baby socks
  • 1 zip tie
  • 1 pacifier
  • 1 bib
  • 1 dishwasher basket
  • 1/4 inch ribbon
  • 1 cute cuddly friend (love the giraffe!)

To start – I would make the “tires” first.  Basically – you layer each diaper on top of one another into a tight circle.  One needs to be larger than the other two and the size is something that you might need to judge for yourself based on how big you want the cake.  This one had 25 in the front tire and 18 in the back.

DSC08199

I found it easier when trying to put it back together to get it started like this and get the rubber band around and then shift them into place.  You will need to leave a hole in the center.  Once you get the tire finished you wrap a piece of ribbon around and secure it on the bottom. 

DSC08197

Next you need to make the back axel.  Using the paper towel tube, you need to wrap a napkin around the end of the tube and then put a diaper around the middle.  Then you use a couple of rubber bands and secure the dishwasher basket around the axel. Slide your two back tires on and you are done with that portion of the trike.

axel

Next you have to make the handlebars.  Straighten a hanger and then bend it into a u-shape.  Bend the ends down and tape them down so there are no pokey ends.  Wrap the receiving blanket and secure both the bottom of U and the ends with rubber bands.  Slide socks over the ends.  You can secure the socks with rubber bands and then roll up the ends to cuff.

handle bars -1

Next – thread the hanger through the front tire and overlap the handlebars.  Secure with a zip tie.   Once secured, use a rubber band to secure a pacifier and ribbon on the front.  Tie a bow to hide any evidence of rubber bands.

handlebar

Lay a bib down as your “seat and wrap around the handlebars. 

DSC08187

To connect your front and back pieces – you need to thread a ribbon through the back and front tires.  Get it pretty tight to ensure it doesn’t fall apart or the front wheel doesn’t fall over.  Set your fuzzy friend on top and you are ready to go!

DSC08186

Again – I can’t get over how adorable this was and it was such a great gift.  The other great thing to do for the mom-to-be is to include a little note in the card that tells the size of the diapers and the type of pacifier. 

So what do you think?  Isn’t this just adorable!  I love it!  Would you make it for a shower?  I wanna know!

Linking this up to

Metamorphosis Monday with Susan @ Between Naps on the Porch
Tip Me Tuesday with Laurie @ Tip Junkie
Get Your Craft On with Kim @ Today’s Creative Blog
Tips and Tutorials Tuesday with Beth @ Home Stories A2Z
Transformation Thursday with Gina @ Shabby Chic Cottage
Hookin up with HOH with Allison @ House of Hepworths

[ | Posted in | Add Comment | ]

Whoa …. how are we already through May?  And how is it that I am supposed to have a baby in 5 weeks?  It blows my mind!  Well – before we get too far into into June I thought I would wrap up my favorites from the past month - both here and from around the web! 

DIY and Crafty Goodness

Since we are in the home stretch for getting the Lil Man here I worked on a lot of projects for the nursery!  For starters – I made some custom name art for his room.  And yep I did two versions – one for the blog and one with his real name.  Because I am crazy like that! 

Next I made a custom crib skirt for our crib.  I love the bright colors we have going on in the nursery!

Finally – we got our dresser refinished!  I still can’t believe the before and after on this one!  I am so in love with with new hardware!

before and after

Inspirational Ideas

I shared some great ideas with you guys on how to make sure you won’t miss out on decorating up for your ceiling.  I love this idea for using a little molding on the ceiling.

From Around the Web

I love this monogram pillow tutorial from Jen @ Scissors and Spatulas!  No fancy cutting machines here – just a little old fashioned freezer paper!  You are going to love this one!

Photo via Scissors and Spatulas

This was too cool – “paint” your own vintage blue mason jars!  I have one of the vintage ones and I am always on the look out for more while I am thrifting.  But these are a great way to reproduce the look for a fraction of the price and with out all the hunting!  Celeste @ My Greenbrae Cottage was responsible for coming up with this great idea!

Photo via My Greenbrae Cottage

This one is another great idea that totally made my day!  Vivienne @ The V Spot shows us how to spray paint tissue paper!  Brilliant!

Photo via The V Spot

And finally – if you ever wanted to know how to reupholster an ottoman Jessica @ Decor Adventures will show you how to do it!  This is a fantastic tutorial!

Photo via Decor Adventures

So there you go!  Those are my favorites from the past month!  What about you?  Have a favorite you want to share?  Feel free to post it on my Facebook page – I love seeing all your great ideas and favorites there! 

[ | Posted in | Add Comment | ]

Update: The Nursery is finally finished!  Hop over and check out the full reveal!

Well we finally got one of our big to-do’s done for the nursery!!  The dresser has been refinished!  Here is what she looks like now and the rest of the post is how we got there.

DSC08297

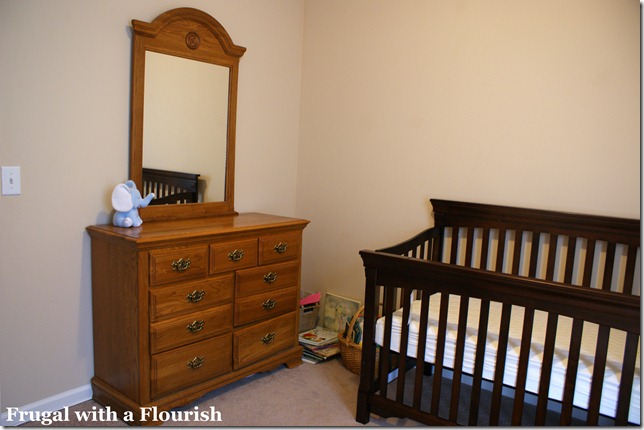
If you remember from my “base” nursery post – the dresser was originally part of our guest bedroom suite.  But there was going to be no room for it in our guest bedroom/office.  So I decided that I wanted to keep it in the nursery and use it as our dresser/changing table.  This served both the purpose of giving it a home in our house and saved quite a bit of money in our nursery budget.  Here is a before picture of the dresser. 

I have loathed this dresser for almost 5 years – surprisingly the same amount of time that this dresser has lived in my house.  I am not a big “oak” fan – so after we picked out the crib – I knew I wanted to strip this puppy down and restain it darker to match the crib.  Add some new hardware and it would be perfect.  But I have always heard that stripping was such a pain. 

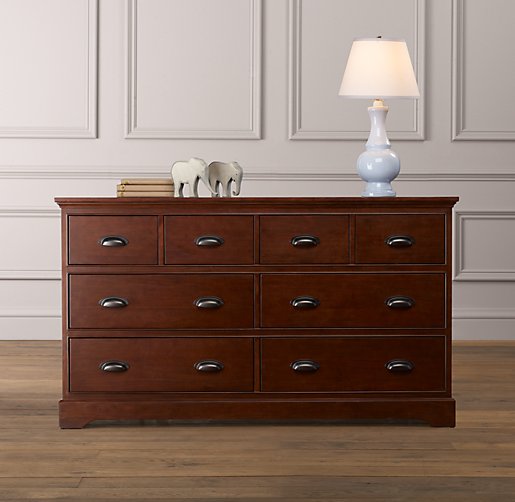
People – I am here to tell you that stripping and restaining is not as bad as what you may have thought.  In fact – having refinished a piece by painting it and refinished a piece by stripping and restaining, I prefer stripping and staining.  Now I didn’t know that at the start of this journey, so I had to get a good inspiration piece to help get the courage up to take on the project.  The piece I found for this redo was this dresser from Restoration Hardware. 

Now the dresser from Restoration Hardware runs $1249.  Loved the color and the hardware was perfect!  I was hoping that we would get this project done for significantly less than that.  And we did – our cost for this redo was $50.  So here is how we did it!

First, the hubby stripped each of the drawers and the dresser frame itself with Citri-strip Spray stripper.  Below is a pic of the product and a drawer that had already been stripped.  This stuff was amazing (and I am not being compensated in anyway to say that – we just loved the product)!  It doesn’t smell chemical at all and was perfect for getting in the crevices of the drawers and trim on the dresser. 

DSC08115

Once you spray it on – you leave it there for awhile while it loosens the old finish.  Then you just start stripping it off with a plastic scraper. You can see below how easy it comes off! 

DSC08118

Once all the stain was off – the hubby sanded everything down and we started staining.  We used Cabot Stain in Maple Leaf which is one of the custom colors that you can get mixed at the store. 

DSC08177

Once the first coat got on – I was really excited about how good it was looking. 

DSC08179

Another coat of stain and then a coat of poly and we ended up with our final product.  Here she is again below!!

DSC08277

Loving the hardware?  Yeah me too!  The cup pulls were the perfect addition and I got them for a steal on Amazon.  $2.19 a piece which is WAY less than what they were charging at the hardware store.

DSC08251

I love love love it!  And it is a perfect match to our crib!

DSC08267

The nursery is coming together very quickly!  I think I should be able to share with you guys within the next couple weeks!  I have a few more projects to finish and then it will be ready for its reveal.  Of course – hopefully that will be before Lil Man makes his appearance! 

So tell me – have you ever stripped or restained anything?  Was it as hard as you thought it would be?  If you haven’t – do you think you might try now?  I wanna know!

Linking this up to

Metamorphosis Monday with Susan @ Between Naps on the Porch
Get Your Craft On with Kim @ Today’s Creative Blog
Tutorials and Tips Tuesday with Beth at Stories of A to Z
Show and Tell with Becca @ Blue Cricket Designs
Transformation Thursday with Gina @ The Shabby Chic Cottage
Weekend Wrap Up Party with Jen @ Tatertots and Jello
Saturday Nite Special with Donna @ Funky Junk Interiors

Before and After Party with Sarah @ Thrifty Decor Chick

Furniture Feature Friday with Miss Mustard Seed @ Miss Mustard Seed

[ | Posted in | Add Comment | ]

I love hydrangeas!  And for some reason I have had them on the brain.  So I decided I wanted to do a quick wreath with some this weekend.  Here is what I came up with – the rest of the post is how I got there! 

DSC08235

Full lush faux hydrangea stems are normally pretty pricy.  Never fear – I just picked up a couple cheap less fluffy stems at the dollar store and cut them apart with some wire trimmers.

DSC08211

Next I took a couple of them and bunched them together to get that big full look that I love.  Isn’t that a better?!?

DSC08214

Then I added in a little bit of the greenery to give it some more texture and covered a cardboard initial with a little moss!  I love the way it came out!

DSC08232

It makes me smile!  Ah – what I wouldn’t give for a big ole bush of these outside my door!

DSC08234

One more and then I will stop I promise!

DSC08239

So what about you – is there a flower you would just love to have at your house?  Or perhaps you are lucky and you already have that flower in your garden? I wanna know!

Linking this to

Metamorphosis Monday with Susan @ Between Naps on the Porch
Tutorials and Tips Tuesday with Beth @ Stories of A to Z 
Tip Me Tuesday with Laurie @ Tip Junkie
Get Your Craft On with Kim @ Today’s Creative Blog
Hooking up with HOH with Allison @ House of Hepworths


[ | Posted in | Add Comment | ]

Update: The Nursery is finally finished!  Hop over and check out the full reveal!

I am slowly but surely getting all my to-do’s for the nursery done.  And one of those was to get a crib skirt made for our crib.  So here was the before. 

Now – the reason I decided to make a crib skirt was because I couldn’t find any bedding that I liked.  I looked forever trying to find something in my inspiration colors.  And when I couldn’t find anything premade – I started looking at fabric.  Luckily – I found the adorable “Wild and Wooly” fabric at Joann’s and I decided to make some of the bedding myself.  The first thing I started was the crib skirt.  My plan was to just do a simple straight skirt all the way around that way I wouldn’t need a pattern or anything fancy!

For starters – I ironed all the fabric and used just a smidgen of starch to keep it a little crisp.  I find that helps with getting straight even cuts.  Then I cut out plain piece of muslin to the size of our mattress.  Which was really simple because we got the mattress on Amazon – so I just looked up the dimensions there.  Way simpler than measuring it myself!  I added a half an inch on either side to use for my seam.  Next, I measured from the bottom of the mattress to the floor to figure out how long my skirt pieces needed to be (at the highest level – that was 16 inches so I added an additional 1 inch so that when I hemmed either side I had a 1/2 inch seam.  Then I ran into a problem. 

DSC08155

I wanted the stripes to hang vertically – but the fabric was only 43 inches wide.  Which as you can see is just a smidgen too short for my piece of muslin on the long side.  So I decided to stich on some additional fabric on either side and then do pleats to “hide” my seams.  Of course that meant I needed to make it longer than necessary to make the pleats.  I decided to do three pleats – one in the middle and the one on either side.

DSC08147

To do each pleat – I picked a mid-point and and overlapped the fabric by an inch on either side.  Pretty simple – but it works! 

DSC08152

See how it makes a nice pleat?

DSC08153

Once I got all the skirt pieces cut and laid out – I hemmed the three sides that wouldn’t be attached to the base muslin.  Next, I attached them to the muslin.  This is how the final piece looked.

DSC08162

The final product?  Check out the close up below.  I love it!  I will show you the “whole” thing once we get the nursery totally finished!  Right now the whole room looks like a baby shower threw up in there – I have stuff everywhere! 

DSC08172

If you are thinking about making a crib skirt – I would say go for it!  It is pretty simple – the whole thing is just straight seams so it is a really an easy beginner sewing project!  

So what do you think?  Will you try one out on your own?  Are you loving the colors as much as me?  I am sooooo in love with them!

Linking this to

Tutorials and Tips Tuesday with Beth @ Stories of A to Z
All Things Inspired with Robin @ All Things Heart and Home
Make it Yours Day with Carolyn @ My Backyard Eden
Transformation Thursday with Gina @ The Shabby Chic Cottage
Metamorphosis Monday with Susan @ Between Naps on the Porch
Tip Me Tuesday with Laurie @ Tip Junkie

Get Your Craft On with Kim @ Today’s Creative Blog

[ | Posted in | Add Comment | ]

Update: The Nursery is finally finished!  Hop over and check out the full reveal!

So way back in when I went thrifting with some other mid-Tennessee bloggers in March – I found the cutest little name plaque at Goodwill.  Of course – it was a little girly – but I figured for $3.50 I could work with that!  And it had the right number of letters for our Lil Man’s name – which was even better.

goodwill sign

I had an idea of what I wanted to do with it – and the first step was to change out that mat from pink to a different color.  Ever wondered if you can spray paint one of those?  Well the answer is Yes!

spray painted mat

I still had a little of my Bahama Sea Blue spray paint from Krylon and that blue went well with the other colors in the nursery.  So I sprayed away and got a nice even color going on it!  I think the blue looks much better than the pink! 

Next I picked out some cardstock in my nursery colors from Hobby Lobby.  I decided to use a base chocolate color and then “layer” on the bright colors on top of that.  After I picked out a font I liked (Georgia if you are wondering), I cut the letters out with my Silhouette machine.  Then I decoupaged them on to some plain white cardstock.

Word art 1

Once I got the base letter color on, I added the brighter color on top – creating a shadow look.  I really like how it gives it a little depth.

Word art 2

Ha!  Thought I was going to slip and revel our Lil Man’s name?  Nope – I actually made a blog version and a “real” version!  Sorry guys – but that one is going to stay private!  I will just switch them out for when I post pics of the Lil Man’s room!  :)

So anyways – here it is all together!  I love the way it looks!

Nursery Art Final 2

And yep we are using the crib for storage of clothes and blankets!  That is cause hubby is working on getting that dresser refinished!  Hoping to have that to show to you guys soon!

Nursery Art Final 1

I am going to hang it back behind the crib!  Should be the perfect addition for back there!  Stay tuned for more updates soon!  Did you work on anything fun this weekend?  Lemme know!

Linking this to

Metamorphosis Monday with Susan @ Between Naps on the Porch
Thrifty Treasures with Rhoda @ Southern Hospitality
Get Your Craft On with Kim @ Today’s Creative Blog
Tip Me Tuesday with Laurie @ Tip Junkie
Show and Share Day with Chris @ Just a Girl
Tips and Tutorials with Beth @ Stories of A to Z
Creative Collage with Denise @ The Cottage Chick

Spray Paint Party with Sarah @ Thrifty Decor Chick


Related Posts with Thumbnails