So I was browsing around online the other day and came across the cutest fabric covered notebook and really wanted it for Blissdom. But it was like $29. Now I might drop $29 on some cute shoes, but not a notebook.
Nevertheless, I could not get this notebook out of my head… so I just decided I would make one. Couldn’t be that hard, right?
Behold – I give you my Bloggy Conference Notebook! I looooovvve it!
Lemme break it down for you. (Please accept my apologies in advance for the picture intensive post.)
So for starters, here is what you will need.
- An el cheapo 1/2” three-ring binder - $1.79
- Fusible batting (I got the craft size variety 50% off at Jo-Ann’s) -$3.49
- Stitch Witchery (or something similar) – already had it
- Your choice of fabric - $2.99 for a yard on clearance
- Some cute ribbon - $1.00
- A glue gun
Ready? Ok – so for starters you need to cut out the batting to where you have enough to wrap around the binder with about an inch to a half an inch at the top.
Once you have it centered, cut a small notch in the middle of the top and the bottom.
Get your glue gun ready and put a bead of glue down the spine of the notebook.
Once you get that glued down take your two notches that you cut at the top and squish (technical term here) them in underneath the ring portion on the binder and glue in place. Do the same for the bottom.
Glue the back of one side down, and pull over and glue to inside. (Don’t you just love my bananas in the background?)
Now tuck your top layer underneath the notebook. Then make a nice small bead of glue across the bottom of the notebook and fold your top layer over top and hold until dry.
(Notice that your hand looks very scary through the camera and that you need to invest in a mani prior to shaking all those hands at the conference.)
Complete same thing with the top and stop to admire work and take pictures.
Repeat process with other side. Realize when starting folds that you have run out of glue. Grab brand new bag to refill glue gun. Epic fail ensues when the size you bought is for regular sized glue guns and not your uber-cute mini gun.
Attempt to use fabric and craft glue. Another epic fail.
Decide to just make it work (it is fusible right?) and skip to fabric step. Cut out fabric needed the same way you did the batting. (I love this fabric! I found it on clearance at Hobby Lobby!)
Shove ends under ring part of binder. Vow to glue gun in place once you can get to the craft store tomorrow. (Like that scratch on my hand? Got that breaking up a real cat fight here at the house.)
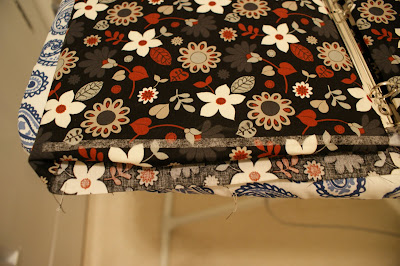
Tuck top edge under again like before.
Move to ironing board. Set iron onto wool function. Hope plastic binder doesn’t melt. (My sincere apology for the pattern overload from the book and my ironing board cover).
Once front and back have been ironed and you can feel that it has “fused” to the batting, stand back and admire. (Say silent prayer of thanks that so far nothing has melted or caught on fire.) Fold up corner edges like you would wrapping paper.
Cut stitch witchery to length of bottom of one side of the binder.
Fold up fabric and iron down.
Continue for all edges. Answer call from your momma. (Wait – no that was just me.) Cut out ribbon to length of binder bottom. Cut out another piece of stitch witchery. Cover up seam with ribbon and iron in place. Do for all for sides. (Start to get crick in neck from talking to momma while ironing and operating a camera.)
Ta da!!! Look how cute it is! I love how the ribbon makes it look “stitched”!
I added some pages to hold all the business cards I hope to get at Blissdom and will add some notebook paper in too! I am so excited. I may cut out some more fabric to make some inner pockets for pens and such (using my stitch witchery and some of that cute ribbon of course).
So there you go! Yeah – I know I don’t have a picture up on my blog, but if ya'll see a brunette walking around with this book in Nashville – come up and tell me hello!!

I'm linking it up this week!
It's So Very Creative Party with Cheri @ It's So Very Cheri
Made it for Monday Party with Cindy @ Cottage Instincts
Make your Monday Party with Kim @ Twice Remembered
DIY Day with Kimba @ A Soft Place to Land
Get your Craft On with Kim @ Today’s Creative Blog
Penny Pinching Party with Jen @ The Thrifty Home
The DIY Show and Tell with Roeshel @ The DIY Showoff


13 frugal friends said ...
This is great....I need to make a recipe book for my newly married daughter, and this tutorial is perfect timing. Thanks so much for linking it to Mi4M!
Totally cute. You know what would make it even cuter? A big "J" on the front! Or maybe your blog name. Or maybe nothing because it's so cute as is! I should keep my opinions to myself, huh? I love it. And I love that you're going to Blissdom! You're bound to have a ton of fun :).
I may just have to do a J!! Ooohhh! Good idea!
I luv the idea of making it yourself...it's soooo CUTE! Hope you have n awesome time at BLISSDOM!
Blessings,
Linda
Super Cute - great work - can't wait to see it in person!
Thats just so awesome! Looks very cute all right! Probably you could add flat fabric flowers or so to make it more so!
Very cute idea! Love the fabric!
...stopping by from SITS...
Steph @ A Grande Life
Neat!!! I love to prettify stationary products. This has turned out very pretty and nice!
TOO stinkin cute!
I have to admit there were WAY more steps then I thought there would be but looks well worth it! Oh and I love the initial idea for the front
Have I told you how jealous I am that u are going...because I am
**Love!** This is so smart and SO cute! Thanks for showing us how! I won't be at the conference itself but will be at the cocktail party on Thursday night...I hope to see you there!
Thanks for linking up to Make Your Monday this week!
Kim
I totally love this and would pay you to make me one for Blissdom. I don't have time! Looking forward to meeting you. Hollee
Okay...this is the cutest thing I've seen all week. It is absolutely fabulous! Great work!
(Love that you call your Momma 'Momma' btw... :) )
Can't wait to see your notebook in person at Blissdom! Looking forward to meeting you!
-Lauren
Adorable. You did a great job.
FYI-I have a fun give-a-way on my blog starting tonight.
Cheri
Post a Comment
Your comments mean the world to me - so please leave one! It makes my day! I read and try to respond to each one!
Didn't get a response? Check out my tips here to link your email and blog back to your profile.