Welcome to Frugal with a Flourish!

Enjoy your time here! Don't miss a post by getting email updates any time there is something new. You can also get updates through Google Friend Connect or follow me on Facebook or Twitter to get the latest info and see all the things that inspire me!

[ | Posted in | Add Comment | ]

Ok – so I am still working on my full house clean out. I like to move around my house clockwise from the front door when I clean out. It just makes sense to me. Anyway – my first space up on the docket (after getting the paper situation figured out) is our wee lil laundry room. Personally, I am just thankful to have a laundry room in an apartment. But it can get cluttered. I find we use it for laundry stuff, cleaning stuff, garage type stuff and of course it is where we keep the cat box.

Here was my original shot of the space before I started cleaning. Not too bad but pretty cluttered. I followed my philosophy of clearing the space, cleaning, reviewing each item to donate, toss or keep.

For starters, I took all the hubby’s car cleaning stuff and decided that would fit better under the sink. I also put all my cleaning stuff there too since half of it was there and half of it was in the laundry room. I removed the hubby’s battery operated fishing lantern and put it in the storage cabinet. I tossed a bunch of hangers that I never use and put away the laundry that was sitting there. And I dusted everything. Laundry rooms get sooo dusty!

Now if I had my way I would love to have a laundry room like one of the ones below …. I have been taking notes for whenever we can get out of “the situation” and into a house.

1. First, you need some shelving.


Martha Stewart Storage idea eclectic laundry room

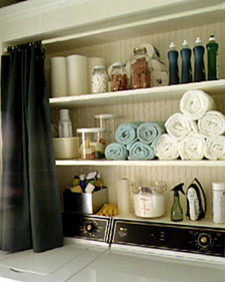
Ah Martha – you do it every time. Only Martha can make a non-high efficiency non-front door loading laundry space look chic. I like that there is a curtain to cover it up your storage space, but what is also great is that if you needed to hang something there it would work and wouldn’t “pool” on the washer. (One of my gripes about our current laundry room.)

2. Some place to fold things


Lime Green Laundryroom- southernhospitality traditional laundry room

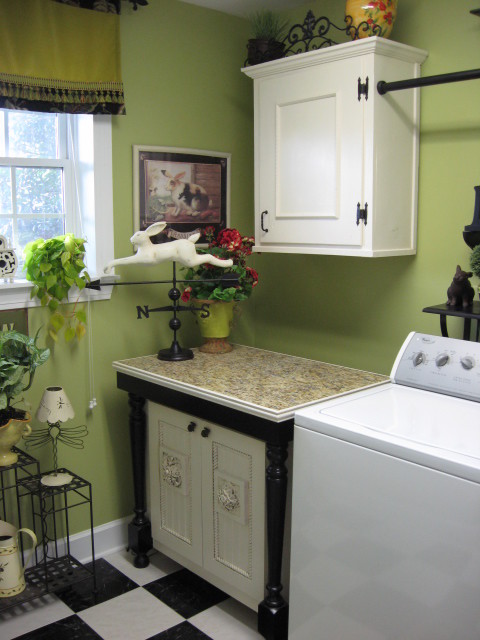
Rhoda’s laundry room is fantastic! Love the green wall color and note the bar so you can actually hang things. But the best part is this lovely little table that you can fold things. I really want to have a folding space in my laundry room in our next home. Check out her post on exactly what went into her laundry room here.

3. An Organized Space


Laundry Room eclectic laundry room

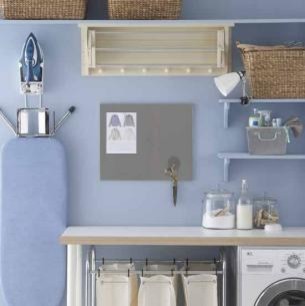
Ahhh … Don't you just feel calm in here. Laundry doesn’t overwhelm you in this space. You become one with the zen of folding. First, I love the ironing board hanger and magnetic board. Second, the pull out drying rack way up top – brilliant. Third, the laundry powder in clear glass jars and the organized baskets – beautiful. But the icing on the cake here is the three-sorter-hamper – is the perfect compliment to my obsessive laundry pile habit! (I must sort everything out according to water temperature, wash cycle and washing liquid type.)

4. All of the above 


c3d design - Portfolio traditional laundry room

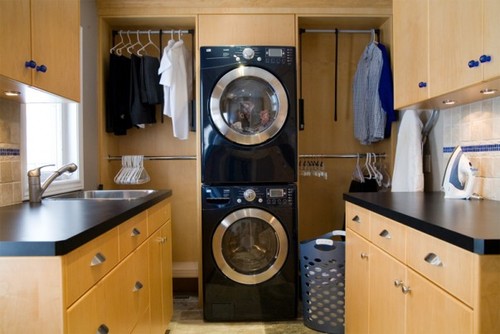
Ok – so this is about the most brilliant space I have ever seen. I love that they stacked the washer/dryer so that they could really maximize the rest of the space in the room. It has it all, storage, hanging space, folding space and it is well organized to boot. Bonus points – there is a great sink to hand wash all your delicates in.

So let’s take this one step further and pick out some elements that you can add to any space to help get some of these qualities. (And for my FTC peeps – I have not been given any incentives in any way for featuring the sites and or products show below.)

If your short on space but still need shelving, this over the washer shelf will work in a pinch! At $13.99 it is also an affordable solution as well.

Another great option is the Antonius System from Ikea. You can built your own combination that includes shelves, baskets, hampers, fold down drying racks and work tops. This is one of their biggest pre-configured combos and it is $264.42. However, just getting the drying racks – that I am in love with – would run you a little under $35. Love it! Head over to their Laundry main page for some more great combos and ideas.
If that is a little modern for you but you would still like a great space to fold laundry or iron, check out this great fold up table from Fingerhut. It is $49.99 and will mount to your wall and then fold up to provide you with the necessary space when you need it and stay out of sight when you don’t.


You can get your sort on with this 3-Section Laundry Sorter from Walmart for $34 plus you can get 4% cashback available through Bing.com.

And of course, if you need some super cute baskets to organize your laundry space – you can always enter to win my giveaway for a set of three! You get to pick your colors - check out some options below. 

So what do you look for/dream of in a laundry room? If you could change just one thing – what would it be?

I am linking this up with AnNicole @ Our Suburban Cottage for her "I'm An Organized LUFF" party. BTW - a LUFF is Lazy, Uninspired, Frugal Folks! Too cute!


Photobucket

[ | Posted in | Add Comment | ]

So – dear bloggy friends, I was recently approached by the gracious folks at CSNstores about their site allbarstools.com and potentially doing a giveaway for my readers. We tossed back and forth ideas on wine gadgets and barware, but I have been on this organizational kick so I said asked them if they had anything that was organizationally optimized? But of course they do! Along with a fantastic assortment of stools and barware, they also offer some great storage solutions.

So, I started looking and I was having a really hard time picking something. You know, it is like when you are trying to pick out a housewarming present for someone you sorta know and really love – but you have never been to his or her place. What is their style? What colors do they have? What do they need? I couldn’t settle on anything.

That is, until I saw the Pam Grace Collection baskets. The baskets are either chocolate or white and have the cutest little liners in all different colors – see a random sample below! They would look great no matter what your style (I guess unless you were hardcore modern) and the color options will let you pick which one you would like to feature in your home. And honestly – can you have too many baskets?

So here is the drill – CSNstores is going to gift one of my fabulous readers who resides in the US or Canada with their choice of one of the 24 options of Pam Grace Collection baskets.  Each basket set comes with three adorable baskets with coordinating liners. 

To enter, you need to go to and look at all the options here and then come back and tell me which one you would like to win. You can get extra entries for either becoming a new follower, twittering this contest, or blogging about it. Just make sure you leave a comment for each of those extra curricular activities so I can count them properly!

I will leave the contest up through next Sunday evening (2-7-10) at midnight and with the help of our friends at Random.org will announce the winner first thing on February 8th.

Good Luck!

[ | Posted in | Add Comment | ]

So were you one of the people that took advantage of the $5 Magazine Deal that Amazon ran over the holidays?

Well I did – I got myself Southern Living and Real Simple and the lil bro got me a subscription of House Beautiful. I love magazines for the simple easy pleasure of flipping through and enjoying the ideas they can bring you. So – I got my first issue of Southern Living last week. One of their features for a “Done in a Day” home projects was to create this hanging photo display.

(photo via Southern Living)

So can I just say that I LOVE this idea. They used picture molding – which I did not know existed until this article. Picture molding – shown below – is used to hang pictures without using nails. How fantastic?? And why don’t more high end apartments use this within their rooms so we could all hang photos? (Note to self:  Must sending strongly worded email to apartment complex.)


So here his how it works, notice that small space between the top of the molding and the wall. You put in a special picture molding hook like the one below, tie a piece of cord, and you get once heck of a classy picture grouping.


(photo via Southern Living)

Or you could use a ribbon.
(photo via HGTV)

There are tons of different options for hooks. Check out the options here at House of Antique Hardware. (Don’t you just love the presentation of these? They come in several different finishes.)

(photo via House of Antique Hardware)

I researched this and evidently, it was a big deal in Victorian Houses back in the day. However, I couldn’t find a whole lot of pictures where people are using this today. Below is a picture from VintageSeattle.org which is a classic example of what picture molding looks like prior to being used for hanging pictures.
(photo via Vintage Seattle)

Next, here is one of the only pictures I found on Houzz.com that showcased picture molding. Note how the mirror is hung off the molding.


pictures


Don't you just love this idea?  I think it is perfect to do in a room so you can change out your art quickly or have a bare wall.

What do you think?  Check out the steps on how you do it at SouthernLiving.com.  You need no "heavy duty" tools to get this look.  Another reason why I am loving it!  

[ | Posted in | Add Comment | ]

Well – it is time for me to do my update. I am sure you can tell from the title of the post that this isn't going to go well.


If you remember from last week, I was all excited that I was able to do a little more restocking and only spent $57. This week I was just going to need the following.

- bananas
- salad stuff
- turkey bacon
- egg whites
- 4 lean cuisines (my lunches)
- individual frozen veggie package (also for my lunch)
- milk
- cooking spray (my can was running on fumes)
- butter
- shampoo and conditioner
- shave gel

Not too bad right. So I went to the store. Quick trip – no worries.

Well my BFF Meighan called me back and I really wanted to talk to her. So I was “that girl” on her cell in the grocery store. Normally my family and friends know I don’t do that. I am the first to say “Well, I am walking in the store gotta go – don’t want to be that person!” But I really miss her and so I was "that girl" and I went on auto pilot. I walked my regular route in the store, rather than just going to get the things on my list.

So I walked past the meat – even though I had a freezer full – I saw that there was a great sale on chuck roast. Then I walked by the fish and there was a buy one get one. Then I walked by and saw my bag o frozen chicken tenderloins was half price (we were almost out anyways). Then when I went to go get the frozen veggies – I saw they were having a great sale on those so I loaded up. And then I remembered that the hubby asked for some of those nutritional shakes so I grabbed some of those on sale too. I was back up to the cash registers – told Meggie that I had to get in line, and started unloading the cart.

$92 dollars later – I was walking out the door wondering how I was going to write this post. Oh I was ashamed. How could I participate in something where I hear about large families spending a $30 and I can’t even do that. The shame ….

But here is the deal … my big mistake was following my regular routine. I shopped the way I normally shop – if it is on sale and it is a regular staple, I buy it. That is cheaper in the long run then having to buy it when I need it and it is not on sale.

Regardless of the sale or the savings – the issue is are you willing to get out of your comfort zone, your routine, your schedule, your habits, your regular practices to make a difference in the way you are living your life (and spending your money)? That is the bottom line. That is the crux of the problem. For me – the dwindling of a pantry puts me back to a time when I didn’t have a lot of money. Having a full pantry is like a security blanket for my family. To really be successful at this I have to let go of the blanket and be willing to trust that my stockpile isn’t necessary.

What is it in your life that you need to let go of and trust in? I am quite sure for me this isn’t the only thing. Does it start with trusting that there will be food before you can trust that everything else will work? I really do want to know your thoughts on this!


Linking this up to Money Saving Mom's Update Post Party!

[ | Posted in | Add Comment | ]

So I was browsing around online the other day and came across the cutest fabric covered notebook and really wanted it for Blissdom. But it was like $29. Now I might drop $29 on some cute shoes, but not a notebook.

Nevertheless, I could not get this notebook out of my head… so I just decided I would make one. Couldn’t be that hard, right?

Behold – I give you my Bloggy Conference Notebook! I looooovvve it!

Lemme break it down for you. (Please accept my apologies in advance for the picture intensive post.)

So for starters, here is what you will need.
- An el cheapo 1/2” three-ring binder - $1.79
- Fusible batting (I got the craft size variety 50% off at Jo-Ann’s) -$3.49
- Stitch Witchery (or something similar) – already had it
- Your choice of fabric - $2.99 for a yard on clearance
- Some cute ribbon - $1.00
- A glue gun

Ready? Ok – so for starters you need to cut out the batting to where you have enough to wrap around the binder with about an inch to a half an inch at the top.

Once you have it centered, cut a small notch in the middle of the top and the bottom.


Get your glue gun ready and put a bead of glue down the spine of the notebook.

Once you get that glued down take your two notches that you cut at the top and squish (technical term here) them in underneath the ring portion on the binder and glue in place.  Do the same for the bottom.

Glue the back of one side down, and pull over and glue to inside. (Don’t you just love my bananas in the background?)

Now tuck your top layer underneath the notebook. Then make a nice small bead of glue across the bottom of the notebook and fold your top layer over top and hold until dry.

(Notice that your hand looks very scary through the camera and that you need to invest in a mani prior to shaking all those hands at the conference.)

Complete same thing with the top and stop to admire work and take pictures.

Repeat process with other side. Realize when starting folds that you have run out of glue. Grab brand new bag to refill glue gun. Epic fail ensues when the size you bought is for regular sized glue guns and not your uber-cute mini gun.

Attempt to use fabric and craft glue. Another epic fail.

Decide to just make it work (it is fusible right?) and skip to fabric step. Cut out fabric needed the same way you did the batting. (I love this fabric! I found it on clearance at Hobby Lobby!)

Shove ends under ring part of binder. Vow to glue gun in place once you can get to the craft store tomorrow. (Like that scratch on my hand? Got that breaking up a real cat fight here at the house.)

Tuck top edge under again like before.

Move to ironing board. Set iron onto wool function. Hope plastic binder doesn’t melt. (My sincere apology for the pattern overload from the book and my ironing board cover).

Once front and back have been ironed and you can feel that it has “fused” to the batting, stand back and admire. (Say silent prayer of thanks that so far nothing has melted or caught on fire.)  Fold up corner edges like you would wrapping paper.

Cut stitch witchery to length of bottom of one side of the binder.

Fold up fabric and iron down.

Continue for all edges. Answer call from your momma. (Wait – no that was just me.) Cut out ribbon to length of binder bottom. Cut out another piece of stitch witchery. Cover up seam with ribbon and iron in place. Do for all for sides. (Start to get crick in neck from talking to momma while ironing and operating a camera.)

Ta da!!! Look how cute it is! I love how the ribbon makes it look “stitched”!

I added some pages to hold all the business cards I hope to get at Blissdom and will add some notebook paper in too! I am so excited. I may cut out some more fabric to make some inner pockets for pens and such (using my stitch witchery and some of that cute ribbon of course).


So there you go! Yeah – I know I don’t have a picture up on my blog, but if ya'll see a brunette walking around with this book in Nashville – come up and tell me hello!!

[ | Posted in | Add Comment | ]

If you saw my post the other day, you will see that dealing with the paper monster is a big concern for me. Part of that is because paper creates so much of the clutter in my life. So in the first post, we discussed how to reduce the incoming paper in your life to get rid of the unnecessary mess.

The other part of dealing with the paper monster is that you have to be proactive and deal with it in a way that protects your financial health. Understanding what you need to keep and what you need to toss or shred will help you manage your tax deductions, avoid not having documentation if you are audited, and can keep you from having your identity stolen. So here we go!

Part Two: What Needs Kept, What Can Be Tossed, and What Needs Shredded
As I shared before, I am uber-vigilant with protecting my identity. You do need to be careful about what you throw away. The other side of that is understanding what you need to keep and how long you need to keep it.

So first – what do you keep? Now, I am not a financial expert by any means but I pretty much swear by anything that Suze Ormond says. (Note to the FTC – no one at Suze Ormond asked me to say that, I just really like her.) On her website, she has a whole page on “Reducing Financial Clutter” and breaks down exactly what you need to keep, for how long, and why.

For example, you don’t need to keep receipts unless there is tax information on them (aka medical expenses or other deductions) or unless they are tied to a warranty. ATM receipts and deposit slips you only need to keep until you see your monthly statement to ensure everything is represented correctly and then you can throw those out. Pay Stubs you should keep until the end of the year to make sure they match up with your W-2 and Social Security Statement and then those can be tossed as well.

What about if you are using your home as your place of business? (I’m looking at all my peeps with Etsy shops now.) If you claim deductions on your taxes for your home office, you may need to keep your utility bills for three years. Check out the full list at Suze’s website.

As far as tax returns go, this is the only thing that I disagree with Suze on about how long you should keep. Technically, the IRS can audit you for any reason for up to 3 years. If you have omitted income, that extends to 6 years. However, if for some reason the IRS says you didn’t submit a return they can audit you at any time. I would hold onto the basic return and any worksheets indefinitely for just that reason. They aren’t going to take up much space and if it comes down to proving it – you are probably better off to have the basic documentation.


Now that you know what you are going to keep and how long you need to keep it the next question is, when do you need to shred and when can you just toss it? That is pretty simple. Anything that has any type account number and address should be shredded. End of story. Better to be over vigilant than under prepared.

A few more things you can do to protect your identity. Keep all your blank checks, unused credit cards, ID documents and other sensitive information in a safe place. Preferably, some place where you can lock it up. This is especially important if you have people in your house – ever. One of the leading sources of identity theft is friends and family that steal from your house. The other thing that most security experts recommend is that you don’t mail bills from a regular mailbox with the flag up. How easy is it for someone to watch you leave after you put your credit card payment in and walk over and take it? Take it to a USPS mailbox or pay your bills online.

Ok – so we have talked about what to keep and how long to keep it. Now how should you keep it? This really depends on your home and how you organize yourself. I am going to highlight some great products and ideas for creating a home filing system. I have not been compensated in any way to feature these – this is just me finding cool stuff for you.

If you have space for a filing cabinet, that is a great investment. (Remember to get one that locks!) You can actually get attractive filing solutions nowadays – though it is a lot harder to find nice looking locking ones. For example, check out this filing station from Sauder that is available at Meijer for $143.99 (you can also get 4% cashback if you get there via Bing). I like that it would be a great place to store a printer and other office supplies and still provides you with a decent amount of filing space.


If you don’t have space for a filing cabinet, bankers boxes can work in a pinch and store just fine in a closet. Check out this six-pack for $9.99 from Staples. Sure they aren’t pretty, but if you wanted to display them that is nothing some high quality wrapping paper couldn’t fix. Remember though – make sure your personal info is kept safe.  I would consider storing these some place where you can lock them up.


Another option are these Rubbermaid Canvas Storage Box with lid for $15.97.


I like to use these hard sided filing boxes to move financial data out of my regular filing system every year to save for archive. This one at Staples is available for $10.39. Typically these end up going into our attic for storage.  I know - not under lock and key but pretty hard to just walk over and get into!  I like that it has a tab lock to keep everything in it and that it already has pre-labeled tabs.


Now to actually develop a filing system for your documents – you need to develop a system that works for you. Typically – I sort things into different categories of expenses or income. I generally use the same categories that I denote things in my Microsoft Money files. (Yes – I do use that for my personal financial management and I just use whatever comes on my computer! No loyalties here!) You need to work with whatever works for you. My dad likes to file things by month, because he does better thinking about when something happened. However, you think best is how you should set it up. Let’s try a quiz – if I were to ask you to gather up all of your medical expenses from last year how would you think about it. If you think about it as “Oh – I would just look through all my stuff and pull out the medical things” then you are probably a category-based filer. If you think about when you had medical expenses, then you are probably date-based filer. Use whatever system seems to come more naturally to you – the more natural it is, the more likely you will use it.

So what kind of filer do you think you are? Are you a type I didn’t even mention? Lemme know!


Related Posts with Thumbnails