Welcome to Frugal with a Flourish!

Enjoy your time here! Don't miss a post by getting email updates any time there is something new. You can also get updates through Google Friend Connect or follow me on Facebook or Twitter to get the latest info and see all the things that inspire me!

[ | Posted in | Add Comment | ]

For this week – I am going to be showcasing a couple of the holiday crafts I have been working on around the house.  One of my big projects has been my outdoor decorations – and as soon as I saw these is the Pottery Barn catalog – I knew I wanted to do the same thing.  And it is a good thing – because they were sold out of these almost immediately.

Photo via Pottery Barn

So I was super excited when I found some BIG blue ornaments at a yard sale in late September.  I got five of them for $2.50.  A couple of weeks ago I gathered them up and decided to try my hand at a faux mercury treatment.   Here are some before pics!  Like my lovely spray painting set up?  Who said you can’t use a shepherds hook off season!

DSC06810DSC06824

Ok – so there are a there are literally a ton of different ways out there to recreate mercury glass.  I am going to show you guys how I did it.  First, I sprayed the ornament with silver metallic spray paint that I happened to have on hand.

DSC06813

Then to create the mottled, aged look – I did quick burst sprays using some silver hammered metallic spray.  It created the “spots” you see on mercury glass pretty well.  And if you ever oversprayed on the hammered spray – you just needed to recoat with a little of the metallic spray and start over. 

DSC06819

So here is a final shot of them drying.   I think they turned out pretty well.

DSC06822

Now – I will have to say that they would have probably looked a little more like PB’s version if I would have used the mirrored spray paint.  But I still love how they came out.  I will have to show you my full outdoor display later this week.  

So what do you think?  Have you ever done a faux mercury glass project?  What technique did you use?  I wanna know!

Linking this up to

Before and After Party with Sarah @ Thrifty Decor Chick
Christmas Crafts Party with Kate @ The Centsational Girl
Get Your Craft On with Kim @ Today’s Creative Blog

Power of Paint Party with Mary Ann @ Domestically Speaking
Weekend Wrap Party with Jen @ Tatertots & Jello

[ | Posted in | Add Comment | ]

Hey guys!  Sorry for being away for so long!  We traveled back to see my Dad for an early Christmas.  It was a lot of fun – but I didn’t have near the time I wanted to be able to get online.  Also – I know I owe a ton of you emails and and such.  I just switched over to a new computer and I don’t have everything transitioned – including all my software for email and such.  So I am running a little slow right now!  Don’t worry!  I will get around to everyone soon!! 

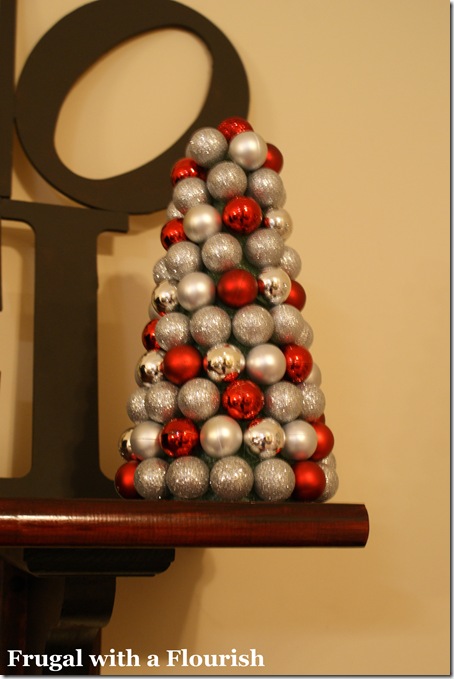
I know I had a ton of you ask how I made the little ornament tree that was in front of my NOEL sign on my mantel. 

Well it was really easy!  So I wanted to show you guys how to do it too.  First, I got a bunch of these mini ornaments from Target.  I think they also have them at the dollar store too.  I took off the little silver tops that you would normally put the ornament hangers through – they just twist right off.

DSC06999

Next I used a foam tree from the floral section of a craft store.  All you have to do is then is put a thin ring of hot glue around the pointy end of your lil ornament and then stick it into the foam.  The glue will hold it in pretty good.  I started from the bottom and went around until I got to the top.  DSC07047

I was going to do it all silver but I ended up having too few lil ornaments to do a full silver tree – it will take between 4-5 packages of ornaments.  So I added in the little touches of red.  In retrospect – this looks WAY better!! 

So what do you think?  Did you pick up any of those little ornaments?  If so – what did you make out of them??  I have another project that I used them in that I will also share with you guys later this week! 

Linking this to

Made it for Monday with Cindy @ Cottage Instincts
Nifty Thrifty Tuesdays with Linda @ Coastal Charm
Boardwalk Bragfest with Jan @ Bobbypins Boardwalk

Creative Christmas Countdown with Rachel @ Rachel Cotterill

Make it Yours Day with Carolyn @ My Backyard Eden
Also linking this up to The CSI Project’s Handmade Holidays Challenge

Visit thecsiproject.com

[ | Posted in | Add Comment | ]

I know I shared my faux Christmas mantel with you guys the other day – but I want to show you some of the other little vignettes that I have set up around the house. 

Here is a full shot of my entertainment center and “mantel”.  I really like how it came out – the entertainment center is the perfect place for us to hang our stockings! 

DSC07117

Here is a close up!  I think the whole theme is really pulled together! 

DSC07124

I love that I was able to use some of my silver glass ornaments to fill my wire basket!  And my lil Reindeer friend is propped up there too!

DSC07127

I also set up a cute little set of Santa’s and a Merry Christmas sign on my side table.

DSC07136

And finally I have a bunch of glass ornaments and some floral pinecone accents in the bowl on my coffee table.  Again – just a few touches but I really like how they bring a pop of Christmas all over!

DSC07139

So what about you?  Any Christmas touches around your house??  I still have some ideas for what I want to do in the dining room – but this is as far as I have gotten so far!!

Linking this up to

Christmas Vignette Party with Rhoda @ Southern Hospitality
Holiday Home Tour with Julia @ Hooked on Houses
Metamorphosis Monday with Susan @ Between Naps on the Porch
Tabletop Tuesday with Marty @ A Stroll Thru Life


Related Posts with Thumbnails