Welcome to Frugal with a Flourish!

Enjoy your time here! Don't miss a post by getting email updates any time there is something new. You can also get updates through Google Friend Connect or follow me on Facebook or Twitter to get the latest info and see all the things that inspire me!

Showing posts with label Link Love. Show all posts
[ | Posted in | Add Comment | ]

This Halloween, if you want to go beyond your standard Jack-o-Lantern carving on a pumpkin – have I got some ideas for you!  Below are some of the beautiful ideas for decorating pumpkins that I have been collecting on my Fall Inspiration board on Pinterest.  Here are nine different ways to purty up your pumpkin – enjoy!

1.  Paint Them with a Pattern

These painted patterned pumpkins (say that three times fast!) from Lolly Jane Boutique are so cute!  I think I may HAVE to do this! 

Photo via Lolly Jane Boutique

2.  Add a Band of Beans

These lentil studded candles and pumpkins would make such a great centerpiece. 

Photo via HGTV

3.  Stuff them with Christmas Lights

Create twinkling pumpkins with some white lights!  Magical aren’t they!

Photo via Martha Stewart

4.  Turn them into Planters

Use your pumpkin as a chic pot for your fall flowers!  Don’t these look cute lining the stairway?

Photo via Habitually Chic

5. Spell out a Message

These are so pretty and I love the lace details!  I can think of all kinds of cute sayings you could put on a set of Pumpkins!

Photo via Seeing Inkspots

6.  Gild them with Gold Paint

Shiny metallic paints can really make a statement on your gourds!

Photo via Country Living

7.  Put some Bling on it!

Get that Bedazzler out and stick some rhinestones on your pumpkin!  I love the spider web detail on this one!

Photo via BHG

8.  Carve out a Monogram

These are so classy!  I love the script initials.  Leave it to Martha to do something so elegant.

Photo via Martha Stewart

9.  Tattoo them with a Vintage Print

I freaking LOVE this idea that I first saw on Holly’s blog, 504 Main, last year.  Silhouette makes printable temporary tattoos and as Holly figured out – they affix to all kinds of skin, including the skin of pumpkins. 
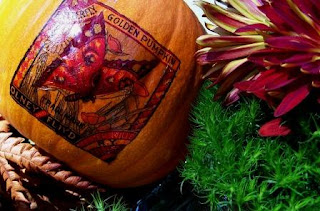
 Photo via 504 Main

So there you go!  Nine different ideas on how to make your pumpkins pop this Halloween!  See any ideas that inspired you?  I wanna know what you loved!

[ | Posted in | Add Comment | ]

Ok – the heat has finally gotten the better of me and I am ready for the cooler weather of Fall!  Is it too early to start thinking about leaves turning, crisp mornings and the general loveliness of a mild clear day?  No – I think not.  In fact I have been collecting a ton of inspirational ideas for decorations, crafts and other goodies in my Pinterest “Fall Inspiration” board.  Here are some of my favorites!

Love this fall vignette from Sugar Pie Farm House.  Those leaves really pop against all the creamy whites!

Photo via Sugar Pie Farm House

Make a simple display of the fall foliage to accent a wall.  Beautiful and rustic all at once!

Photo via Bloesem Living

Need some fall printables?  Colleen @ Mural Maker and More has 12 reasons why you will want to download these for yourself!  (You have to read this post – it is hysterical!)

Love this mantel from Happy Together.  The Thankful pennant really makes it!

Photo via Happy Together

These DIY Fall Tiles are adorable and easy to make!  Visit Erika’s blog for a full tutorial!

Photo via Little Miss Crafty Pants

Love this trio of wreaths that Tricia @ The Sweet Survival made!  So pretty!

Photo via The Sweet Survival

Aren’t these lanterns gorgeous!  These Pottery Barn beauties have me scheming how I could knock them off. 

Photo via Pottery Barn

Love these ideas?  Hop over and check out some of the others I have saved in my Fall Inspiration board!  I will also be sharing more of my favorite finds on my Facebook page for the month of September.  Make sure you “Like” Frugal with a Flourish to make sure you don’t miss a good one! 

[ | Posted in | Add Comment | ]

Trellis patterns are all over!  The pattern of overlapping lines can be as simple as just diamonds and as complicated as the imperial pattern.  How can you use this classic pattern in your home?  Well, I have come up with seven ways to incorporate it into your decor below!  Enjoy! 

1. Overlay it on a Mirror

The contrast of trim over a mirror is a great way to feature the pattern and can really add some great layered texture in a room.

Photo via HGTV

2. Frame Fabric and Hang on Walls

This is a quick and easy way to incorporate different trellis patterns into your decor.  Bonus points if you get your fabric from the remnant bin at your fabric store.

Photo via Pinterest

3.  Use it to Tie Together Accent Pieces

The use of the imperial trellis pattern on the pillows and the ottoman is a great way to add in a vivid pattern and tie the accent pieces in the room together. 

Photo via Decor Pad

4.  Alter an Basic Accessory

This simple DIY lamp makeover is a great way to add a little trellis pattern into your room.  You could also extend this idea to other accessories like a tray, the top of a table or a vase. 

Photo via Caitlin Wilson Design

5.  Use it in your Window Treatments

If busy patterns make you a little nervous – contain them to just your window treatments and leave the rest of your room fairly neutral like the photo below. 

Photo via Decor Pad

6.  Accent the Back of a Bookcase

Love this idea!  Again this is a great way to add a little punch of pattern into a room and create a visual focal point.  

Martha OHara Interiors Showroom  home office

7. Stencil it on a Wall

I think everyone was in love with this stenciled wall that Kate @ The Centsational Girl did in her Master Bedroom.  It was even shown when she was on the Nate Berkus Show!  Stenciling can be subtle – like Kate’s – or more dramatic.  All you have to do is adjust the contrast of your stencil color from your background color!

Photo via Centsational Girl

So there you go!  Seven great ways to add a beautiful and classic trellis pattern into your decor.  So I wanna know, do you like this pattern?  Have any in your home?  Any of these ideas inspire you to add some? 

Linking this up to

Weekend Bloggy Reading with Amanda @ Serenity Now

Pinning and Singing Party with Natasha @ Five Minutes for Me

[ | Posted in | Add Comment | ]

Hey guys!  I am so glad to share a great post from Angie @ The Country Chic Cottage.  Angie is one of the sweetest people and I have had the pleasure of hanging out with her in person.  Looking forward to hitting the thrift stores with her again soon! 
Angie is also extremely talented and you have to check out some of her great projects like her Sheet Music Letter.
Or her fantastic Burlap Ribbon Pillows – I love these.  I have to agree with her that they are like something you would find at Pottery Barn!
And if you are feeling beachy – you have to hop over and check out her Beach Bash going on now with all kinds of great ideas for you to infuse a little beach feel in your home this summer.
~~~~~~~~~~~~~~~~~~~~~~~~~~~~~~~~~~~~~~~~~~~~~~~~
I am so happy to be here on Frugal with a Flourish!!  First I want to say congrats Jess and her family!!  My name is Angie with The Country Chic Cottage -- where I bring farmhouse flair to your home through creative crafts and vintage finds!  I met Jess a couple of months back in real life and let me tell ya she is just as sweet in person as here on her blog!  Can't wait to get together with her again!  Today I am going to show you how to make your own stamp with yarn, glue, and cardboard.  I bet you are a little skeptical huh??  Well, let's get started!!
I made a starfish stamp for my project!  The idea came from Family Fun magazine where they used a pipe cleaner to make name stamps.  So I figured I could use the same idea.  Gather up some cardboard, yard, school glue, and a template.   You don't have to have a template but I wanted my starfish to at least be star shaped! 
Glue your template to the cardboard and place a bead of the glue all the way around your template. 
Lay your yarn down on that glue bead.  And let it dry.
Break out your ink pad!  I am going to make a muslin ribbon strip with my starfish stamp.  So I have a torn piece of fabric.
Cut around your stamp portion.  I learned that this is important through experimentation.  So just do it! :)  Ink up your stamp!
And stamp away!!  I loooove the rustic nature of the yarn stamp!  It gives the starfish more depth I think!
I stamped a few randomly on my torn strip...
And tied it on my little lantern!  Yes the starfish was already in there!  And the green goes well in my bathroom!
So break out your yarn and get to stamping!  Before you go though...head on over to my blog and poke around a bit!  You will find even more tutorials and fast fixes!  I am all about the easy, quick craft!  With three kids, a hubby, a full time job, a blog, an etsy shop and a farm...well there is not a whole lotta time!  I hope y'all will stop by for a visit! Thanks for having me Jess!! ~Angie~

~~~~~~~~~~~~~~~~~~~~~~~~~~~~~~~~~~~~~~~~~~~~~~~~~~~~~~~~~~~~~~~

Thanks for giving us such a great idea Angie!  I think this will be really easy and fun to do with kids too! 

Stay tuned for some more great guest posts coming up soon!  If you want to pitch in and do a post – just let me know! 

Linking this up with

Show and Share Day with Chris @ Just a Girl
Weekend Wrap Up Party with Jen @ Tatertots and Jello
SNS with Donna @ Funky Junk Interiors

[ | Posted in | Add Comment | ]

Have you heard about PinterestPinterest is a virtual pin board that lets you collect and share inspirational ideas and pictures. 

image

First, it lets you organize all the great stuff you find online into your own “boards” so you can keep track of the things you love.  But the best part is that you can share these boards and your finds with everyone else!  Which means they share their finds with you too!  And let’s face it some of the best ideas out there are the ones that other people turn us on to! 

So what have I found on Pinterest recently?   How about this beautiful room – one of many in my Inspirational Spaces board.

Photo via Country Living

Or you might enjoy my collection of Great Ideas – like this one to cut the lid off old salt containers and use it with a mason jar!

I have also found tons of DIY ideas – like these rosemary planters.

Photo via 3 Meadow Lake Cottage – originally from BHG

Or this Ikea hack coffee table – a little wallpaper and some nail heads and you could have something beautiful here! 

Photo via Pretty City Things

People also share all kinds of food ideas and recipes – like these yummy slow cooker Mexican Pulled Pork Tacos.  Those are totally going on my “To Try” list.

Photo via Can You Stay for Dinner?

And there are also all kinds of fashion and style ideas – like this one on 12 different ways to wear a scarf! 

Photo via Tip Junkie

Love what your seeing – there are tons more ideas like this out on Pinterest!  Normally, you have to be invited by someone else who is already a member to join.  But Beth @ Home Stories A2Z got us all the hook up with an invite on her site!  She also has a great tutorial video posted if you want to learn more about how to use it! 

Oh and if that wasn’t enough Michele @ The Scrap Shoppe and Tammy @ Not Just Paper and Glue – two of my favorite people – are hosting a Pinterest Party on Friday!  Everyone is welcome to come and link up their Pinterest profile and find new fun people to follow!  So make sure you are all set up and ready to link up by Friday!

Hope to see you Pinning soon!

[ | Posted in | Add Comment | ]

Whoa …. how are we already through May?  And how is it that I am supposed to have a baby in 5 weeks?  It blows my mind!  Well – before we get too far into into June I thought I would wrap up my favorites from the past month - both here and from around the web! 

DIY and Crafty Goodness

Since we are in the home stretch for getting the Lil Man here I worked on a lot of projects for the nursery!  For starters – I made some custom name art for his room.  And yep I did two versions – one for the blog and one with his real name.  Because I am crazy like that! 

Next I made a custom crib skirt for our crib.  I love the bright colors we have going on in the nursery!

Finally – we got our dresser refinished!  I still can’t believe the before and after on this one!  I am so in love with with new hardware!

before and after

Inspirational Ideas

I shared some great ideas with you guys on how to make sure you won’t miss out on decorating up for your ceiling.  I love this idea for using a little molding on the ceiling.

From Around the Web

I love this monogram pillow tutorial from Jen @ Scissors and Spatulas!  No fancy cutting machines here – just a little old fashioned freezer paper!  You are going to love this one!

Photo via Scissors and Spatulas

This was too cool – “paint” your own vintage blue mason jars!  I have one of the vintage ones and I am always on the look out for more while I am thrifting.  But these are a great way to reproduce the look for a fraction of the price and with out all the hunting!  Celeste @ My Greenbrae Cottage was responsible for coming up with this great idea!

Photo via My Greenbrae Cottage

This one is another great idea that totally made my day!  Vivienne @ The V Spot shows us how to spray paint tissue paper!  Brilliant!

Photo via The V Spot

And finally – if you ever wanted to know how to reupholster an ottoman Jessica @ Decor Adventures will show you how to do it!  This is a fantastic tutorial!

Photo via Decor Adventures

So there you go!  Those are my favorites from the past month!  What about you?  Have a favorite you want to share?  Feel free to post it on my Facebook page – I love seeing all your great ideas and favorites there! 


Related Posts with Thumbnails