Welcome to Frugal with a Flourish!

Enjoy your time here! Don't miss a post by getting email updates any time there is something new. You can also get updates through Google Friend Connect or follow me on Facebook or Twitter to get the latest info and see all the things that inspire me!

[ | Posted in | Add Comment | ]

So if you followed my first post in this little feature segment, you will know that often times I hear the, “I have this great [insert piece of furniture], but I [don’t like the rest of the room, don’t have anything else, can’t afford anything else, etc.]” So this feature is designed to create a showcase of affordable accessories and complementary pieces for a room/furniture example. See last week’s post here.

For this week, I know many people that have a mattress for a guest bedroom. Maybe you even have an old bedroom set that you have been hanging on to because it is decent furniture, but you hate it. On the other hand, perhaps you have recently upgraded your own mattress and now have this spare that you need to get all gussied up before your mom comes to stay again. Either way, guest bedrooms all need some specific things that you can add without spending a whole lot and have a very welcoming space.

I have created this showcase with a great neutral white bed frame from Ikea with a matching nightstand. I paired it with a great vanity set from Home Decorators Outlet. I finished off the set with a clearance light from Target and a relaxing blue comforter from Overstock.com. I would paint this room with a either a light warm beige or a cool soothing grey. (But I would wait to get the comforter so I could match the color just right!) All in all, this guest room set up would run you just under $500.  Happy Shopping! 


[ | Posted in | Add Comment | ]


Like crows and little kids, shiny objects easily distract me! The sheen, the glow, the gleam – the glazed eyes and simple smile … so pretty… sigh.

Whoa! Gotta snap my self out of that because I have to tell you about what I found! I spend a lot of my time trolling the internet looking at things I want but can’t buy! (read “the situation” if you aren’t up on the WHY of this dilemma)

So I just happened upon the most fantastic aluminum chairs!!! Someone out there HAS to buy these! Please – I need to live vicariously through you!


Set of Two (two!!!) Teak Aluminum Chairs for $99.99


Marta Bar Stool – 79.99

Of course you might want a matching table … see below.


Yes – you read that correctly. A table with granite for under $50!!


(Counter and Bar Height Also available from 114.99-124.99)
I feel like this is perfect for that Man room garage space!

If you buy these, you have to send me pics! I will post them if you do!

I am linking up to Jane's Frugalicious Friday and Melissa's Beautiful Life Party - join in the party!


Photobucket

Happy Friday!

[ | Posted in | Add Comment | ]

Ok – here is another installation of Frugal Foods where serving a family of four for under $3 per serving is easy-peasy!!

Now most of the time, I roll through the grocery store like a woman on a mission. I can be in and out in 20 minutes (30 tops if there is a wait at the deli). However, there are days when I stroll through and I am hit with the most fantastic inspirational ideas for dinner. Most of the time, these are triggered by that shiny sale sign.

This week was one of those weeks! As I was walking down the aisle, past the prepackaged lunch meat and bacon, one of those little sale signs jumped out at me. Turkey Smoked Sausage on sale 2 for $5. That is one of those things I have to be in the mood for and the mood was right! So, I doubled back to pick up a few other things and created this tasty dish! I am including a cost per serving below!

The best thing about this dish is that it is all the components can be bought and can sit in your fridge/freezer/pantry for quite some time until they are ready to be cooked (or until you have the time to do it!). I highly recommend that you stick with my recommendation on the Vodka Sauce as it pairs so nicely with the smoky taste of the sausage!

Turkey Smoked Sausage in Vodka Sauce with Farfelle Pasta
1 package Turkey Smoked Sausage (14 oz package)
1 tbls Olive Oil (or whatever you have handy)
1 bag frozen 3 Peppers and Onion Blend (12 oz)
3/4 box Farfelle Pasta (that is fancy talk for bow tie pasta – get the 14.5 oz box with Omega 3’s)
1 jar Vodka Pasta Sauce (24 oz)

Start a pot of water boiling. While water is boiling, slice the Smoked Sausage into ½ inch rounds. Heat a non-stick sauté or fry pan with the olive oil.

Once water boils, put in pasta and cook based on package instructions. Toss sausage into pan and stir until it gets it starts to sweat. Add peppers and onions. Stir consistently until veggies are cooked through and the onions are clear. Add the jar of sauce into the sauté pan with the meat and veggies and let simmer for a couple of minutes to get the flavors throughout. (Psst! Make sure you didn’t forget to drain the pasta when it is done!) Once the pasta is drained and your sauce has simmered, combine the two in a nice big bowl and toss.

Enjoy!

Servings 4 – cost per serving is $2.29
Total cost – $9.13 (and I have my receipt to prove it!)

[ | Posted in | Add Comment | ]


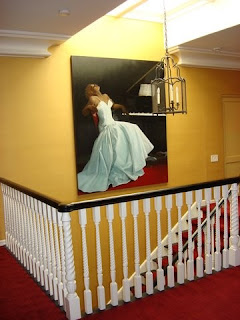
This is the fourth and final post in this series where I am featuring ideas and inspiration on how to decorate spaces with big open walls. In the third post here, we looked at how to do this with photo groupings. Photo groupings are a great way to take a bunch of little things to make a large presentation. But what about if you want a single big piece of art. That is our subject for today – BIG art! But BIG art on the cheap… I will explain more below!


Using BIG art
Big art can be the “it” factor in the room. It can be the part of the overall scheme or the pop! Check out these examples below for a little inspiration.


(Photo by Lucas Rios Giordano Architects via Houzz)


Can you say “drama” – I thought you might!

(Photo by Tomar Lampert via Houzz)


I love the way these two large prints flank either side of this cut in!

(Photo by Basil Walter Architects via Houzz)


(Photo by Shubin + Donaldson via Houzz)


(Photo by Harrell Remodeling via Houzz)


(Photo by Harrell Remodeling via Houzz)


(Photo by Belmont Freeman Architects via Houzz)


(Photo by Ryan Associates via Houzz)


(Photo by Martin E. Rich Architect via Houzz)


So now your feeling all inspired and I know what you are thinking. Those four little words. I can’t afford that. YES you can!

So let’s start with some resources. If you wanna run around town, Home Goods (a Frugal Favorite) always seems to have larger prints for anywhere from $30-$70. However, you might not always be able to find what you are looking for in the store as their inventory rotates frequently.

This is why we have Ebay!  Behold several great (highly ranked) sellers with BIG art at affordable prices. Most of these sellers are overseas and this is how they gain a living.

First – unstreched paintings have the most bang for your buck and are cheaper to ship. You will either need to stretch it yourself or incur the fee of getting it stretched once you get it.  Note: Some sellers will including stretching as a "fee" be sure to read their whole Ebay listing. 

7oilpainting – 24x36 inch paintings at $29.90 a pop (unstretched)
Okeart-gallery – 30x30” paintings starting at $16.95 (unstreched)

For already stretched paintings - my personal favorite artist on ebay is hand-painting.  I really want this painting!!!!  I love the knife detail and the lotus flower subject!  All of their landscapes are great and they do BIG art prestreched for around $119.00 with free shipping.

Now … if you want to get really low cost, here is what you do. First, you learn how to make your own stretcher bars. I have a couple resources listed below that quote the cost of making the stretcher bars starting from $4. Read a little bit about stretching canvas and then decide what you are going to stretch.
  • E-how- guide on how to build your own stretcher bars
  • Ray Schloss – how to build really big canvas frames
You could buy your own unstretched art from Ebay and stretch it yourself. You could also stretch canvas and paint your own masterpiece. Painting something in all one color with gradients is a beautiful way to add a pop of color. You can also stretch a great piece of fabric which will also add color and potentially (depending on the fabric) texture!

(If you don’t have the tools or the time, you could also just buy your own stretched canvas at Rexart.com. They have a basic canvas in either 36x48” for $34.59 or 48x60” for $55.35.)


So what about you?   Do you have big art?  Have you ever stretched your own canvas (or something else)? Have pictures or links?? Please share!!

This ends this Decorating Obstacles series! Please check out parts 1-3 if you missed them!


[ | Posted in | Add Comment | ]

This is the third post in this series where I am featuring ideas and inspiration on how to decorate spaces with big open walls. In the second post here, we looked at how to do this by adding some built-ins. Today, I want to look at one of my favorite frugal decorating ideas, picture groupings.

Picture Groupings
This is honestly one of the cheapest and easiest things you can do around your home. It is just so simple. There are several ways to group your pictures. You can go with a uniformed look, a random look or a linear look. Check out these great inspirational pics to see what would fit best in your space.

Even sizes with even spaces makes for a uniformed look. There are some great examples below.

You would need lots of little frames and a good ladder for something like this! Although I would love to see someone with a two story foyer do this (if you do – please send me the link!!!)
(Photo by Tracy Murdock via Houzz)

(Photo by Tomar Lampert Associates via Houzz)


(Photo by Gina Willman via Houzz)


(Photo by CL3 via Houzz)


For a more organic look, try random sizing and placement. Keep your common denominator (aka the subject matter) consistent.


(Photo by Bosworth Hoedemaker via Houzz)

(Photo by Laura Britt Design via Houzz)

I think you could do a similar thing with wrapping paper in matted frames for an easy quick look!
(Photo by roseannabanana via Houzz)

One of my favorite bloggers – Thrify Decor Chick and her awesome use of frames and trim to highlight her big tall walls!
(Photo by Thrifty Decor Chick via Houzz)


(photo by Koning Eizenberg via Houzz)

If you have a long, horizontal wall try linear placement. It is a great way to get a gallery feel. Ikea, of course, has the fantastic lighting here if you want to highlight your collection.

(Photo by Chapman Architects via Houzz)


(Photo by Butler Armsden via Houzz)


(Photo by Bruno Kearney Associates via Houzz)

So those are the ideas, now what do you need to get it done.

First, you are going to need something to frame. For most of us we frame photos that we have taken of family or places we have visited. Need photos to frame? Try bigstockphoto.com if you are looking some royalty free images to create your perfect scheme. Ikea has also come out with some great photo collections that are already matted that run from $10-20.

Another great idea, create your own textures and patterns through fabric or paper. Simply cut to fit so that you have enough to wrap around the back of a strong piece of cardboard, mat and frame.  You will have a cheap and easy piece of art.  (Hint - a good place to look for unique paper is in the scrapbooking section of craft stores!)

Looking for something more unique? I love getting old books and framing illustrations. Another great idea is to go to antique stores and find piles of old magazines. Some of those classic advertisements from Life, Time, or Vogue can become instant art when framed.

Next, you are going to need something to frame all this beautiful art up in so you can group it up. Personally, I like getting frames from clearance bins, $1 stores, garage sales and flea markets. This is especially good if you have a more eclectic decor scheme going on. If you want to plan something that is styled to be even and consistent, you may want to buy frames in bulk.


This frame and many others like it are available in bulk from frameusa.com if you are willing to place an order of at least $50. (If you buy up, orders over $100 are not assessed a $15 charge.)  For the frame above, the bulk order will run you $5.35 a frame (for an 8x10!) and it looks like you can mix and match sizes to get you up to that $50 to $100 minimum.  They also have the hard to find 5x5 and 8x8 square frames.  If you want to place an order for under $50, their sister site frameplace.com has 8x10’s for 8.50 a piece.

If you would rather just purchase a set of frames, Photoframes.net has a 6 pack of 11x14’s for only $35.10 and a studio group 5 pack of black frames in different sizes for only $29.99.

Displays2go.com has a great deal on bulk purchase matted frames. For an minimum order of 12, you can get 8x10’s with a 5x7 mat for $4.93 a piece. They also have some great overstock sales if you are interested!

Once you have all your art framed and ready to go on the wall, you have to get your plan together to get these bad boys hung. Several sites recommend that you cut out newspaper or butcher paper outlines to “tack” up to the walls which I think is a great idea. (Cause, I am that person that hangs the picture up, stands back and goes – “yeah that is crooked!” and creates multiple holes in the wall in an attempt to get it straight!) I would also recommend a measuring tape and a level if you are trying to space them all evenly.   A good friend of mine recommended creating a grid out of painters tape, which seems like overkill.  But if you are that paranoid about getting it perfect it might be the thing to do!


So what about you? Have you done picture groupings? Have pictures or links?? Please share!!

BTW - I think that we are reaching a level of collective thought out here! I have been working on this series for a couple of days and two of my favorite blogs just had similar posts yesterday about photo groupings! I gotta give a shout out. Please check them out below!

The Nesting Place here – with her great frame collection and fantastic song writing skillz!

Pure Style Home – for framing up some art here that is just beautiful.


Next up tomorrow – Featuring “BIG” art pieces to highlight an open wall space (and where to get some on the cheap!). Make sure you don't miss it - subscribe to my blog or follow me on twitter.

[ | Posted in | Add Comment | ]

This is the second post in this series where I am featuring ideas and inspiration on how to decorate spaces with big open walls. In the first post here, we looked at how to do this with just paint and trim. Today I want to look at how we can use some of the wall space that you have been blessed with by adding some built-ins.

Adding Built-ins
Built-ins are one of those things that are always in demand. They are always appreciated by buyers and are considered classic. Built-ins give you additional storage, a point of interest, and a place that you can display other elements of style. Another great thing about adding built-ins is that unlike going out and buying a piece of furniture, built-ins add value and appreciate with your home. The pics below (all from Houzz of course) are wonderful examples of how built-ins can add that certain something to your soaring or wide walls.


This is a fantastic loft space (I am a little addicted to lofts!). Ryan Associates is the mastermind behind this huge built-in that features a flat panel TV, built-in speaker panels, and corner window seat. The warm wood used in the built-in picks up the same wood tones as the floor and is a nice neutral compliment to the off-white walls. This is a great idea for a media room, which is one of those places that accumulates many things that need a place (aka – DVD’s, toys, games).


This home, by Sullivan Conard Architects, is another great built-in showcase. By keeping the paint color very basic the elements in the cubbies really pop and become the showcase of the room along with the huge stone fireplace. I love this room, it is formal but not stiff. I can totally see myself curled up on one of these couches enjoying the fire


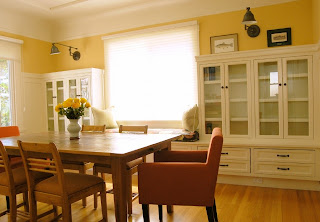
Both of these dining areas are good example of how to maximize your storage space when you have a smaller room with high ceilings. Bosworth Hoedemaker did top space and Niche Interiors did the second one. I love that these are basically built-in hutch/buffet combos. The upper sections are your display cases, while the lower drawers are perfect for linen’s and flatware.


These are all great pictures and ideas, but how can we get this look? Well, that really depends on how “handy” you are. If you would rate yourself a zero on the handy scale then you are probably best off either hiring a professional or faking the look with a bookshelf set. Ikea has a new Billy bookshelf planner that is very handy for playing around with finishes and measurements. It also calculates up the total cost of your project and lets you print out your product list.


Another idea would be to actually and install some of Ikea’s custom kitchen cabinetry in your space if you want a more custom fit look. You can download the planner for that here

If you are a little more handy, there are lots of resources out there on how to build your own Built-ins. You will want to consider what you plan to store on/in the built in when deciding on your building material. This article on This Old House, is a good start for determining what product you want to use.  If you are planning on stacking books, dishes or other heavy objects you probably want to consider hardwoods.  If you plan on the storage being for lighter, spaced out decorative elements using a soft wood or MDF will probably work.

You can also check out Julie’s guide at My Home Redux, where they created built-ins to flank either side of their fireplace. DIYnetwork also had a really good guide – with pictures – that can also help.

So what about you? Have you ever built a built-in? Have pictures or links?? Please share!!

Next up tomorrow - Using picture groupings to define and fill a large open wall space!

[ | Posted in | Add Comment | ]


I got to see my best friend’s new home last weekend while we were traveling. It is a great space with a huge open floor plan with great vaulted ceilings. The wall space is a little intimidating though. Soaring over two stories high on several of the walls, the question on what to do with that much blank space is overwhelming.

Of course, she is not the only person in this situation. With the popularity of the open floor plan and vaulted ceilings, there are a lot of walls out there that need to be spruced up!

How do we add the flourish then? I have been pondering this and I am planning on giving you guys lots of ideas over the next several days.  (All photos below are from Houzz - go start your own ideabooks if you love these!)

Trim and Paint
For the first part of this series, I wanted to focus on the least expensive option, paint and trim.  These can work wonders in a room that might be all white right now.  Paint and trim work assist you in dividing up sections, allowing you to flow from one area into another, or creating the "focal" point in the room.  In the pics below, we can see how paint and trim can draw the eye up.


This photo of a loft library is one of my favorite pictures on Houzz. Done by Donald Billinkoff Architects, I love how the paint draws the eye up to the top window casement where they have added a thick molding. They have then painted the top section of the wall the same color as the ceiling. That color is then used on the back wall of the loft area as well. Genius!


This is fantastic and was done by Team 7 International. This is a great example of how to use the same paint color on both the walls and the ceiling. Here they have taken what could have been just a “nice” vaulted ceiling and by adding the trim work along all the different angles, it has been turned into a striking architectural feature. The built up mantel also helps fill the space, although personally I find that a little bulky. The mirror is a great idea though!


This space by Rosemarie DiSalvo, is a great example of how to highlight an alcove with a vaulted ceiling. Those of you with above-the-garage bonus rooms, take notes! I love how this nook has been painted a rich deep brown that draws you back into this sitting area. Coordinating window treatments that also pull in the color of the main room are another great touch!

So what about you? Please share your ideas for decorating big spaces. If you have written about it, I would love to see your links.

Next up tomorrow - Using built-ins to add storage and create visual interest! Make sure you don't miss it - subscribe to my blog or follow me on twitter.

[ | Posted in | Add Comment | ]

One of the conversations I seem to always have with my girlfriends, co-workers, even my mom is one that goes a little like this … “well, I really love the [insert name of major piece of furniture] that I already have, but the rest of my stuff is [choose adjective: dated, old, dirty, not my style].”

Therefore, what I have decided to do is a regular feature where I create a showcase of affordable accessories and complementary pieces for a room/furniture example.

For this week, I know a lot of people that have a good neutral Living Room Seating set, but my not like the coordinating furniture they have in place around it. On the other hand, you could be like a lot of us getting started and have no coordinating furniture, but only those great beanbag chairs from your dorm room. Either way the standard couch and chair or couch and loveseat combo set will rarely provide you all of the seating space you need when you have people over.

I have created this showcase with a cute accent chair, a coordinating rug that should pull in any colors you already have in your current set, a hot leather coffee table and some coppery accents. This whole set is from Home Decorators Outlet. Your shopping list includes:

Leather Cocktail Table - $114.99 (was $329)
Area Run (5’3” x 8’3”) - $109.99 (was $399)
Accent Chair - $94.99 (was $269)
Lowboy - $184.99 (was $269)
Six Light Chandeliers - $99.99 (was $269)
Two 18” square framed prints - $19.99 each (were $109 each)


This set would have run over $1700 at retail. At the outlet, you can get it all for a little under $700!

Happy Shopping Saturday!!

[ | Posted in | Add Comment | ]


Ah … the chill of fall has been in the air. I decided I HAD to feature all my favorite creature comforts of fall.

First, we need to have some warm drinks to nuzzle up and get cozy with as we enjoy the changing of the seasons. Look no further than Williams-Sonoma for the Le Creuset Teakettle, Slate - $49.99.


The color of this kettle is also fantastic. It is the perfect neutral shade for any kitchen.

Next, we need a great snuggly blanket. This one from Oxford on Overstock.com is perfect - $26.99 (10% Bing cashback)


This nubby, cuddly blanket is the perfect addition to any room. The fact that it comes in several colors is equally divine!

Finally, we need the perfect place to curl up! How about this warm red chair from Home Decorators Outlet? The Soho Eaton Chair - $114.99


Grab your cup of tea and snuggle in with a great book!

P.S. I am linking up with Melissa's Beautiful Life Friday!  Join the fun!

**(learn about Bing Cashback here - note that you need to "search" via Bing to get the cashback, but the link and amount give you a headstart!!) 

[ | Posted in | Add Comment | ]

With as busy as we are, I love things that I can prep ahead of time and then just throw in the pan. This is one of those recipes. I have a prep day once or twice a month and freeze a bunch of dinners. This particular recipe is one of the hubby’s favorite and it is a lean alternative to your typical meat and veggies meal. It also cooks up in 15 minutes, which is a bonus!


Whatcha need:

1 lb flank steak or precut stir fry meat (your choice)

Marinade/Rub
1 tbl Ginger Powder
1 tbl Garlic Powder
2 tbl Cornstarch
¼ to ½ cup Soy Sauce
½ tsp to 1 tbl Red Pepper Flakes (optional – only if you want it a lil spicy)

Cook Day
1 tbl Olive Oil (or whatever you have handy)
1 bag frozen Brocolli Florets (steam in the bag variety)
1 bag Boil in a Bag Rice (we use a brown rice)

Whatcha do:

For the day you prep (or the morning of the day you want to cook it) we need to let the goodness get all soaked in the beef. Slice the flank steak to about ½ inch wide strips – or if it is precut, you can skip this step! Put all the meat into a gallon-size freezer bag. Mix the ginger powder, garlic powder, and cornstarch together and sprinkle over the meat. If you want to add the red pepper flakes for a lil spice, go for it now, personally I like to rub the pepper between my hands to release the natural oils. Squish the meat all around in the bag until you get all the meat covered with the powder. Once covered, add the soy sauce and again squish the meat around in the bag until all the meat is covered.

Squeeze all the air out of the bag and close. If you are making for that day simply put in the fridge and give it at least 4-8 hours to sit and get yummy. If you are freezing, make sure to note the day you prepped it with a sharpie and what it is. Pull it out to defrost the evening before or morning of cook day.
On cook day, start bringing water to a boil for the rice. Heat a non-stick fry pan over medium heat and add the oil. Once hot, dump your meat out of the bag into the pan and stir-fry. While this is going, add the rice to the boiling water and put your Steam Bag of veggies into the microwave and cook for half the recommended time on the package (normally about 2 to 2:30 minutes). Once the meat is browned, add in the half-defrosted Broccoli to the pan and let it cook the rest of the way thru. Drain the rice and add a little to each plate. Spoon some meat and broccoli on the rice and you have a complete dinner cooked in about 15 minutes! Serves 3-4 people depending on the size of the portions.

I am linking up to Rhoda's Recipe Party over at Southern Hospitality! Join in the fun!

[ | Posted in | Add Comment | ]


Ok … so I know what you are thinking … why are there no pics of my home up on here? Well that simply has to do with state of this craptastic economy.

The Hubby and I were happily settled in our first home that we bought in 2007, a lovely 3br, 2ba rancher on 2.5 acres in the country in VA. It was a steal at over $40k cheaper than anything we had looked at and the way the housing market was going we thought it was the safe bet. It didn’t have everything we wanted, but it had most of it. We painted, installed new light fixtures, put up a shed and moved what must have been a ton of dirt with the landscaping projects I started. After my promotion at work, we were ready to start really amping it up. We had plans for a deck, new décor for the bedrooms, and finally getting the living room finished.

Then the economy went down the tubes and both the hubby and I were both laid off this past January. I went to work finding another job like was well my job. And in a little over 4 weeks I had a great offer to move to Nashville and start a new life. Hubby got a job a few weeks after and we were both gainfully employed again by April. I even got a relo package as part of the new job, so we put the house on the market and were hopeful we would have it sold by mid summer. We even left all our “good furniture” in the home in hope that the staging would help sell it.

Well (sigh) summer has come and gone, and the house has still not sold. We have done everything that we have been recommended to do … including lowering the price and every marketing gimmick in the book. Everyone who walks through loves the house (we have even had 20 Realtors tour it) but comes back with the same response … “The house is great, priced right, perfect for a new homeowner and shows beautifully - but it is a little far out in the country and is going to take that person who wants to live ‘out there’.”

Therefore, we hope and pray everyday that someone who wants to live “out there” will find our lil home and put in an offer. We currently are shacking up outside Nashville in a small – albeit adorable – 1br apt. I can’t buy too much stuff here (because we are space constrained) and I can’t really consider getting a new place until we get the old one sold. It doesn’t help that the mismatch of hand-me-downs and college furniture in the apartment is driving me insane. Instead, I have resorted to dreaming vicariously via the internet for all my home design dreams.

So I for all my dear friends at the blogs I have followed, I hope you will forgive my months of lurking while salivating over your beautiful homes. Please keep it coming so that I can make it through this rough patch! I know God will provide just as he has for the rest of our trouble.

[ | Posted in | Add Comment | ]

I am still feeling that organizational vibe. And after dumping my makeup bag out from my weekend trip into my caddy I thought “Who doesn't need to organize their makeup?” I am afraid to admit, mine is nowhere near organized. I have thrown it all together in a chic brown basket, but there it sits – jumbled and one hot mess. I end up going through it once a year and trying to figure out either why I have not been using the wonderful gloss that was buried at the bottom or if perhaps that mascara is still ok (I know, I know ... gross right).

That is when I started finding some great makeup organizers online. Hope you enjoy!


Mineral makeup is the new big thing right, but what to do with all the little round containers?  The answer is the Mineral Case – this ingenious little container holds up to 18 jars of your favorite brand.  It has slots for your foundations, correctors, finishing powders, blushes, highlighters, shadows … you name it!  And if you have more than 18 jars – that is ok!  This baby stacks on itself!  Perfect for those of you who are looking to clean up the clutter and would make a fantastic gift!


Handcrafted Pottery Makeup Organizer - 34.95 (Bing Cashback is 8% at linked site)
If there is one thing that is not my cup of tea, it is the clear acrylic organizers on the counter. I mean no offense if you have one. However, perhaps you should switch that up into something a little more natural and organic. If so, how about this beautiful hand glazed organizer. It comes in three different finishes so you can pick the one that fits with your décor. Personally, I am digging the blue color and all the brush organizers. They also have the matching bath accessories if you want to do a full redo of your bath stuff too!

Expandable Bamboo Drawer Organizer - $19.99 (Bing Cashback is 15% at linked site)
Perhaps you are luckier than I am and you have a makeup drawer. (I confess it is a dream!) If your cosmetics are lying about a tangled mess in your drawer then this is the answer. This expandable organizer will fit to your drawer and give you the cubbies you need to separate your tubes from your jars and so on. It expands from 11’ to 20’ wide, with seven partitions in the middle and two larger cubbies on the side. Plus, it is made from eco-friendly bamboo. Be earth friendly and organized all in one!

**(learn about Bing Cashback here - note that you need to "search" via Bing to get the cashback, but the link and amount give you a headstart!!) 


Related Posts with Thumbnails